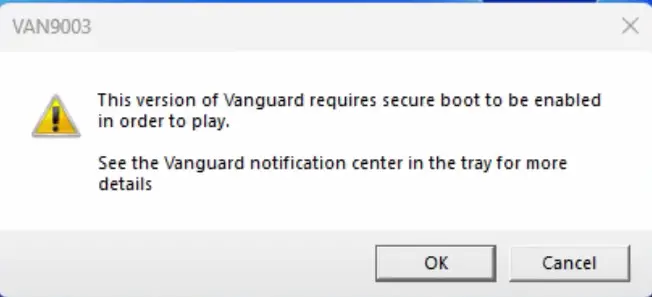
Are you trying to open Valorant on your Windows 11 device and getting a VAN9003 error? Does this error state, “This version of Vanguard requires secure boot to be enabled in order to play”? Or are you finding a different error with the VAN9003 error code? If yes, then this error means that the Secure Boot or UEFI is disabled from the BIOS of your device.
Why does the VAN9003 Error occur on your Windows 11 device?
The error occurs due to Secure Boot and UEFI. It shows that “This Build of Vanguard is Out of Compliance” when the required components are disabled from the firmware interface.
The secure boot and trusted platform module (TPM) are security features that allow safety for Windows to boot programs. Thus, Vanguard requires both Trusted Platform Module and Secure Boot to ensure the safety of the system.
Before finding the solution to fix this error, you must first focus on understanding the cause of the VAN9003 error. For this, check if Secure Boot State is ON and BIOS Mode is set to UEFI on your device.
How to check whether the Secure Boot or UEFI is enabled or not?
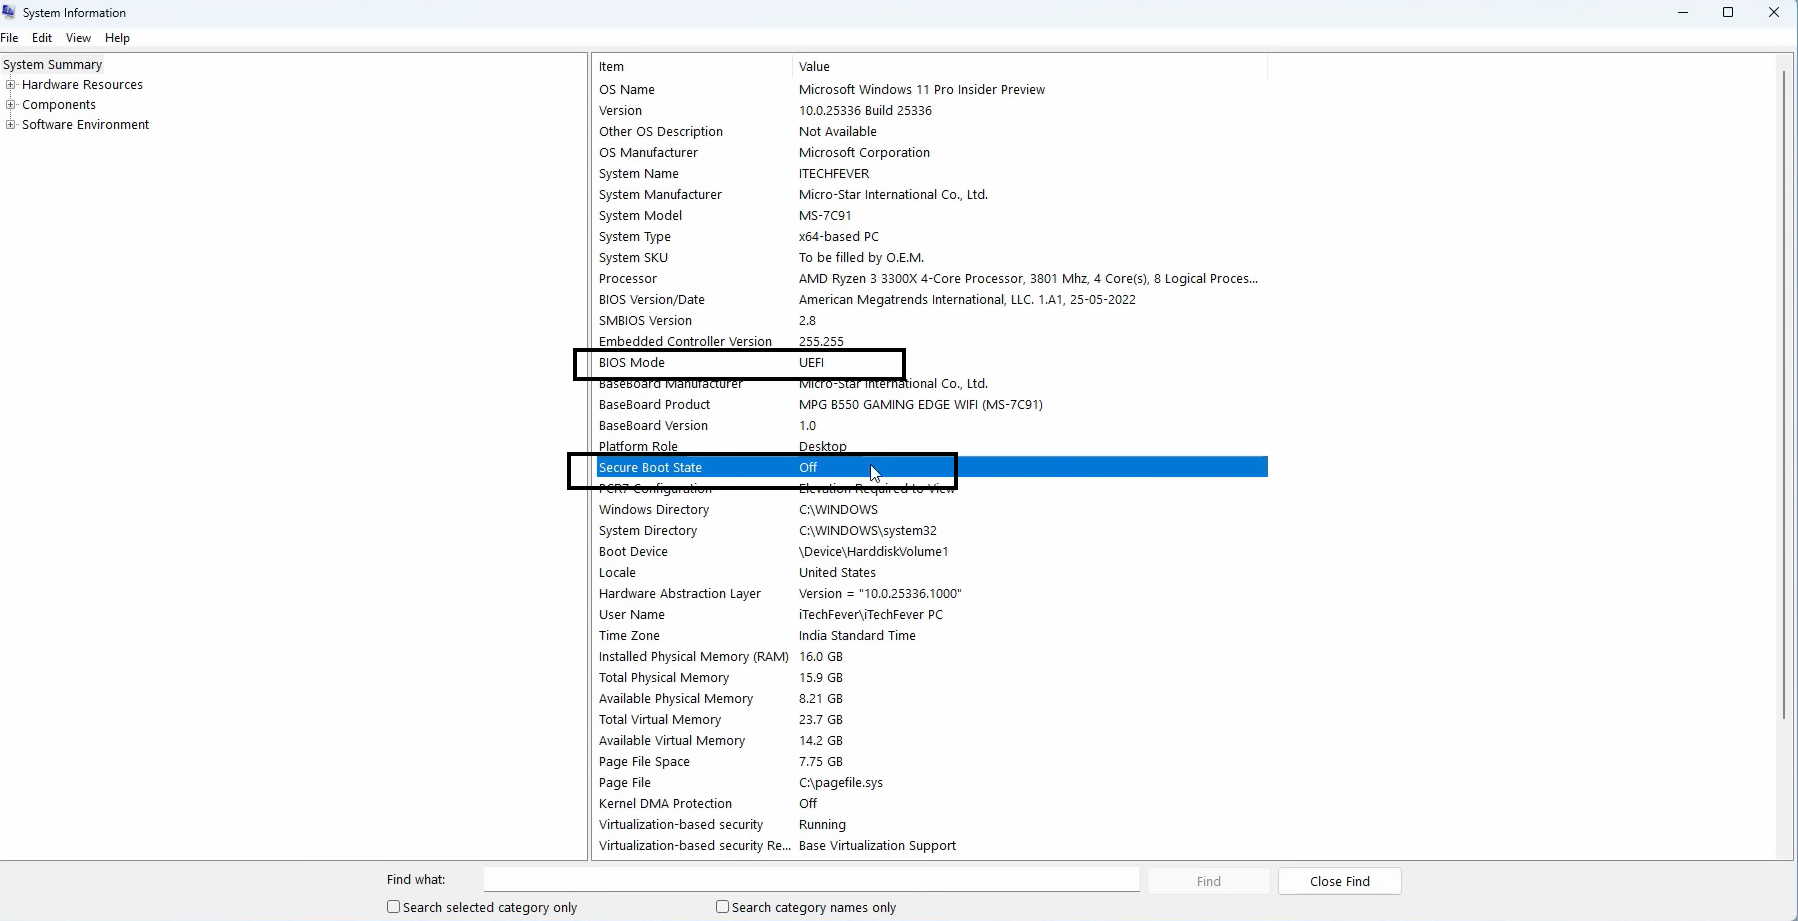
1. Go to Windows Search and look for the System Information app.
2. Click on the System Summary from the left side and find BIOS mode and Secure Boot State from the right.
3. Now, check the value of these items. The value for BIOS mode should be UEFI; if it is CSM or Legacy, then you must change it to UEFI. Similarly, the Value for Secure Boot State must be ON; if it is Off, then you must turn it On from BIOS.
How to fix Valorant VAN9003 Error?
You can easily fix Valorant VAN9003 Error on your Windows 11 PC by following the steps mentioned below. These must be followed one after the other if the previous one does not work for you.
1. Enable Secure Boot
Valorant requires Secure Boot to be enabled. You can do it by opening UEFI/BIOS on your PC. For this, you must know the BIOS key for your PC.
Here are the BIOS Keys for major brands:
| Manufacturers | BIOS Key |
| Acer | Del or F2 |
| AOpen | Del |
| Asus | F2 for Laptops/PC, F2 or Del for motherboards |
| Asrock | Del or F2 |
| Biostar | F12 |
| Dell | F2 or F12 |
| Gigabyte | Del or F2 |
| HP | F10 or Esc |
| Lenovo | F2 or Fn+F2 F1 for desktop Enter+F1 for Thinkpads |
| MSI | Del |
| Origin | F2 |
| Samsung | F2 |
| Sony | F1, F2 or F3 |
Once you have found the BIOS key for your PC, then proceed with the below-mentioned steps:
1. Close everything and Restart your PC.
2. While restarting, when you see the manufacturer logo, you have to press the suitable BIOS key on your keyboard; this will load the BIOS settings.
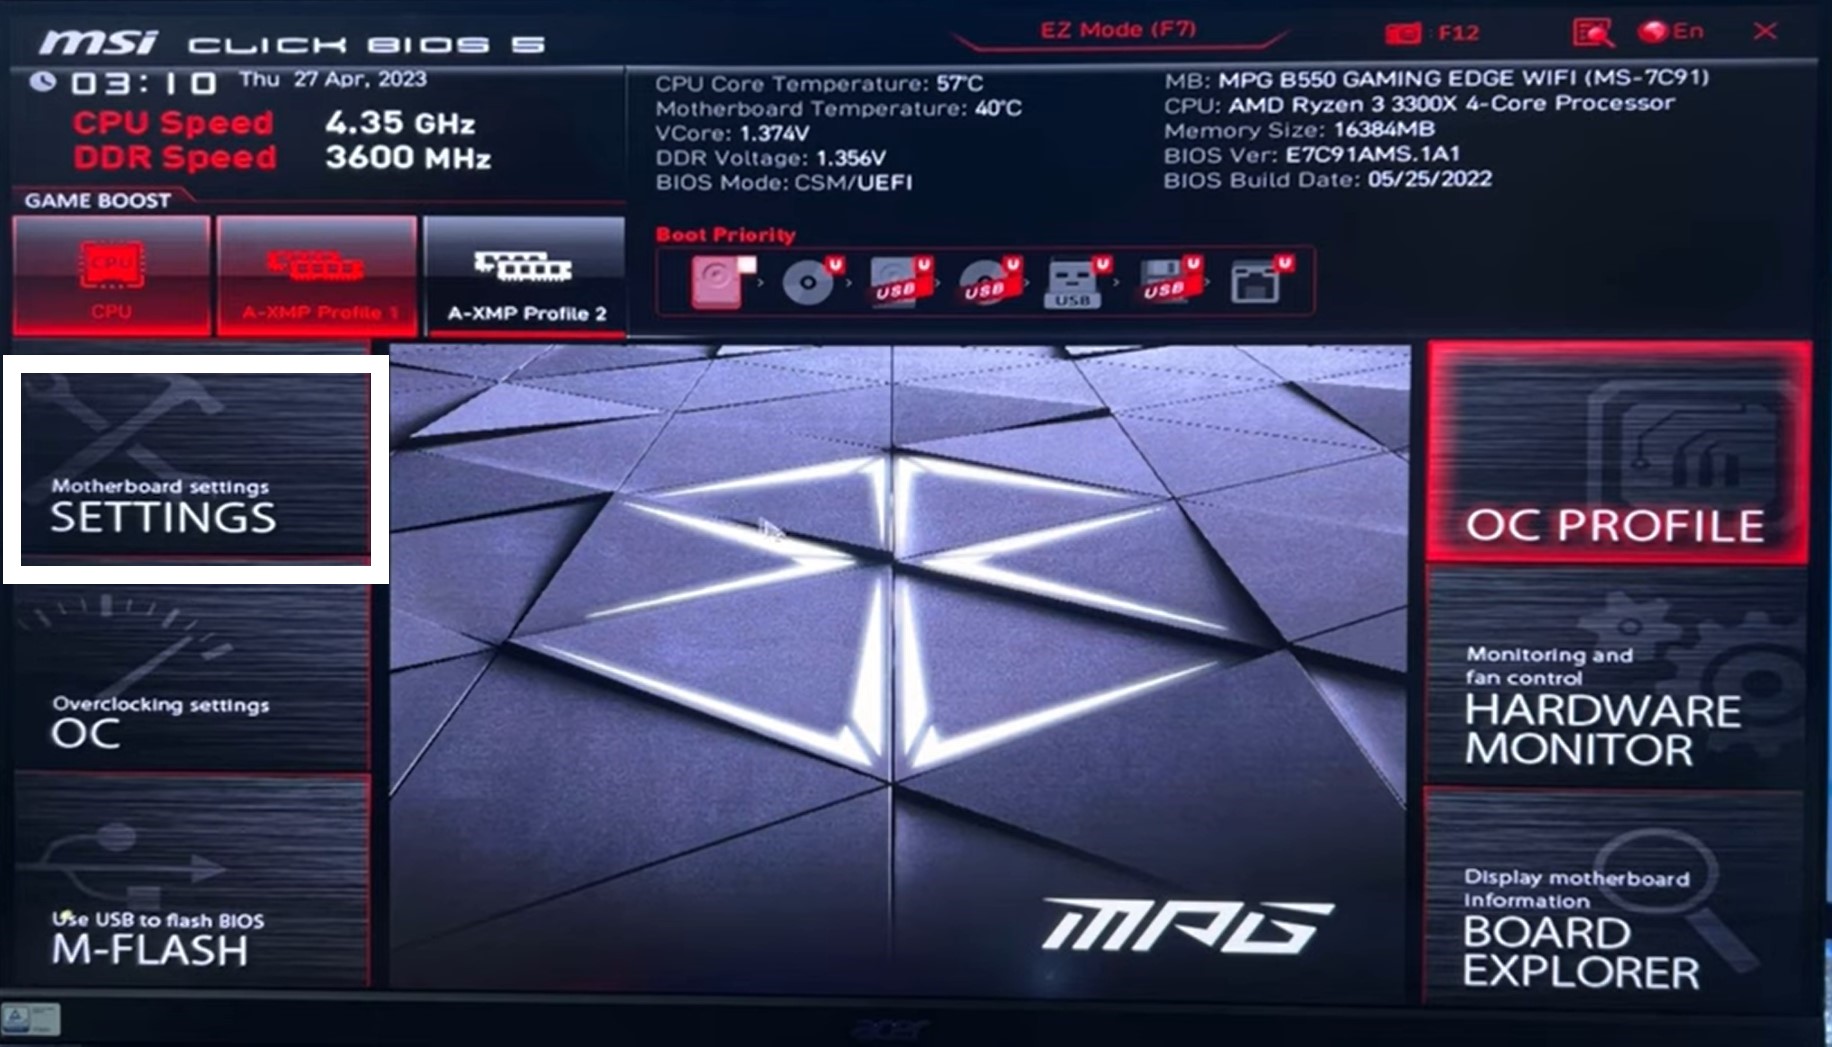
3. Open the BIOS in advanced mode. Click on Advanced Mode or press F7 from your keyboard to open the advanced BIOS mode. (For MSI motherboard, see pictures)
You might have different motherboards; just look for the Settings option, or you can search for it.
4. Click on Settings.
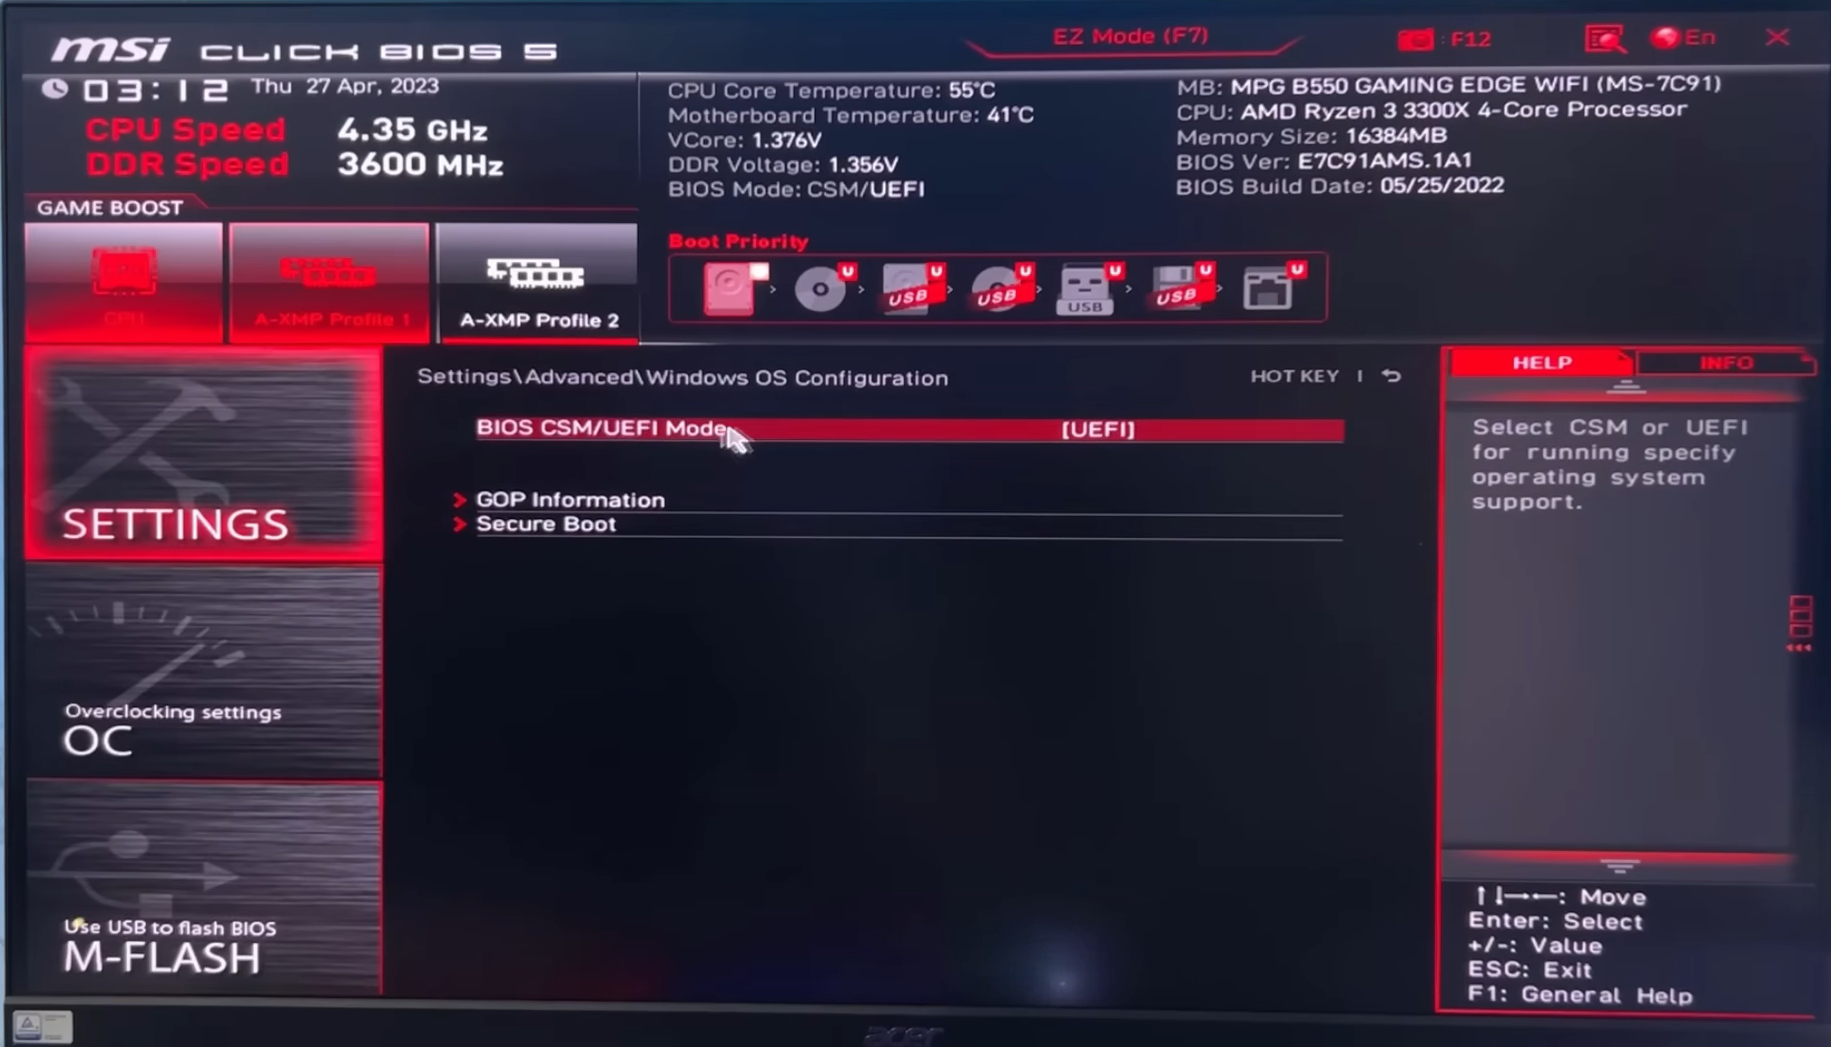
5. Go to the Advanced option and then click on Windows OS configuration.
6. Now, switch BIOS mode from legacy or CSM to UEFI.
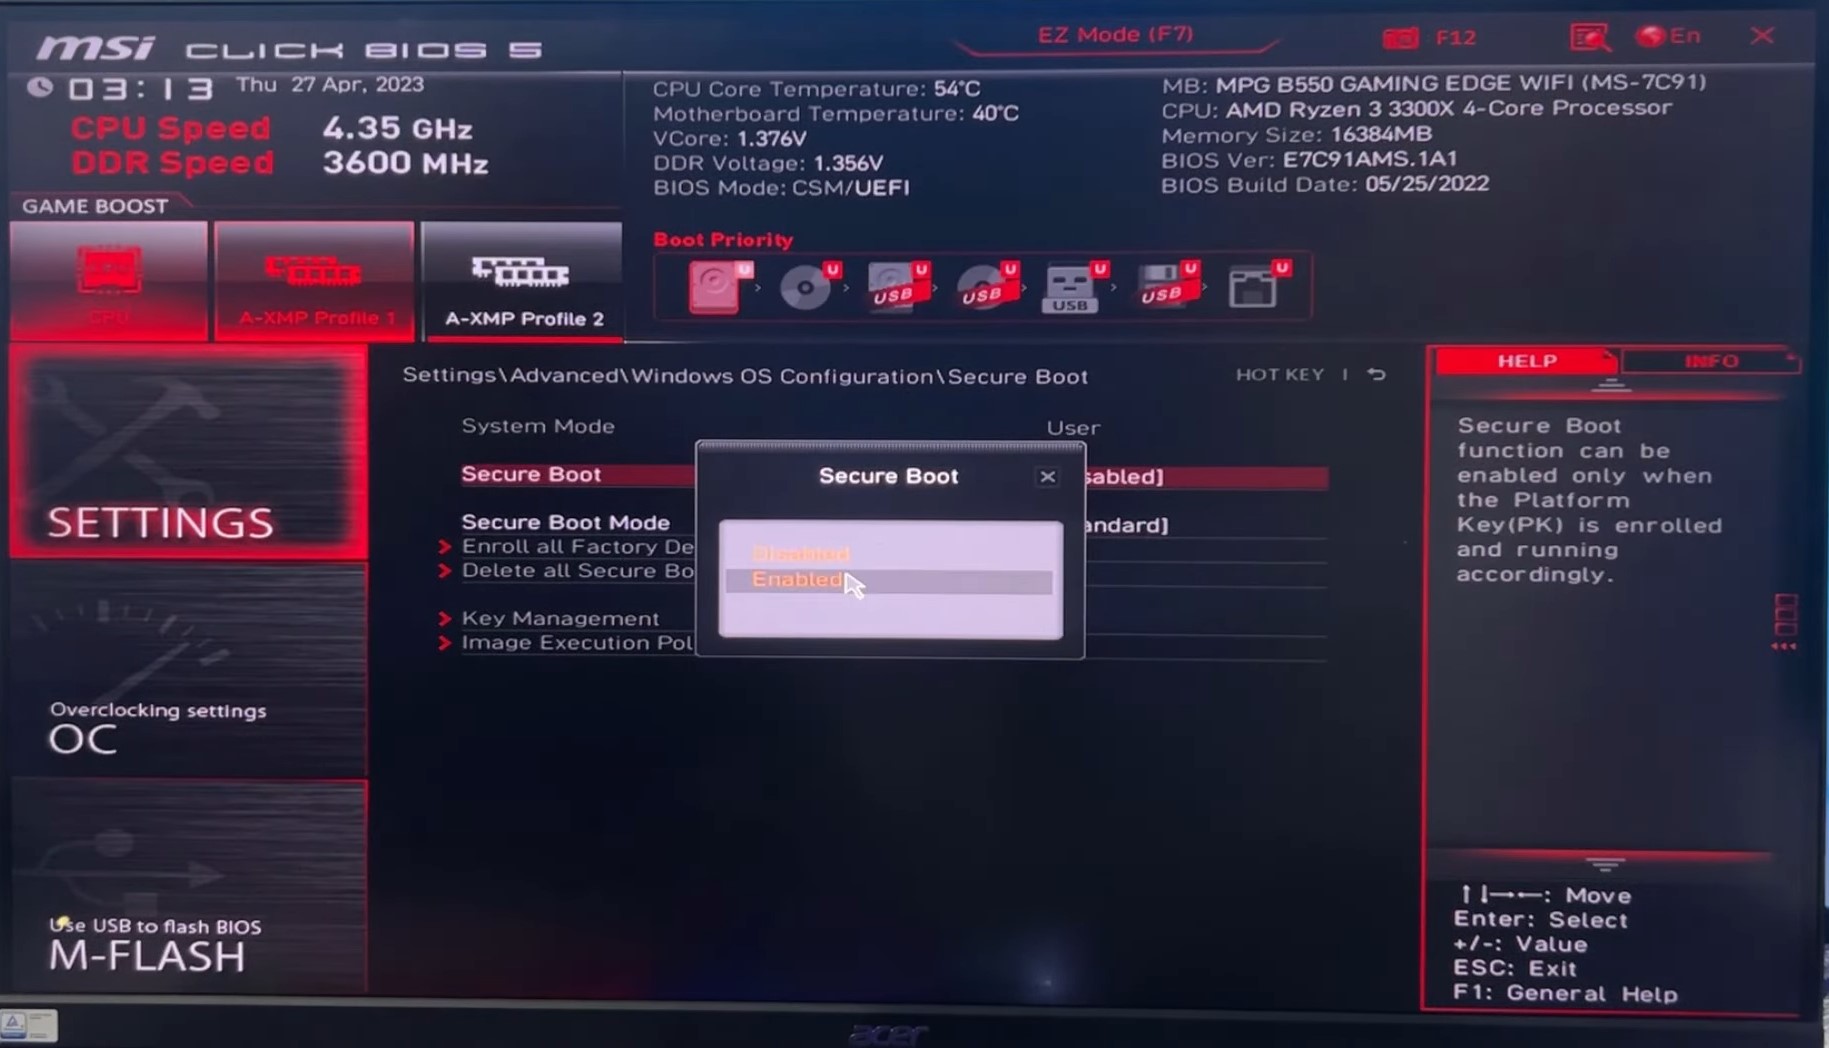
7. Click on Secure Boot and Enable it. Then, set the Secure Boot Mode to Standard.
2. Enabling TPM 2.0
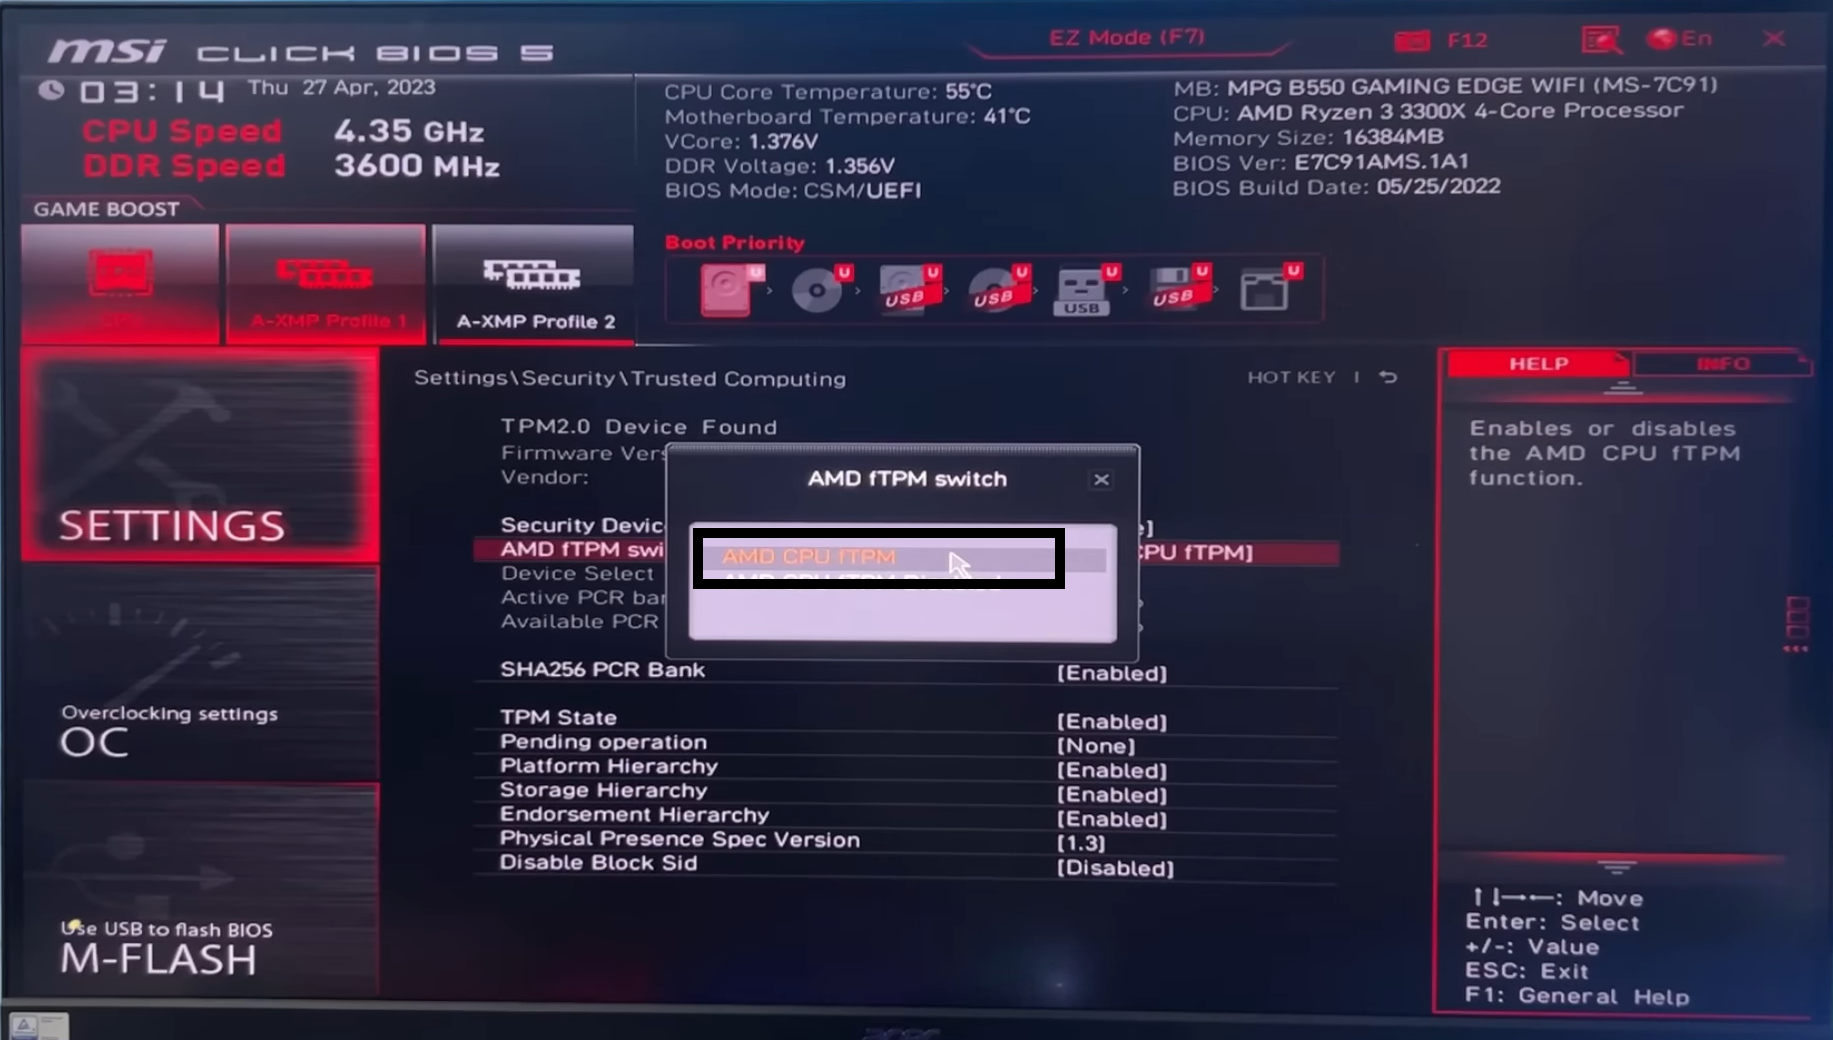
8. Go back to the main menu, then click on the Security option. Click on Trusted Computing and Enable Security Device Support. (Some motherboards have different names for “Security device support”)
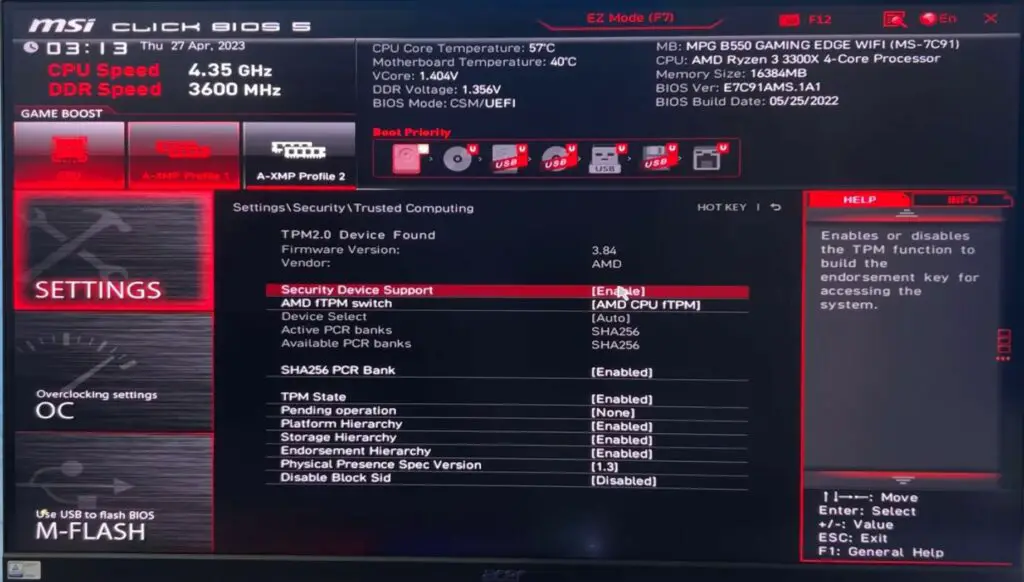
9. Now, you can select the available TPM Switch; it can be AMD FTPM, ITPM, or Intel PTT. Or select the available TPM switch as your processor support.
10. Now, save all the changes by simply clicking on the Red X button from the top right, followed by clicking on the yes option to save all the changes you made. OR Press F10.
11. Then Restart your PC.
12. Lastly, log in to your device and check if you can open Valorant.
3. Reset Factory Default Keys if you can’t Enable Secure Boot
If you are unable to play the Valorant even after following the method mentioned above, then Secure Boot might not be enabled.
Or you might get another error “System is in setup mode; secure boot can be enabled in user mode.”
Verify the Secure Boot state by opening the “System Information.” If it is still OFF, then follow the below steps.
1. Open the BIOS menu again (follow steps 1 and 2 mentioned in method 1).
2. Go to Advanced Mode or press F7.
3. Click on Settings.
4. Go to the Advanced option and then click on Windows OS configuration.
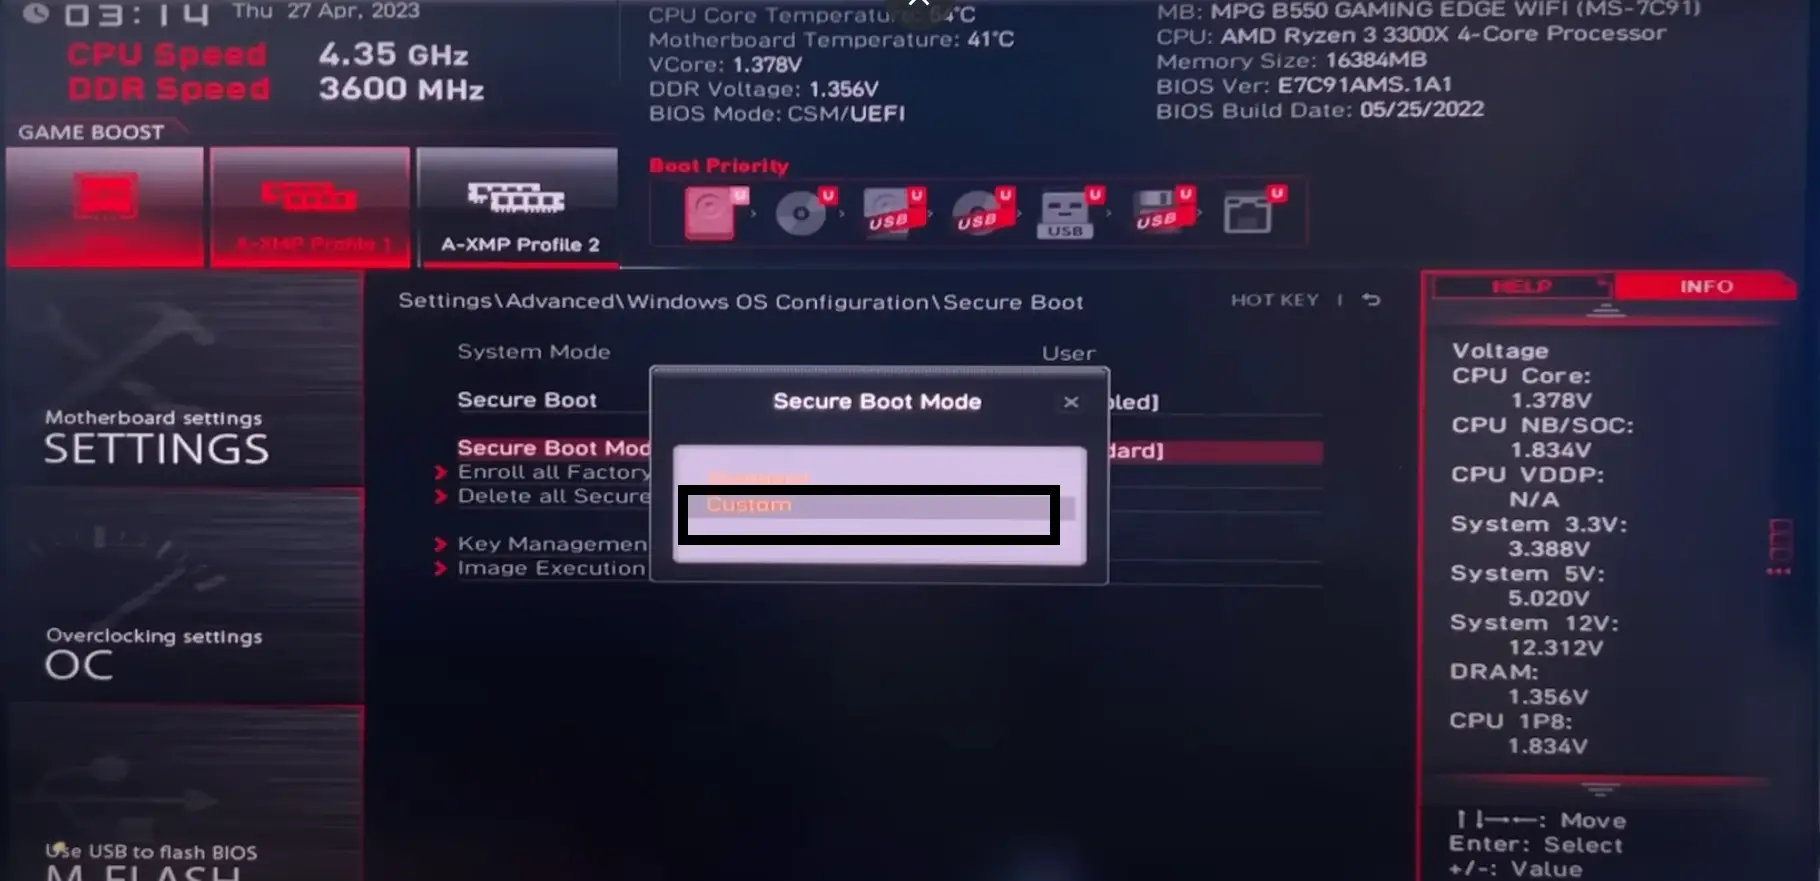
5. Click on Secure Boot. Then, disable the Secure Boot and select the Custom option for Secure Boot Mode.
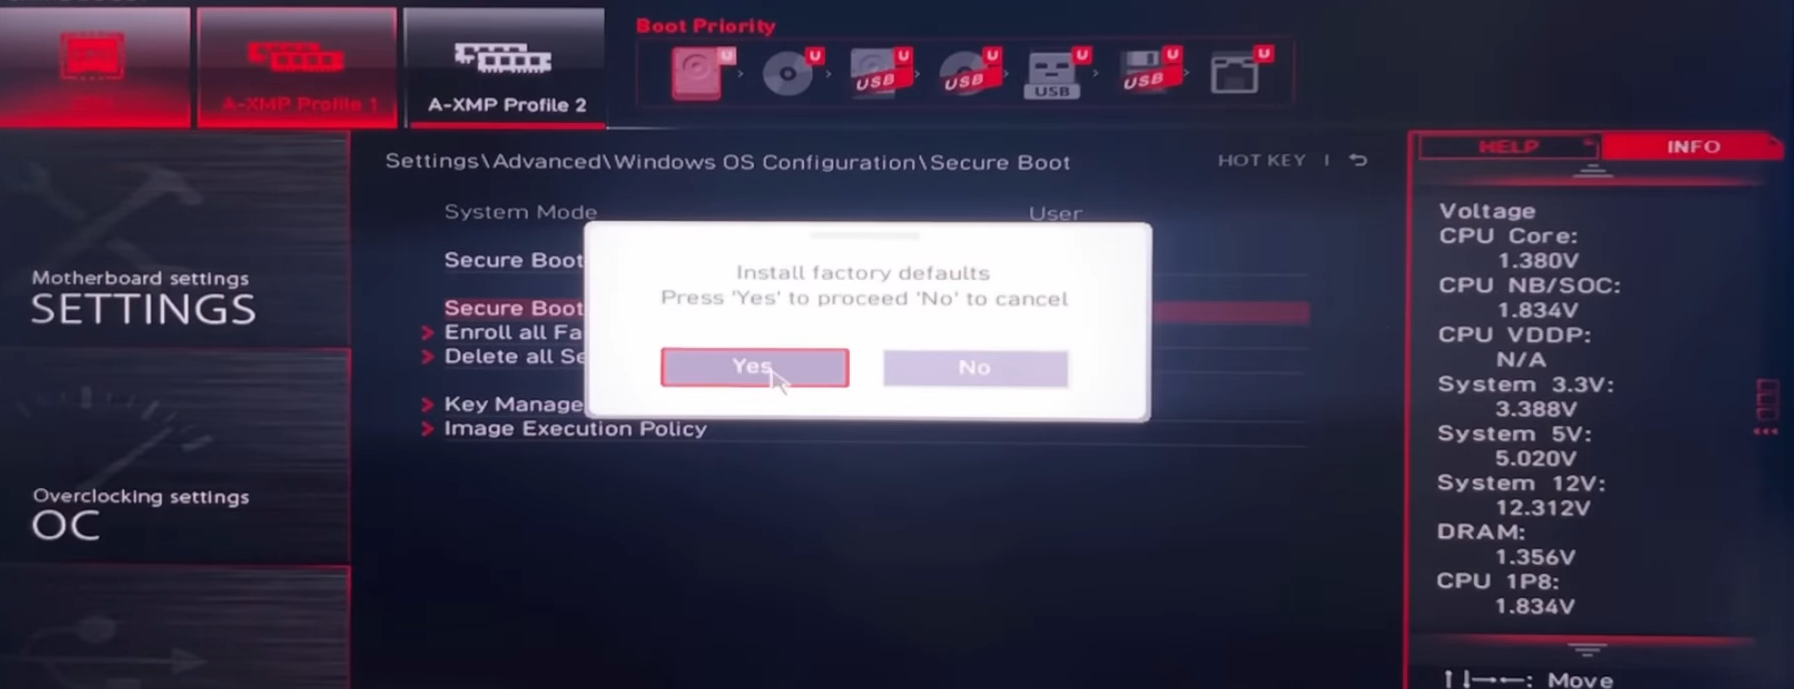
6. Now again, click on Secure Boot Mode and select the Standard option. This will ask you to install the factory default keys, so press Yes. Then it will ask to “Reset without saving” here; click on the No option.
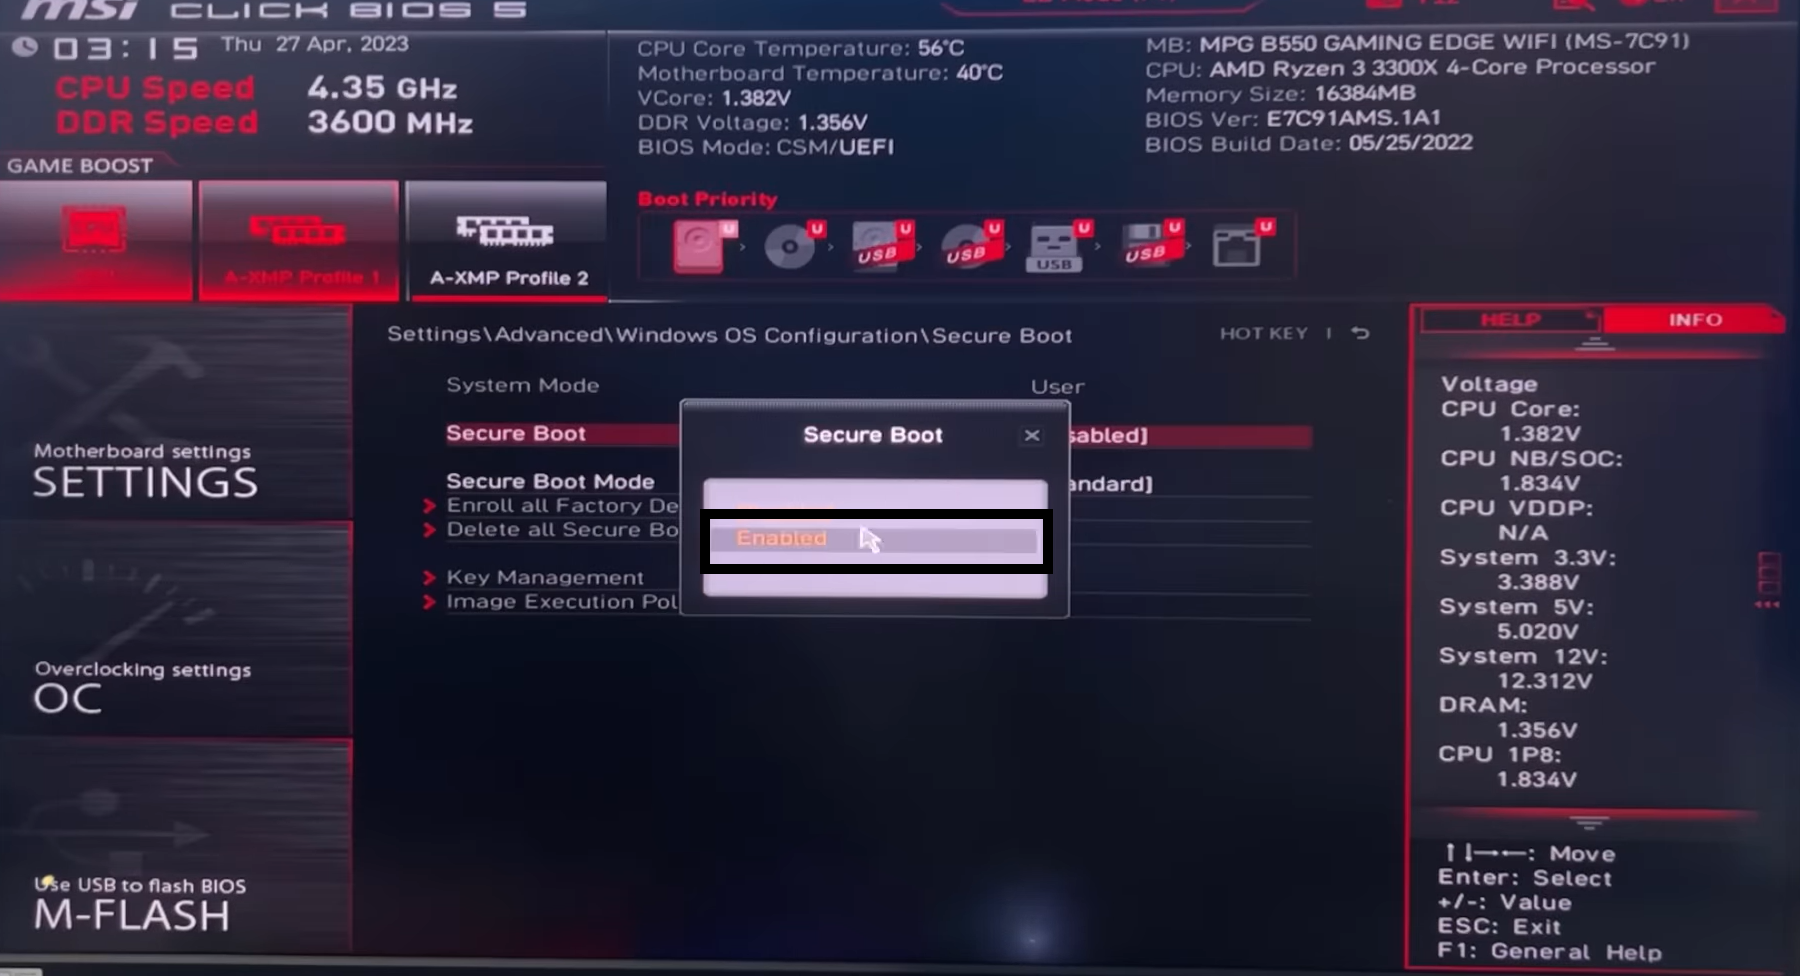
7. Now, Enable the Secure Boot.
8. Save all the changes by pressing F10. Or simply click on the Red “X” button from the top right, followed by clicking on the Yes option to save all the changes you made.
9. Now, your device will restart.
10. Login back into your Windows 11 and open the System Information again. Now, the BIOS mode will be UEFI, and the Secure Boot Mode status will be ON.
11. Lastly, open and play Valorant on your Windows 11 Device. If you are still unable to do so, then follow the next method.
4. Compatibility Mode to fix Valorant VAN9003 Error
1. Locate the Valorant’s Shortcut. If it is not on your desktop, then search for Valorant and right-click on it to open the file location.

2. Now, copy its shortcut and paste it on your desktop.
3. Right-click on the Valorant shortcut from your desktop and click on Properties.
4. Click on the Compatibility tab from the top right.
5. Under the compatibility mode, select the option Run this program in compatibility mode, and select Windows 8 from the drop-down menu.

6. Click on Apply, followed by clicking on OK.
7. Lastly, open and play Valorant.
Take Away!
The primary reason for the Valorant VAN9003 error is the disabled Secure boot or TMP 2.0. This will not allow Valorant to launch. The above methods will definitely fix the problem.
After that, Valorant will work without the error “This Build of Vanguard is Out of Compliance.” Or any other Secure Boot and TPM 2.0-related errors.
This will help you easily open and play Valorant on your Windows 11 device.
FAQs About VAN9003 Error
If TPM is disabled on your device, then it will show a VAN9003 error. To fix this, you can start by checking if the BIOS mode is UEFI and Secure Boot State is enabled.
The Van9003 error in Valorant often pops up when the TPM 2.0 (Trusted Platform Module 2.0) is not enabled on your Windows 11 device. It is a security feature that allows safety for Windows to boot programs. To fix this, you can follow the steps mentioned in this article.
Yes, you need to enable both secure boot and TPM 2.0 to run the Valorant on your Windows 11. If these features are turned off, then Valorant will not open.
When there are already Platform Keys enrolled, then you need to change them to Default Keys before enabling Secure Boot.
Fix other Valorant Errors:-