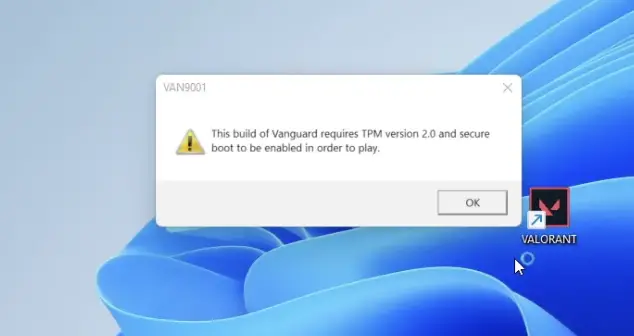
Many Valorant players are getting an error This build of Vanguard requires TPM version 2.0 and secure boot to be enabled in order to play while playing the game by Riot Games. The issue occurs whenever a player tries to launch the Valorant.
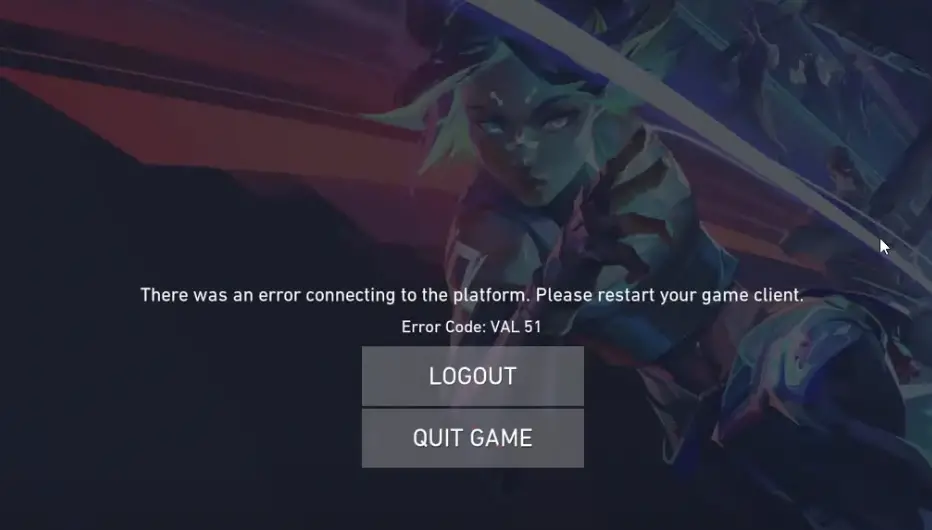
Because of this, players face inconvenience, and even if the game launches, it shows a message reading: There was an error connecting to the platform. Please restart your game client. And the error code is VAL 51.
If you are a player facing this issue, you have just landed on the right page. In this guide, you will say ways to fix This build of Vanguard requires TPM version 2.0 and secure boot to be enabled in order to play errors on your Windows PC.
If these features are disabled, you might get the VAN 9003 error as well.
Why are you getting this build of Vanguard requires TPM version 2.0 error?
So it seems like Riot Games is now enforcing TPM 2.0 and secure boot for their game. If a PC does not have these features enabled, the game won’t start.
TPM stands for trusted platform module, a secure cryptoprocessor embedded in your computer’s motherboard. It stores the cryptographic keys and verifies the firmware and operating system on your device are what they are supposed to be.
Secure boot is another security standard that verifies that the device boots using only software that is trusted by OEM (original equipment manufacturer).
To run valorant or install Windows 11, you need to enable these 2 features from the UEFI/BIOS of your motherboard.
Fix This Build Of Vanguard Requires TPM Version 2.0 and Secure Boot to be Enabled
This issue has the simplest fix, and you can resolve it by enabling TPM Version 2.0 and Secure Boot from the BIOS menu. Here is how you can do it:
Step 1: First of all, restart your PC.
Step 2: When you see the manufacturer’s logo while restarting, press the BIOS key on the keyboard.
The BIOS key is different for different PC brands. You can either search for your BIOS key on the internet, or I have also mentioned them below:
| Asus | F2 |
| HP | Del |
| MSI | F10 |
| Dell | F2 or F12 |
| Gigabyte | Del |
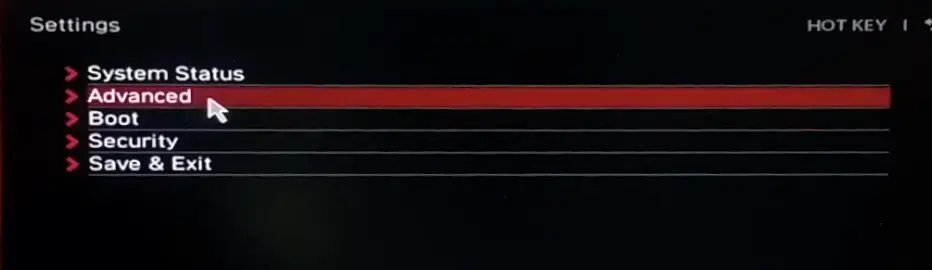
Step 3: Once the BIOS menu opens, go to the Advanced option.
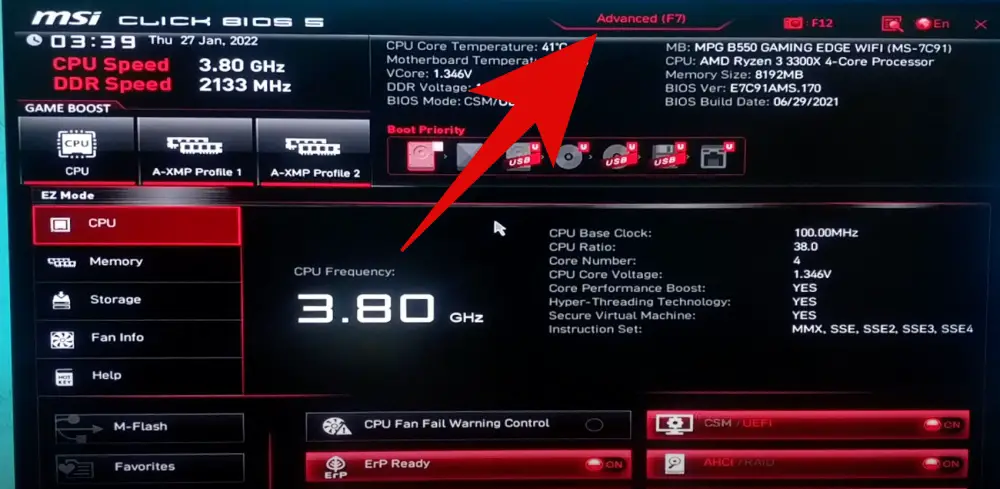
It might look a bit different depending on your motherboard, but the Advanced mode is available on all BIOS menus. This is what UEFI-BIOS looks like in MSI motherboards.
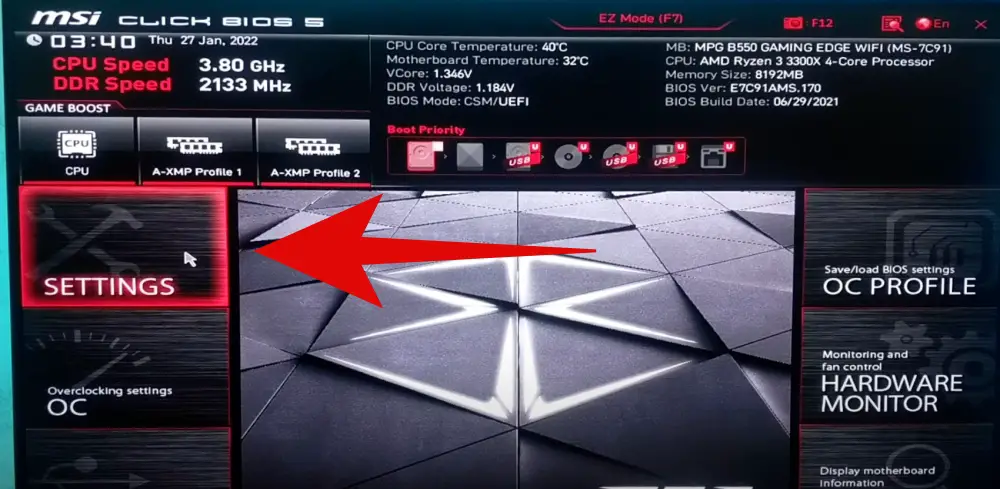
Step 4: Now go to the motherboard Settings.
Step 5: Here, you have to find the Security option and click on it.
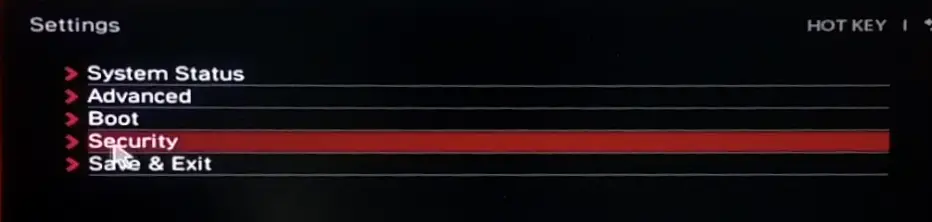
Step 6: From here, click on Trusted Computing.
Step 7: Check for the option against Security Device Support; if it reads disabled, click on it.

Step 8: Now, simply enable it.
Step 9: Once you enable this, click on the TPM switch option just below and enable it. It might be an AMD fTPM switch, Intel TPM, ITMP, or similar terms, look for it and then enable it.
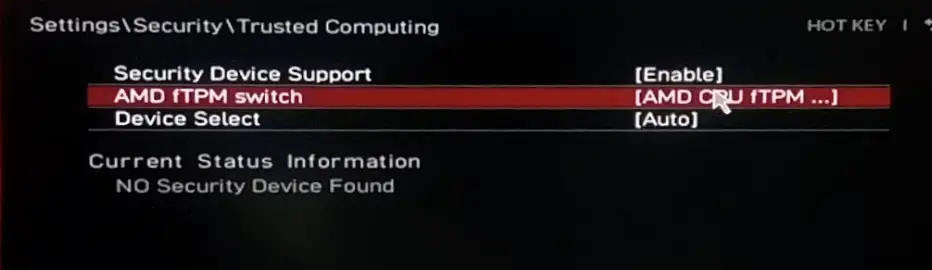
Although once you enable the Security Device Support, it will automatically pick the default TPM switch.
This is how you enable TPM Version 2.0
Enabling Secure Boot
Once you have enabled TPM Version 2.0, you also have to enable secure boot, and here is how to do it:
Step 1: You have to go to the main BIOS menu again.
Step 2: Once the BIOS menu opens, go to the Advanced option.
It might look a bit different depending on your motherboard, but the Advanced mode is available on all BIOS menus.
Step 3: Now go to the motherboard Settings.
Step 4: You must find the Advanced option and click on it.
Step 5: Navigate and click on Windows OS Configuration.
Step 6: Here, the BIOS mode should be UEFI, which must enable the secure boot.
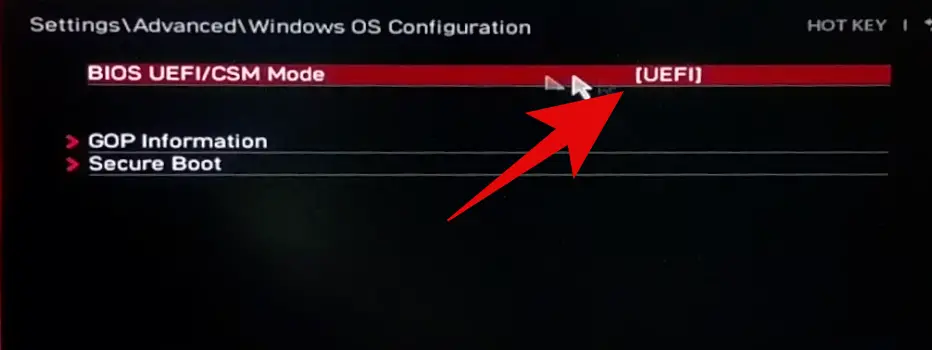
Step 7: Click on Secure boot.
Step 8: Check against Secure Boot; if it is disabled, click on it and then click on Enabled.

Finally, click on the X icon on the top right to save the changes. In the pop-up menu, click on Yes to save the new settings.
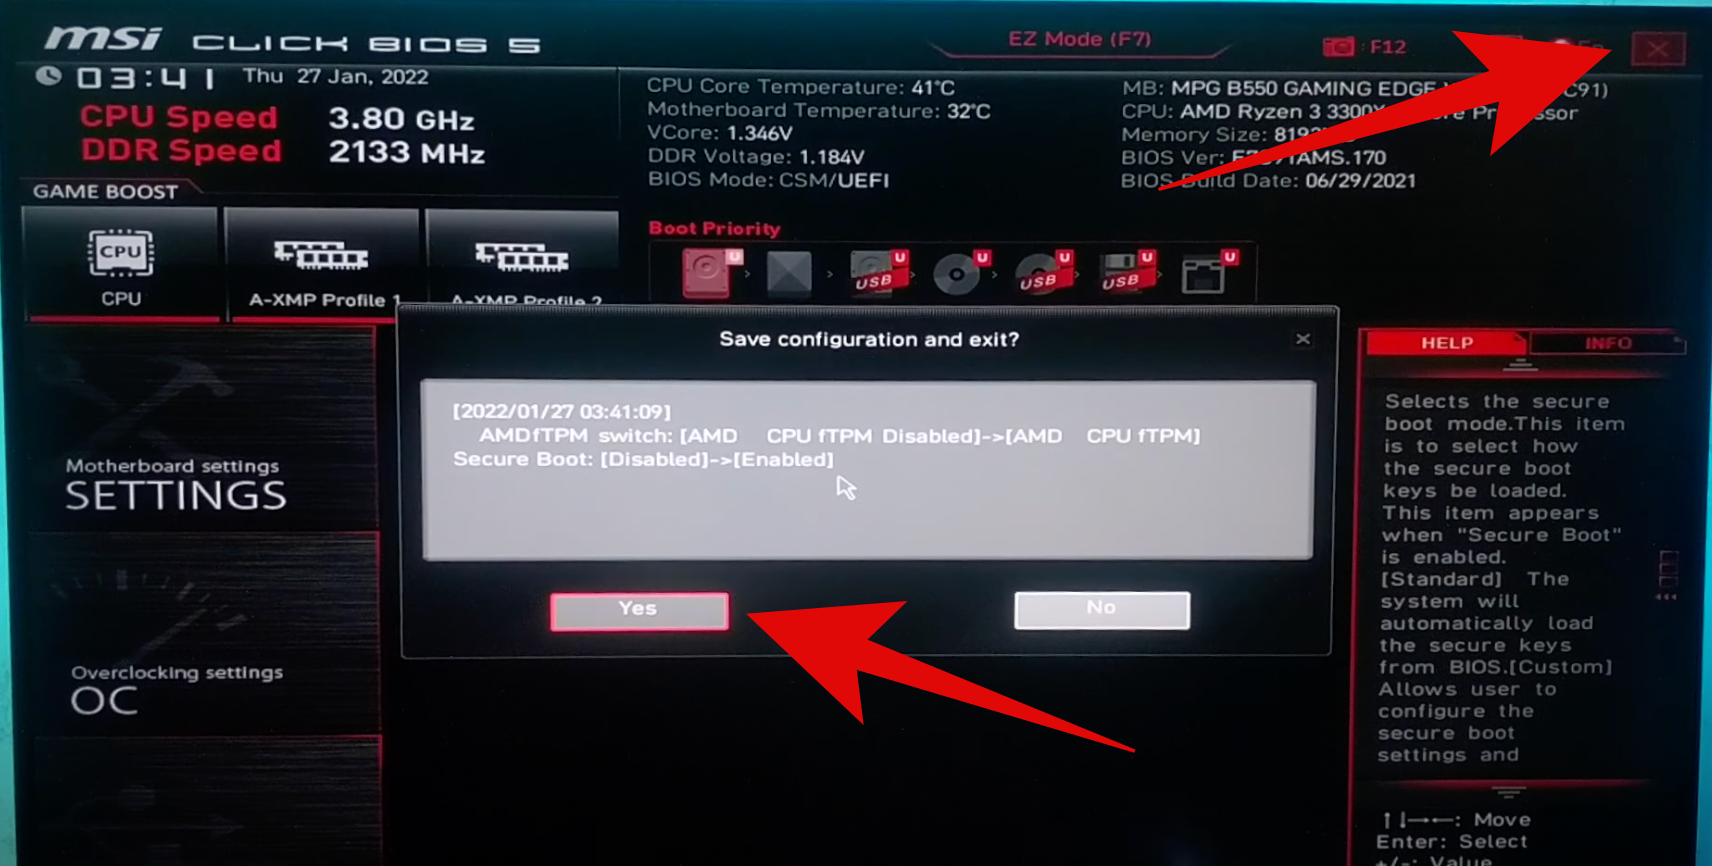
This will enable the secure boot and TPM 2.0 on the motherboards that support AMD CPUs.
Enable Secure Boot and TPM 2.0 on Motherboards For Intel CPUs
The method above is for AMD motherboards, but if you have an Intel motherboard, don’t worry. The process to enable Secure Boot and TPM 2.0 is pretty much the same; there are just a few different steps you will have to follow. Here is how you can do it:
You can again open the BIOS menu by pressing the boot key on your keyboard during the restart.
Here’s an alternative way to open UEFI/BIOS firmware settings.
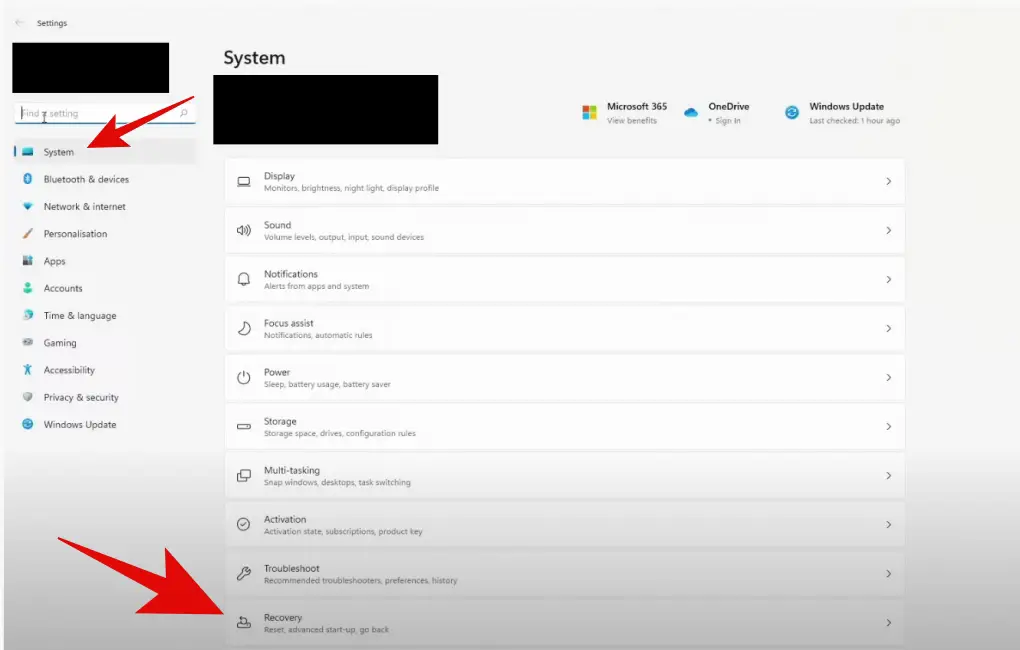
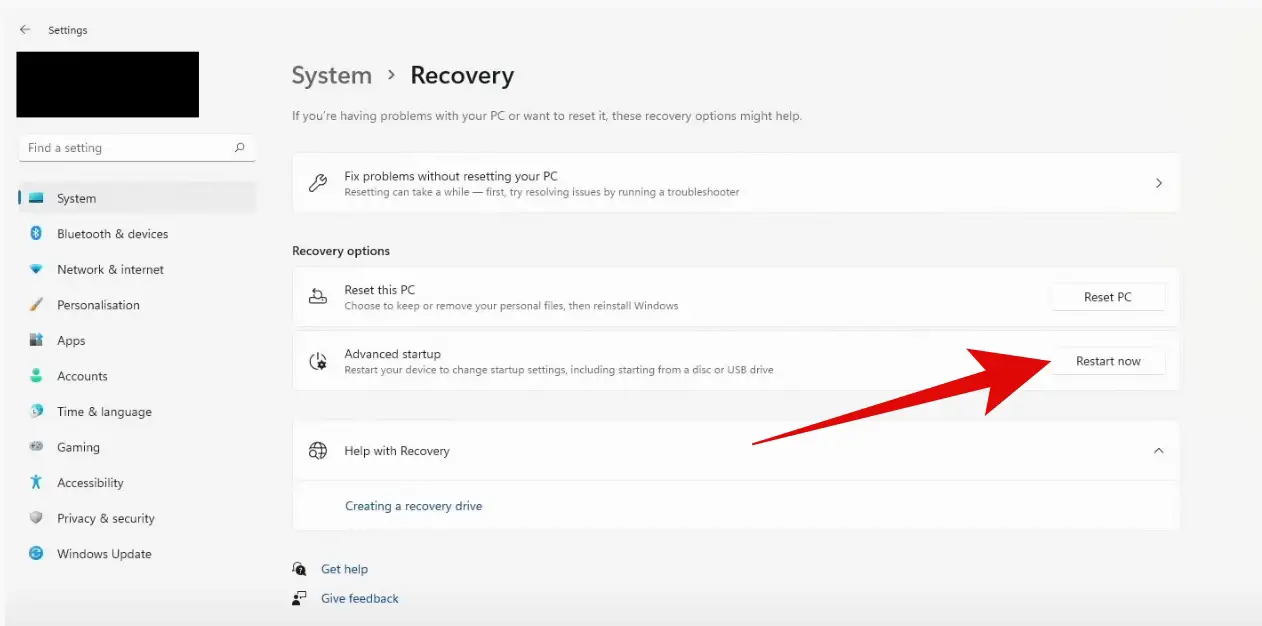
Step 1: Go to the Windows Search icon, type “Settings,” and hit enter.
Step 2: Under the System tab, tap on Recovery.
Step 3: Click on Restart now next to Advanced startup.
Step 4: Press Restart now again.
Step 5: In the recovery mode, click on Troubleshoot, then click on Advanced options, and finally click on UEFI Firmware Settings. Click on Restart in the next menu.
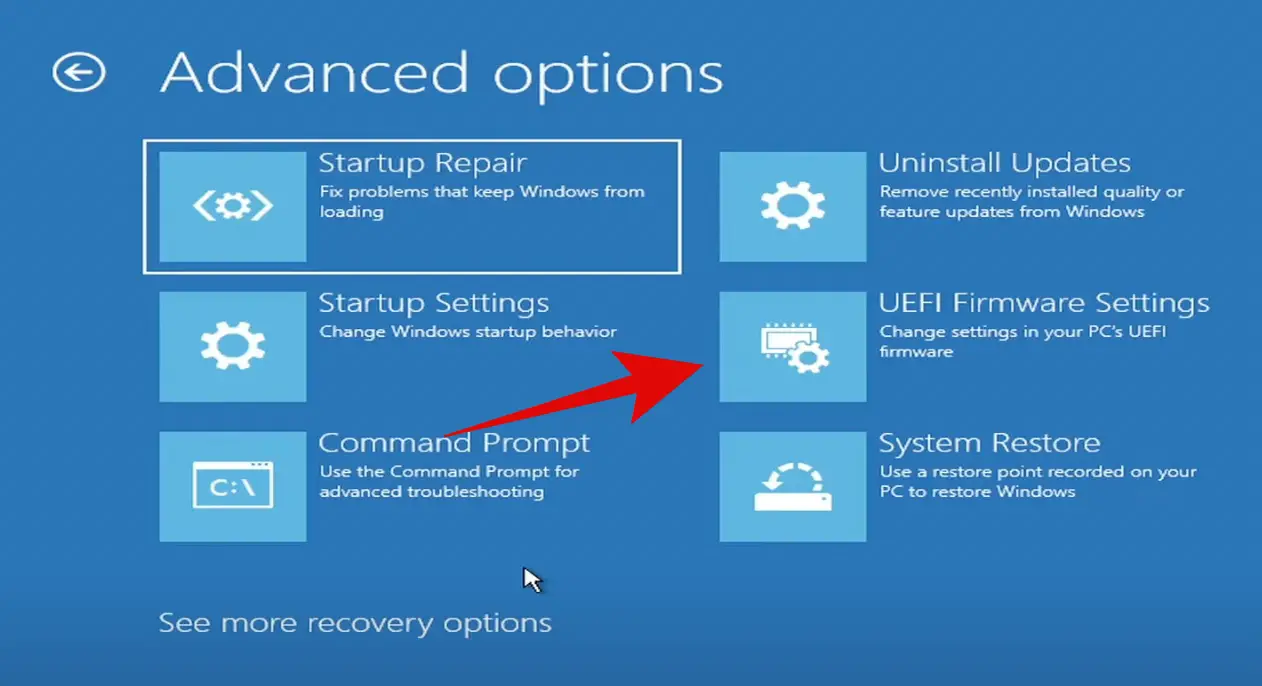
This will take you to the BIOS, where you can enable TPM 2.0 and Secure Boot.
Enabling Secure Boot
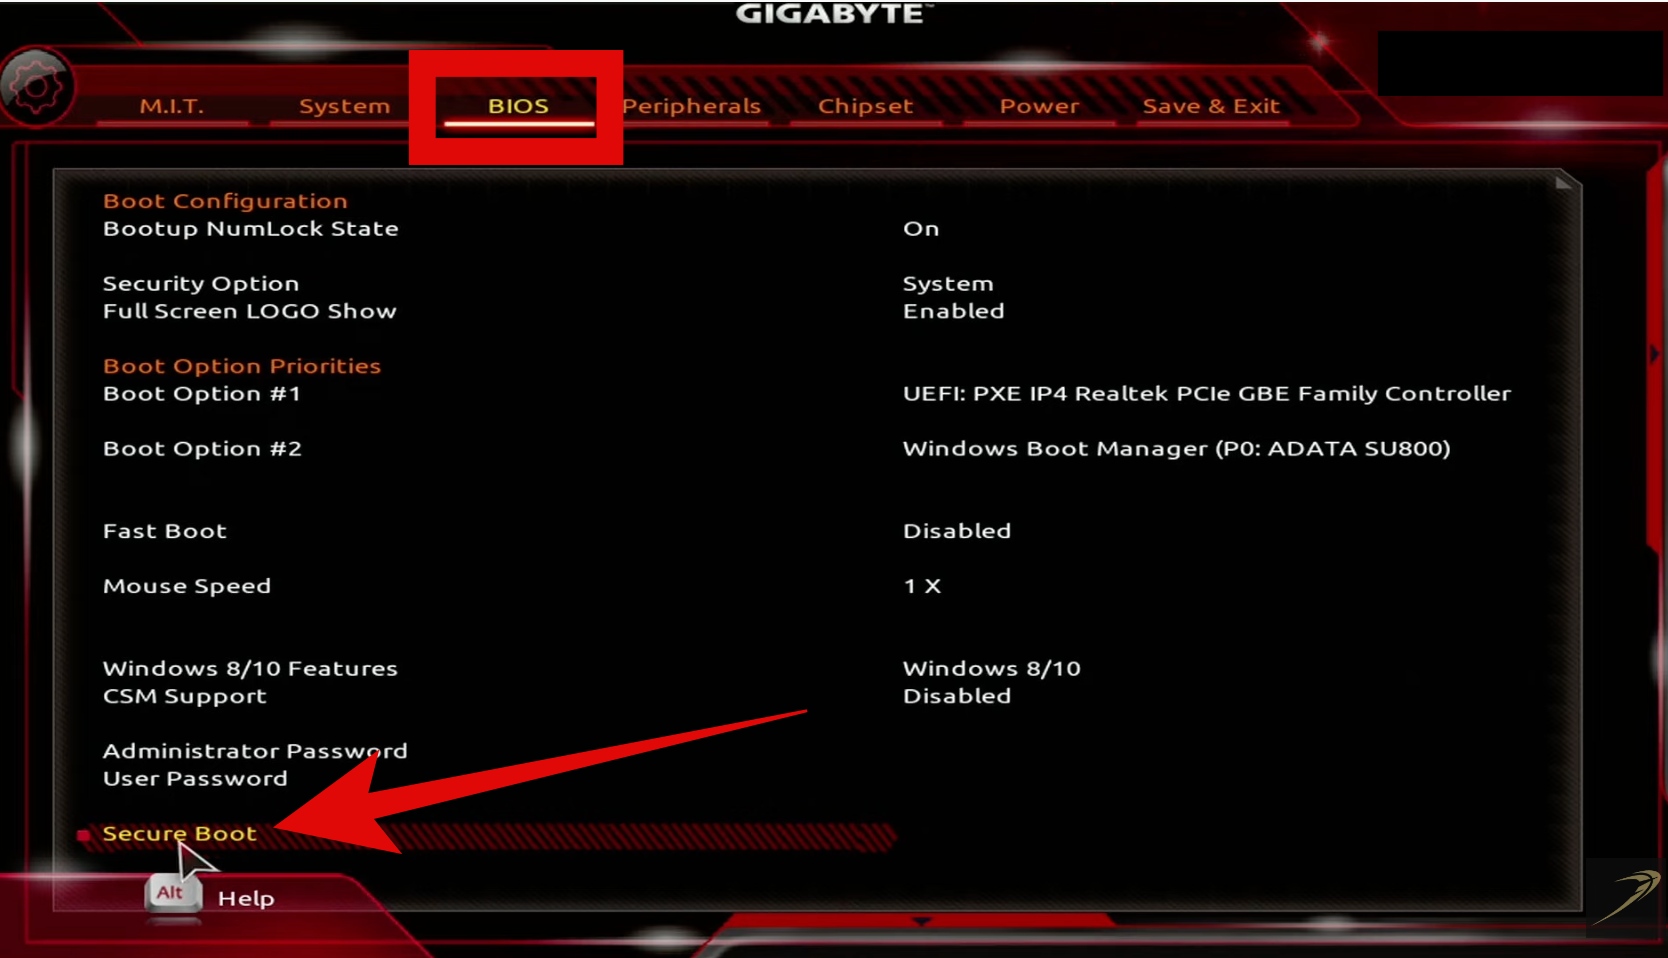
If you have an Intel motherboard, the BIOS interface might be different. The BIOS interface depends on the manufacturer, not the CPU. Once you see the BIOS menu, follow these steps:
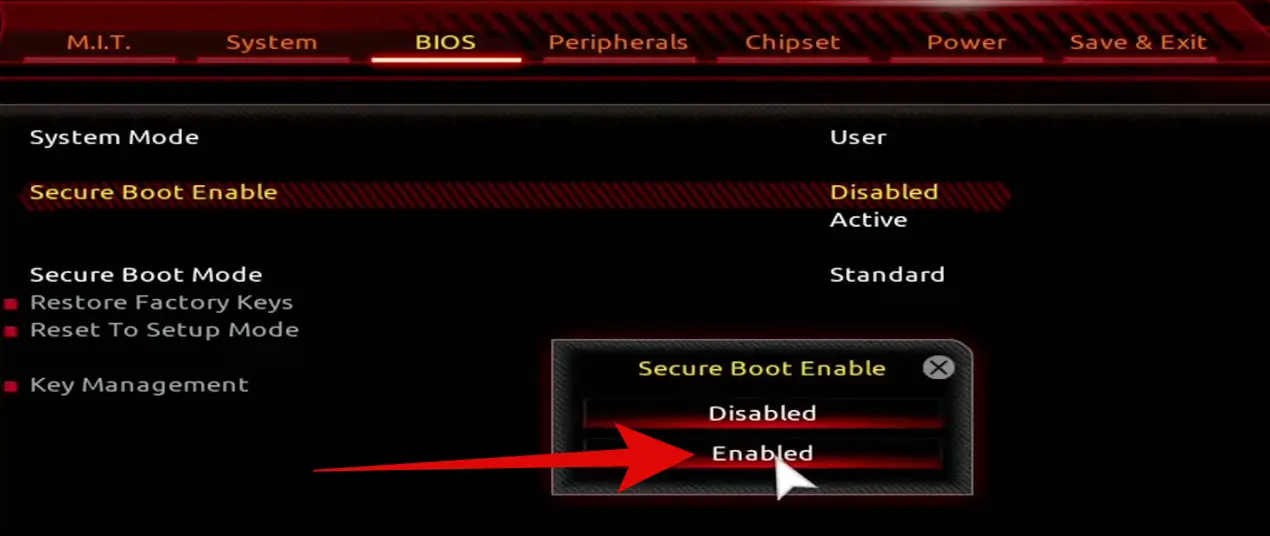
Step 1: Go to the BIOS tab.
Step 2: Scroll down, and you will see an option for Secure Boot. Double-click to open it.
Step 3: Now double-click on Secure Boot Enable.
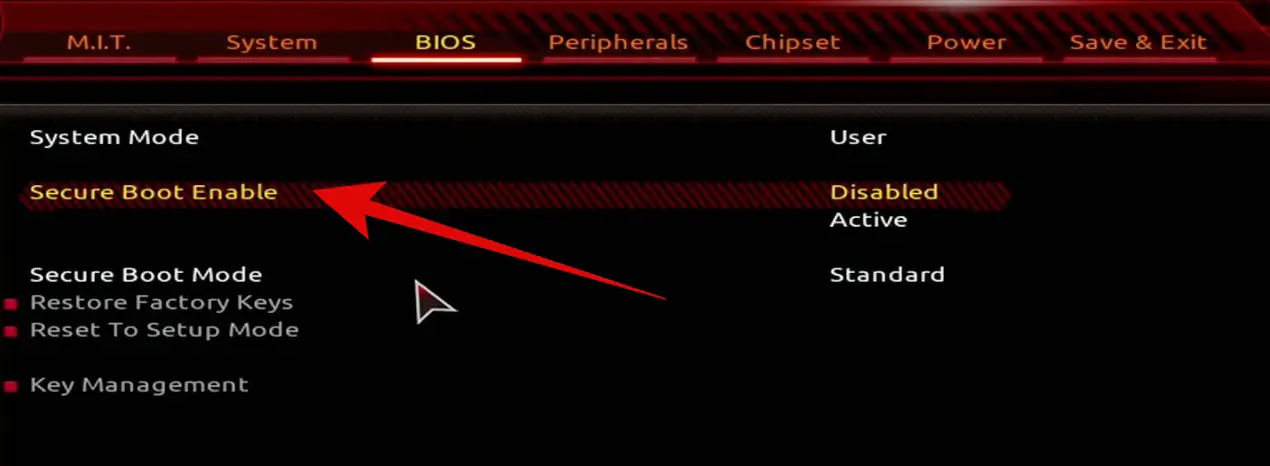
Step 4: Select the Enabled option.
Enabling TPM 2.0
Open the BIOS menu and then follow these steps to enable TPM:
Step 1: Go to the Peripherals tab or the Advanced option, depending on your motherboard.
Step 2: Double-click on Intel Platform Trust Technology(PTT).
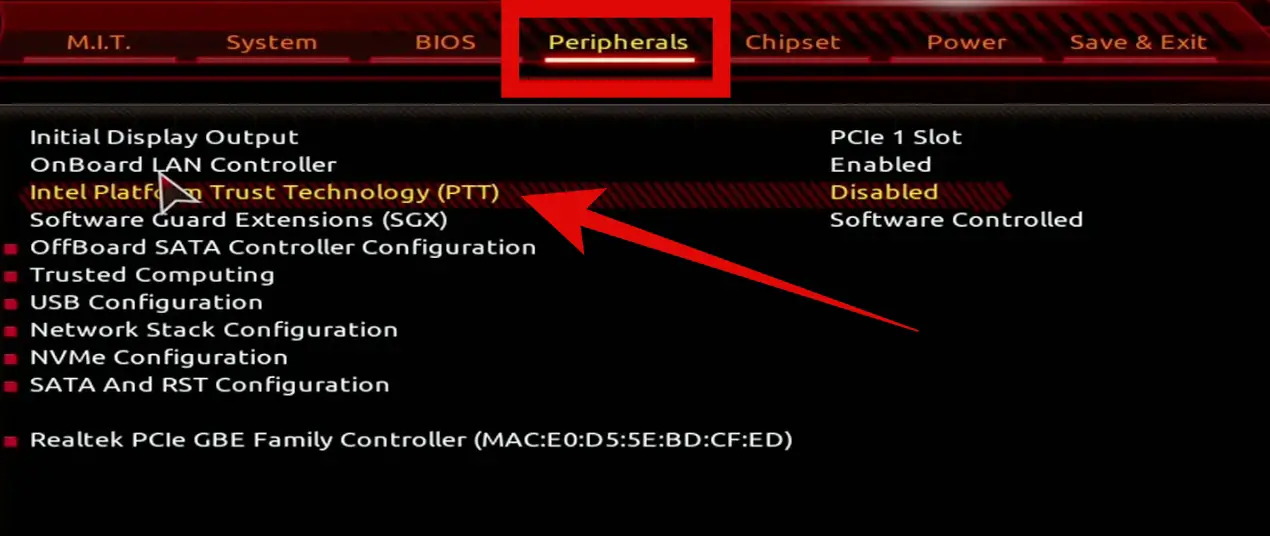
Step 3: Select the Enabled option.
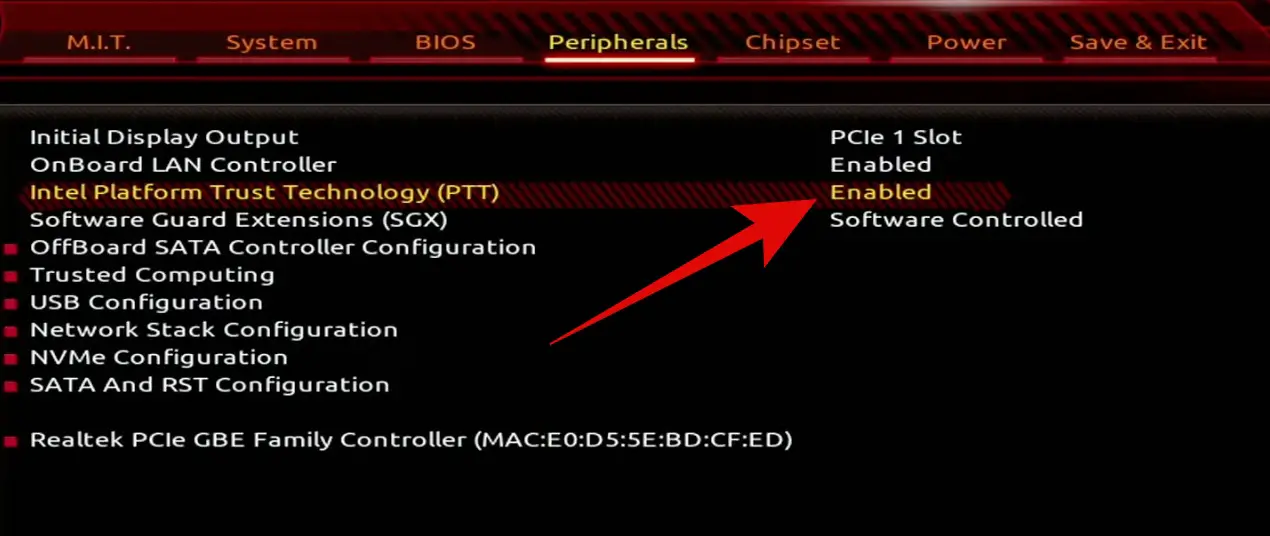
Press F10 to save and exit with these settings. That is it!
Now start your PC and open the valorant. Now, you will be able to play the game without any issues.
Conclusion
Riot Games is enforcing TPM 2.0 & secure boot for their games; it is also required to install Windows 11. By enabling these features, you can fix This build of Vanguard requires TPM version 2.0 and secure boot to be enabled in order to play errors while playing Valorant.
Essentially, you just have to enable TPM Version 2.0 and secure boot from the BIOS menu. The process is relatively straightforward. All you have to do is follow all the steps carefully. During the process, you might encounter the system in setup mode; secure boot can be enabled in user mode. However, you can easily fix it as well.
Also, ensure that you have installed the Windows in UEFI mode, as it must enable secure boot.
Read Next:
- How to Improve Gaming Performance on Your Laptop
- 17 Best Facebook Messenger / Instant Games To Play
- 15 Best Facebook Instant Games to Play With Friends
- Windows 11: How To Check if Your PC is Compatible For Upgrade
FAQs About This Build Of Vanguard Requires TPM Version 2.0 and Secure Boot
If your computer is not older than 5-6 years, then you should see the TPM 2.0 and secure boot features in the UEFI/BIOS. All the newer laptops and motherboards are equipped with trusted platform modules and UEFI.
Open the BIOS menu, find the TPM option under the CPU configuration settings, and enable the feature; if your CPU supports overclocking, then you will find this setting in the overclocking profile.
Secure boot can be enabled from the UEFI settings.
1. Restart the PC and press the “Del” key when you see the Asus/ROG logo.
2. Go to Advanced > AMD fTPM or Intel PTT configuration page and enable the “TPM device selection” option to “Firmware TPM”.
3. Press F10 to save the changes and restart the PC.
When TPM 2.0 and secure boot are disabled from the BIOS, you will get VAL 51 error while opening the game; you can follow the above guidelines to enable TPM 2.0 and secure boot to fix the error message.