You might find yourself in trouble when the WiFi stops working and the WiFi adapter is missing on your Windows 10 PC. You are trying to fix the WiFi issue and don’t find a Wireless Adapter or driver in the device manager.
Without a Wireless Adapter, you won’t find any WiFi signal on your computer and can’t connect to any wireless network. So it becomes important to fix the missing Wireless adapter in your Windows 10 PC.
In this article, you will find some simple and easy ways by which you can re-install the wireless adapter back.
Fix Wireless Adapter Missing in Windows 10/11
There may be different reasons why you can’t find the wireless driver in the device manager. These are some common causes behind driver failure-
- Accidentally uninstalled the driver from the control panel.
- Failed Windows updates.
- Failed driver update.
- Third-party firewall.
- Conflicting Apps.
- Different types of malware.
Or it could be an unknown reason; here are some methods you should try.
1. Check For Driver in the Device Manager
The very first thing to do is to check if the Wireless Adapter is hidden or not. You can do that easily:
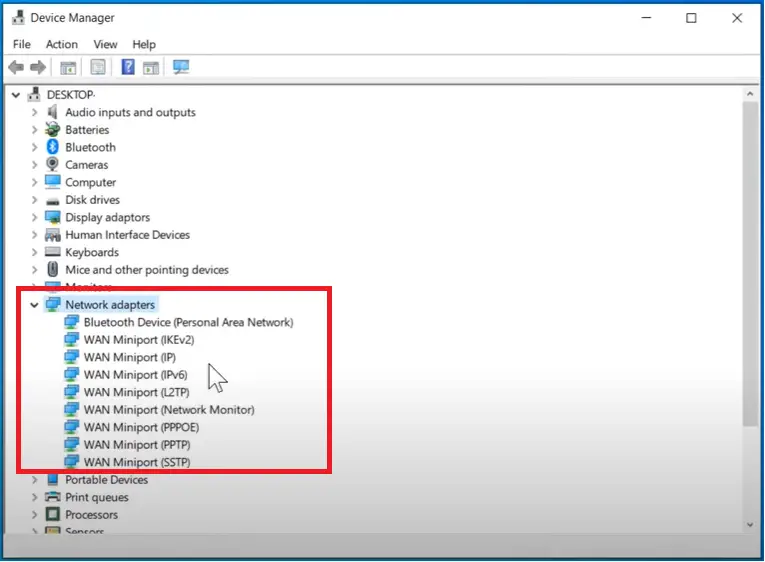
1. Go to the Windows Search Bar, type “Device Manager,” and hit enter.
2. Double-click on the ‘Network adapters‘ to expand it.
3. Now check if you can locate the Wireless adapter; it may be Broadcom, Atheros, Realtek, or any other.
4. If the WiFi adapter isn’t listed there, it might be hidden.
You can show the hidden adapters. Select ‘Network adapters.
5. Click on the ‘View’ tab from the top menu.
6. Now click on ‘Show hidden devices.
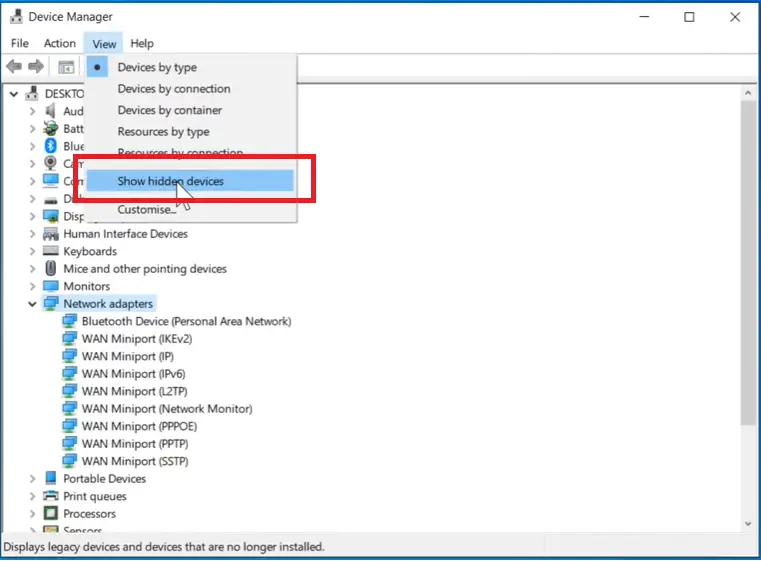
You might see your network adapter listed.
In case it is disabled for some reason, you can re-enable it. Here is how:
1: Select your ‘Network adapters.’
2: Click on the ‘Action’ tab.
3: Now click on ‘Scan for hardware changes.
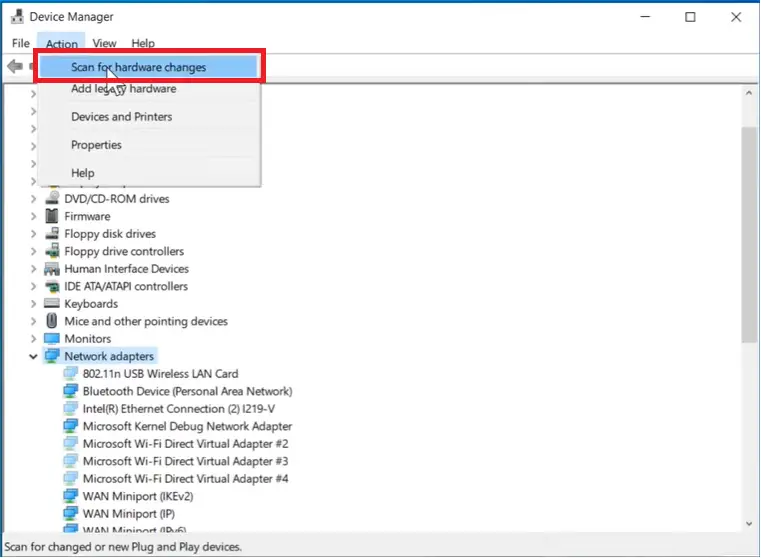
That’s it, and now your WiFi adapter will be re-enabled. If it was uninstalled, this method will reinstall it, and the missing wireless adapter issue will be fixed for you.
2. Take the Help Of Network Troubleshooter to get the WiFi adapter back
Windows inbuilt network troubleshooter can help you to find the reason behind this issue; if it can find the problem, you will see the recommended solutions.
1: Go to the Windows search bar, type “Settings,” and hit enter.
2: Open the ‘Network & Internet’ option.
3: Click on the ‘Network Troubleshooter’ button.
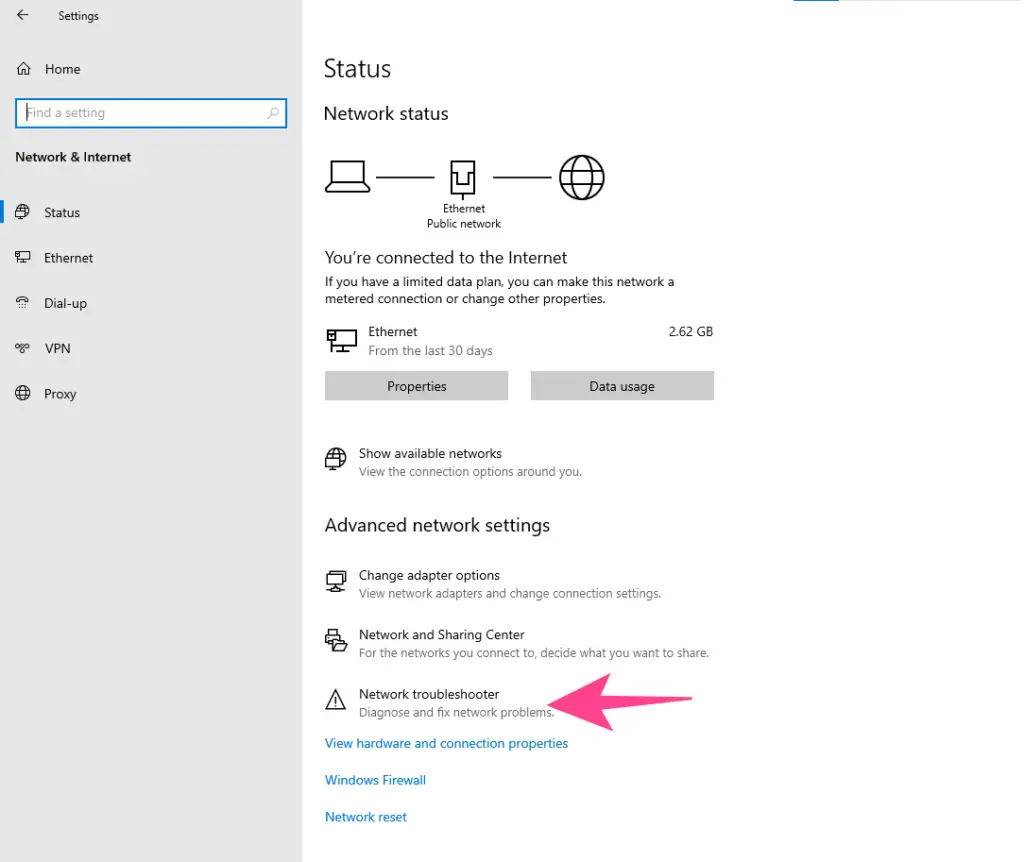
If it is not present there, navigate down, and you will find the option to troubleshoot network-related issues.
4: Run the troubleshooter.
Now, the troubleshooter will look for any potential problems. If it finds anything, you will get the option to fix it. You can apply the fix, and the issue will be solved for you. That way, you can get the WiFi adapter back.
3. Enable Network Services
There are multiple Windows services that need to be running in order to operate WiFi on your PC. If any of these services are stopped, then you need to enable them manually.
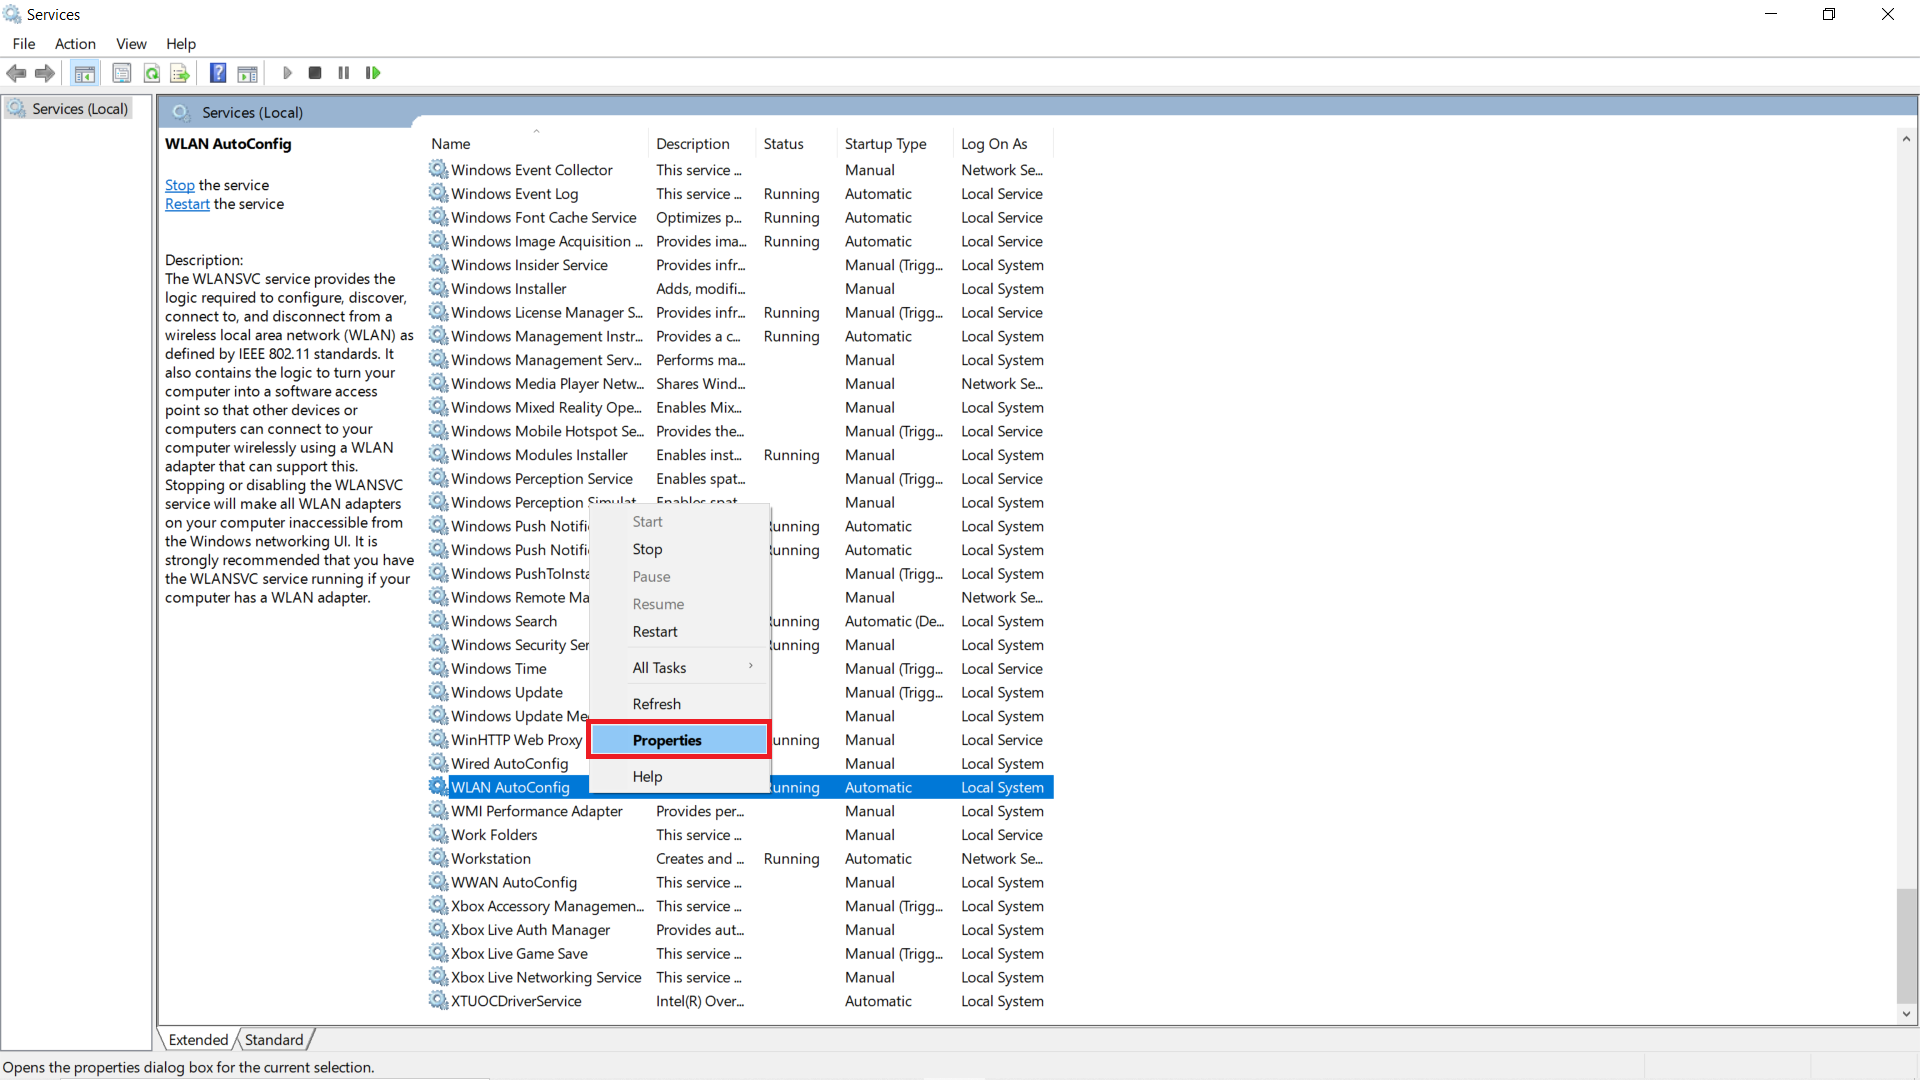
1: Go to the Windows search bar, type “Services,” and hit enter. You will see a list of Windows services.
2: Navigate down, locate, and select the ‘WLAN AutoConfig’ service.
3: Right-click on it and click on ‘Properties.’
4: Ensure the ‘Startup type’ is “Automatic.” If it is set to Manual, then change it to Automatic. Now click on “Apply.”
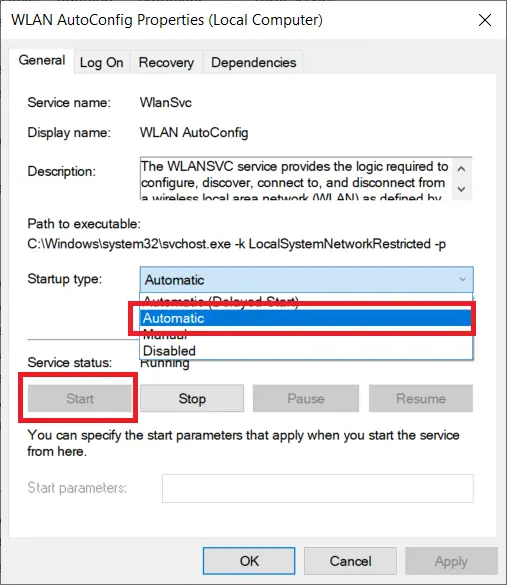
5: If the service isn’t running, click on ‘Start’ to run the service.
6: Apply the changes and click on OK.
7: Repeat all of the above steps for the ‘WWAN AutoConfig service.
That’s it, and now you can restart your Windows, and the WiFi adapter missing issue should be fixed. If not, move on to the next method.
4. Fixing The Network Sockets & Ports
The network ports and sockets could have a bad configuration. You can reset it to fix any possible socket API errors.
1: Go to the Windows Search Bar, type “cmd,” and right-click to ‘Run as administrator.’
2: Type the following command and hit enter:
netsh winsock reset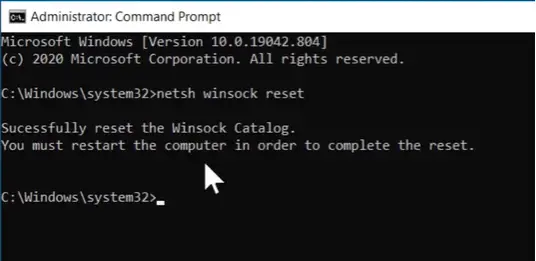
If there are any socket API errors, this command will resolve them. Just restart your computer and check if it is working or not. If it is still missing, follow the next steps:
1: Go to the Windows Search Bar, type “cmd,” and right-click to ‘Run as administrator.’
2: Type the following command and hit enter:
netcfg -d 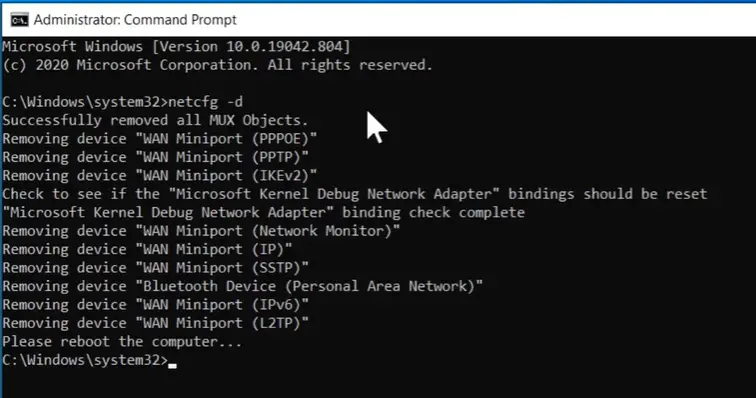
You’ll get a message reading, “Successfully removed all MUX objects.”
The above command will uninstall all the network adapters; you should see the “Removing device..” message. If not, execute the command again.
Now restart your computer. After the restart, Windows will re-install the missing WiFi driver from the versions stored in the system.
5. Perform Network Reset to Fix the Missing Wireless Adapter
Although the above method should fix the underlying issue, it is better to perform a network reset if the above methods don’t work for you.
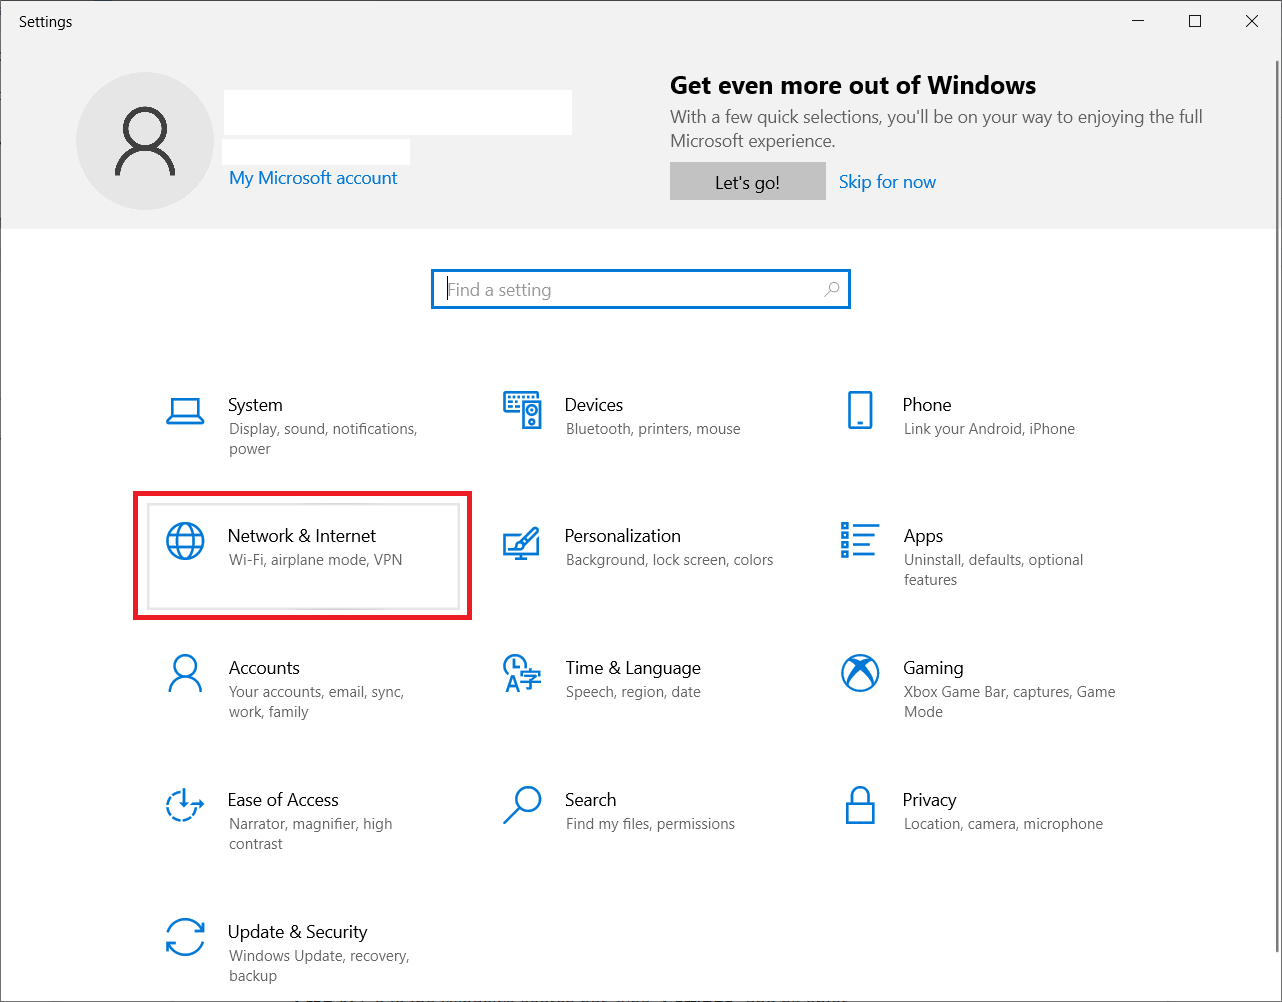
1: Go to the Windows search bar, type “Settings,” and hit enter.
2: Open ‘Network & Internet.’
3: Navigate down and click on ‘Network reset.’
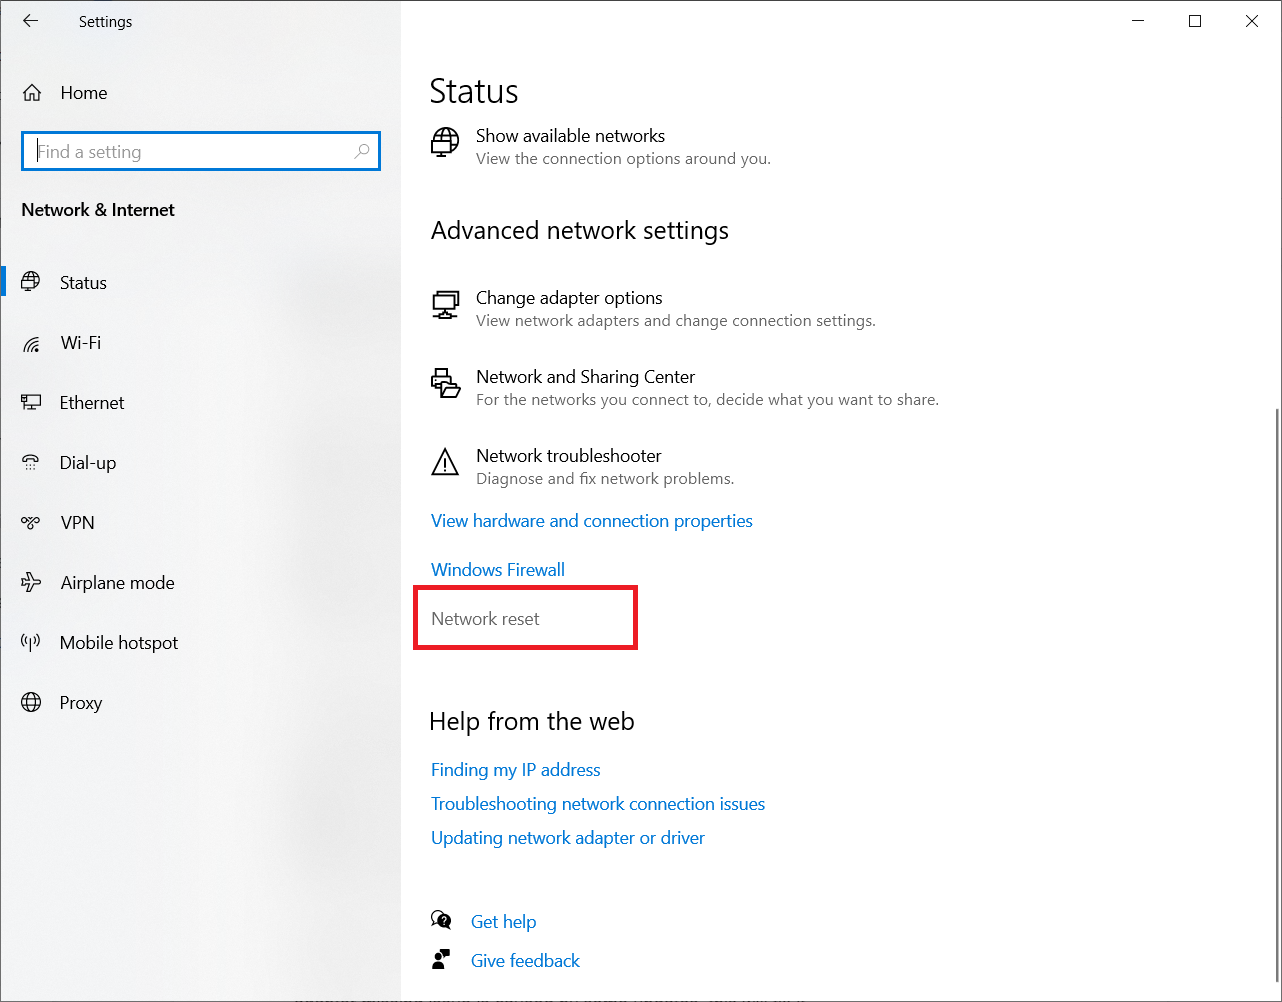
4: Now click on ‘Reset now’.
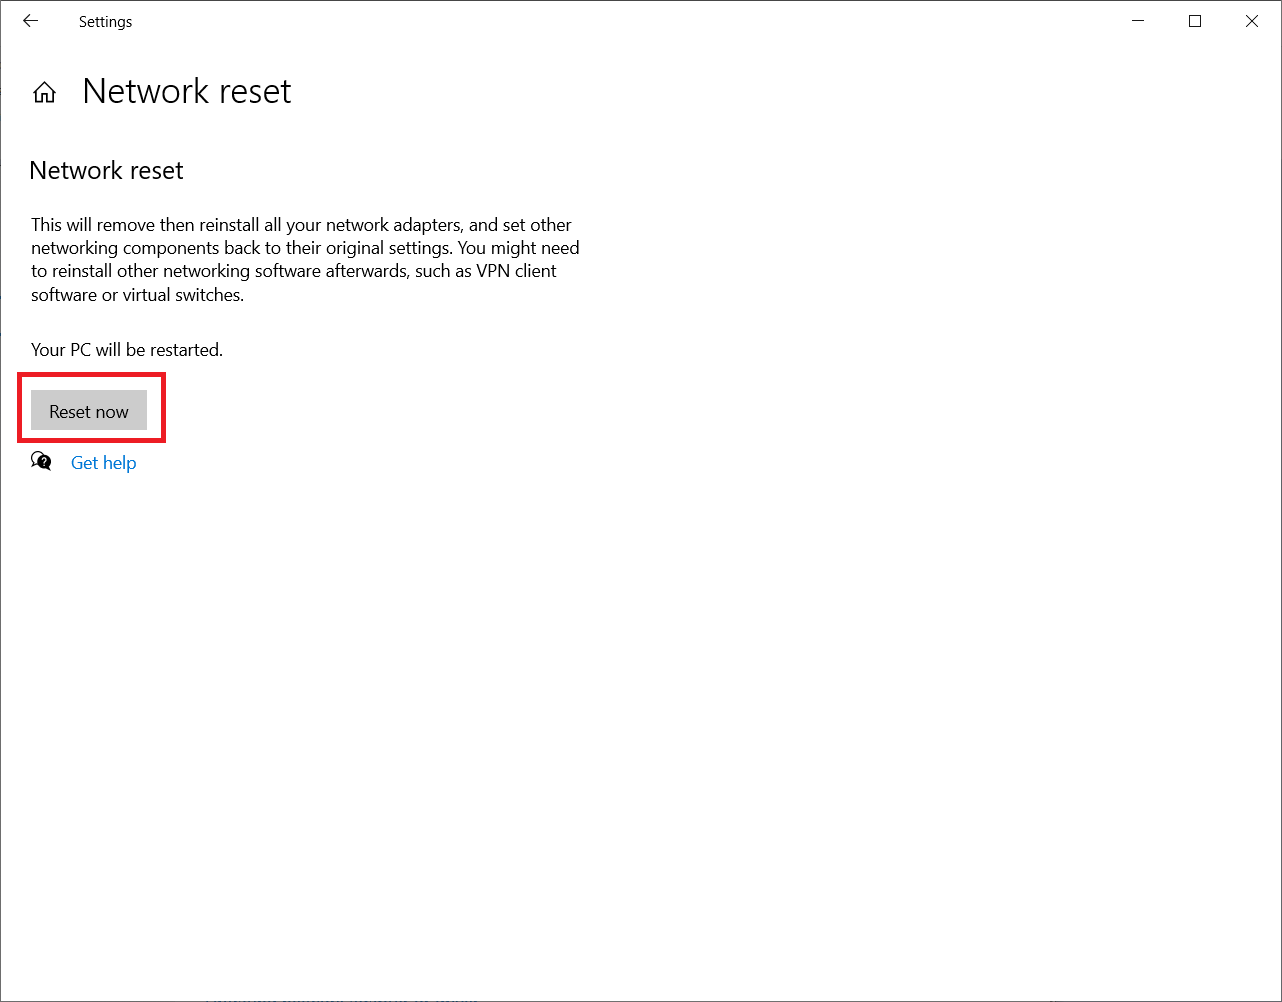
5: A confirmation pop-up window will appear; click on ‘Yes’ to confirm.
Let the process complete, and restart your computer, which will fix the wifi issue for you.
6. System Restore to Get back the WiFi Adapter
You can restore Windows to an earlier date by performing a system restore. If there is any restore point when your WiFi was working as usual, then you can restore Windows to that date; this will revert the system changes made after that date.
1: Press the ‘Windows+R’ keys together to open the Run box.
2: Type “rstrui.exe” and hit enter.

3: The System Restore wizard will now open; click on Next.
4: Select a restore point when your network adapter was working fine. Click on Next.
Complete the process, and this will restore your system when the WiFi adapter was fine. Just restart your computer, and this issue should be gone.
7. Download and Install WiFi Drivers
If this issue is caused by a driver malfunction, then you will have to reinstall the drivers. For this, you need access to another computer which has internet access. Once you have a computer with internet access, follow these steps:
1: Open the browser.
2: Now, simply search for your computer’s drivers.
Just enter the name of your computer manufacturer followed by “drivers” and hit enter.
3: This works differently for different manufacturers. Some ask for the serial numbers, and some ask for models and series.
The main goal here is to download the latest wireless drivers for your Windows 10 PC.
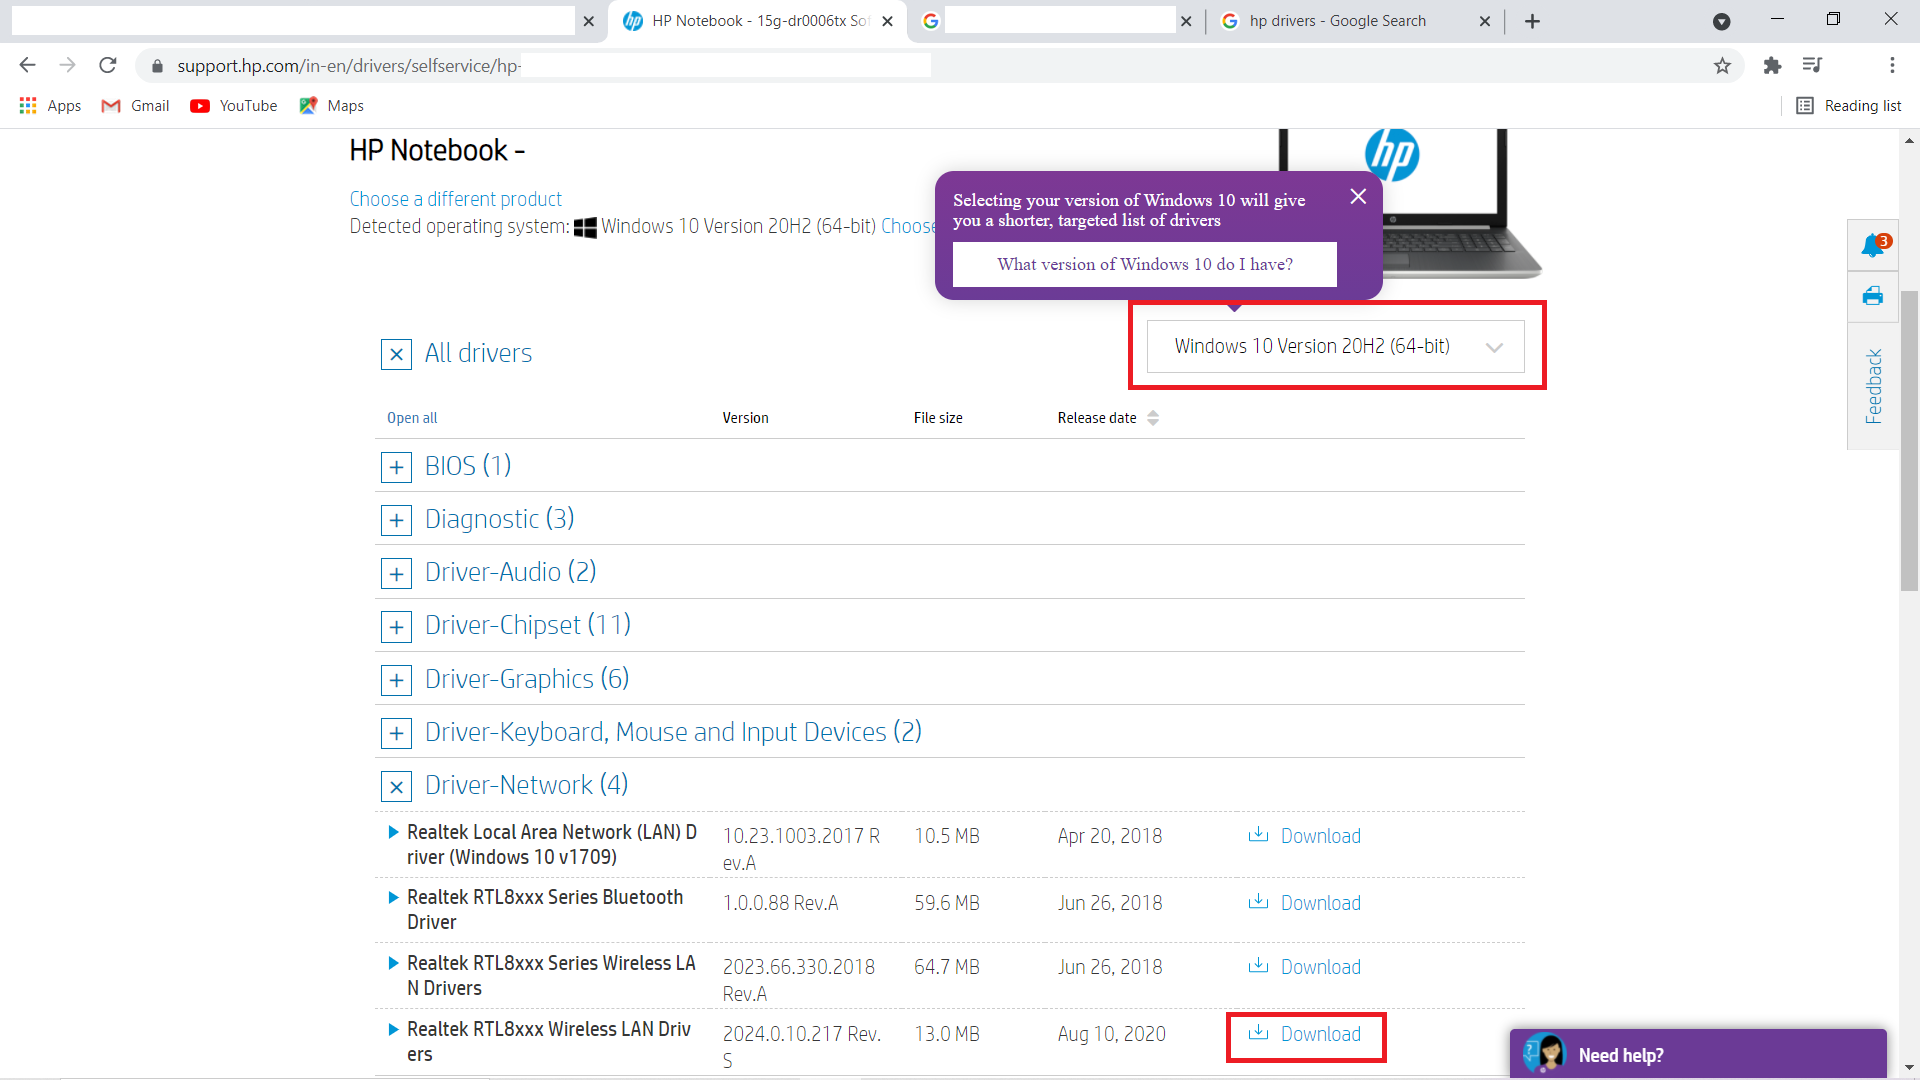
Here are the websites from where you can download the drivers for major computer manufacturers:
| Manufacturer | Site |
| Asus | Download Drivers |
| HP | Download Drivers |
| Dell | Download Drivers |
| Acer | Download Drivers |
| Lenovo | Download Drivers |
| MSI | Download Drivers |
4: Once you have downloaded the latest wireless drivers for your computer, simply transfer it to the affected computer, install them, and restart your computer.
That’s It!
Closing Phrase
The wireless adapter may go missing due to failed updates or any other reasons; you can simply re-enable it to get it working. All of the above methods are tried and tested. Apply these methods one by one, and it should fix the issue. Now, you will get the WiFi adapter back.
Also, Read:
- How To Fix WiFi Keeps Disconnecting on Android SmartPhone
- Steps To Fix Can’t Connect To This Network On Windows 10 Error
- Fix WiFi Keeps Disconnecting On Windows 10
- WiFi Connected But No Internet Access On Windows 10 [Solved]
WiFi Adapter Missing in Windows 10 /11 FAQs
First, you need to find if the WiFi adapter is hidden; if yes, you can scan for hardware changes. Otherwise, proceed with a network reset, check Wi-Fi services, fix the socket API error, reinstall the Wi-Fi driver, or lastly, you can do the system restore. Follow all the methods given above.
There could be multiple reasons why your network adapter disappeared, such as –
1. Windows updates
2. Malware
3. Conflict between drivers
4. Failed driver updates
5. Accidentally uninstalled the wifi adapter
6. Improper shutdown.
Follow the given methods; if those don’t work, try to download the wifi driver on a working computer. Now, transfer the driver to the affected PC and install the driver. Now, you need to restart the PC. Also, check the network-related Windows services and make sure they are enabled.
Power Flush – It is a process to discharge all the capacitors of your motherboard. To perform the power flush, follow the below process-
1. If you have a desktop PC – Shutdown the PC, disconnect all the power, and remove the power cable from the wall outlet.
Now, press and hold the power button for 30 seconds to drain the static power from the PC. After that, connect the power cable and start the PC.
2. If you have a laptop, then shut it down and remove the battery. Now press and hold the power key for 30 seconds. After that, put the battery on and start the laptop.
3. If the laptop has a non-removable battery, then shut down, press and hold the power key for 30 seconds, and start it again. If that doesn’t work, discharge your laptop completely and do the power flush.
Power flush should help you to get back the missing Wi-Fi adapter.