You might encounter a network-related error where your WiFi is connected, but the Internet doesn’t work. This detailed guide will help you to fix the “WiFi Connected but no Internet Access” problem on Windows 10. If you have full network signals on the PC but can’t access the Internet, then you are connected to the router but not to the Internet. Ensure the Internet works on other devices; this way, you can find it is a problem with computers, not the Internet.
Before checking the instructions, you must find the root cause of the problem; it will educate you to avoid similar issues in the future.
Reasons Why WiFi Connected But No Internet Access
Here are some possible reasons you can’t access the Internet even if you are connected to the router.
- Any issue with the router itself can cause this problem on your computer.
- If you connect to public WiFi, you might face this issue.
- Incorrect DNS settings.
- Temp files build-up can also cause No internet access problem.
- Corrupt network adapter drivers.
- A corrupt Windows update.
- Invalid IP/DNS configuration.
- Socket API errors.
- VPN & Proxy server.
- Different types of malware.
There could also be some unknown problems; you will find methods to resolve all such issues.
Ways to Fix WiFi Connected But No Internet Problem
Depending on the situation, there could be different fixes for your Windows 10 PC. It would be best if you started with the simpler one.
1. Restart your Computer
An improper boot-up of a system can not only cause this issue but can cause additional problems, too. If you are facing any performance or UI-related experience, it is better to restart your computer before doing anything else.
So restart your computer and check.
2. Check The WiFi Router
You will get no internet access error if something is wrong with your router. In that case, try restarting your router. Also, make sure that your internet plan is active. Furthermore, use other devices and check if only a particular device has this problem.
If only your Windows computer has this issue, there is nothing wrong with the router. In that case, you can apply the methods below.
3. Check Proxy Settings And Reset the IP & DNS
Before we go on to reset the IP & DNS settings, you should check the proxy settings. An invalid proxy server can redirect you to the malicious URL or the local IP.
- Go to the Windows Search Bar, type “Control Panel,” and press enter.
- Here, click on Internet Options.
- Go to the ‘Connections’ tab and click on LAN settings.
- Here, check only the option reading “Automatically detect settings.” Uncheck any other options.
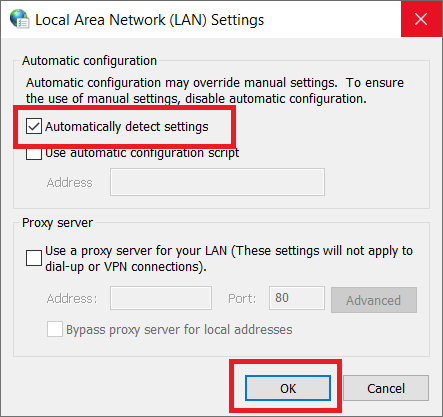
Click OK to save these settings, and try accessing the Internet. If it was a problem with the proxy server, then it should be fixed.
If not, proceed further to reset the IP and DNS settings.
1: Right-click on the WiFi icon in the taskbar. Then click on Open Network & Internet settings.
2: Now click on Network and Sharing Center.

3: Click on your network connection from the ‘Connections.’
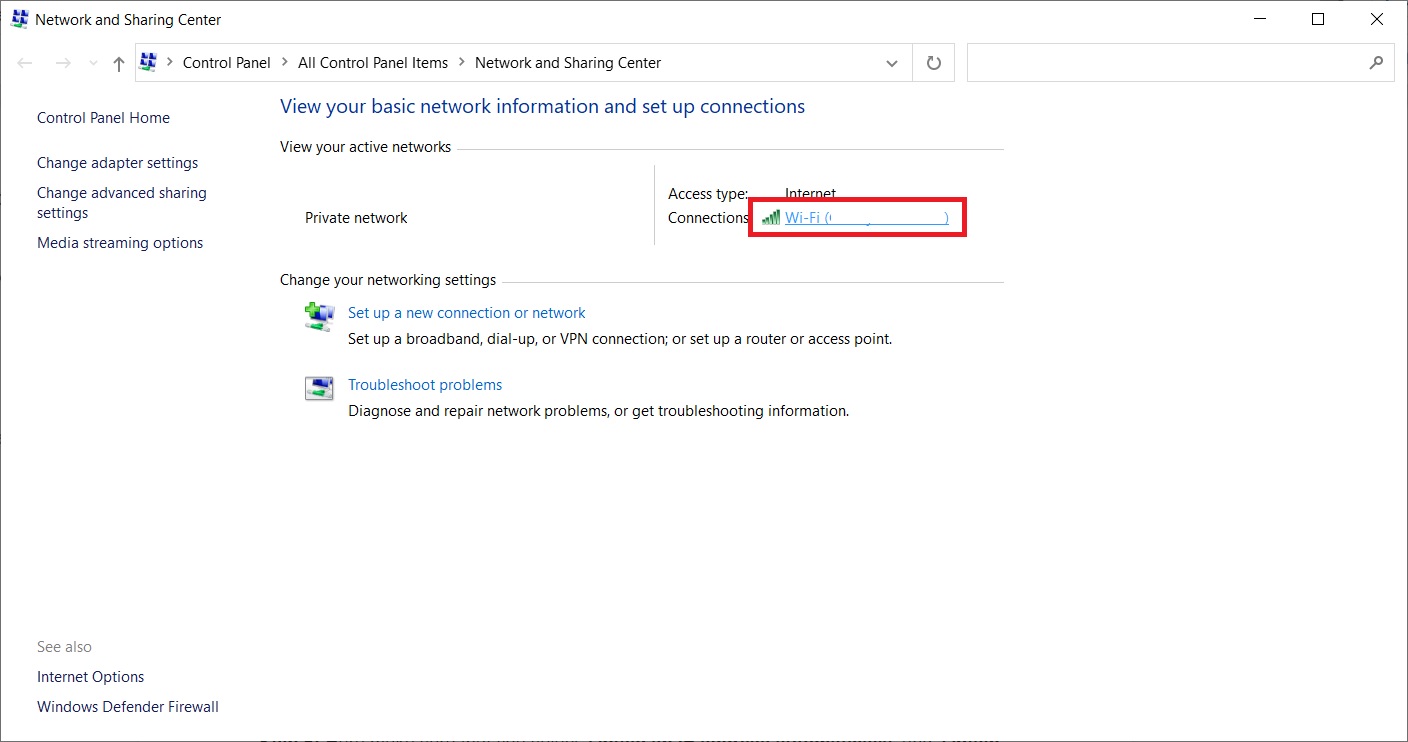
4: Here, click on ‘Properties.’
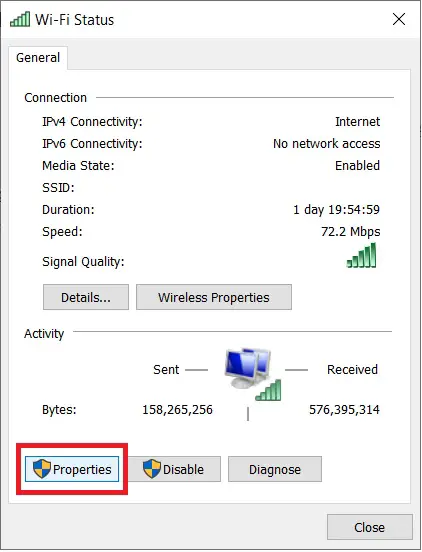
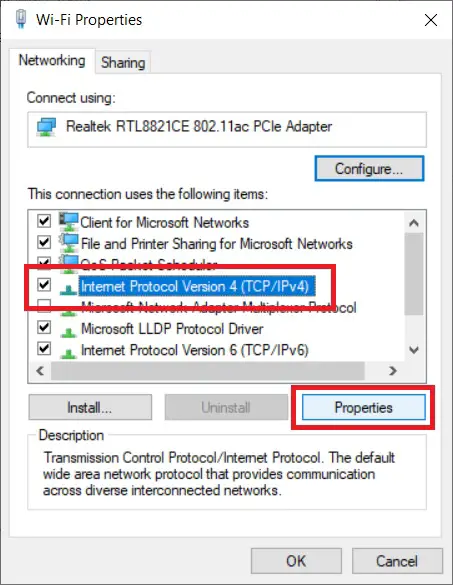
5: Select ‘Internet Protocol Version 4 (TCP/IPv4)’ and click on ‘Properties.’
6: Ensure you select ‘Obtain an IP address automatically and ‘Obtain DNS server address automatically.
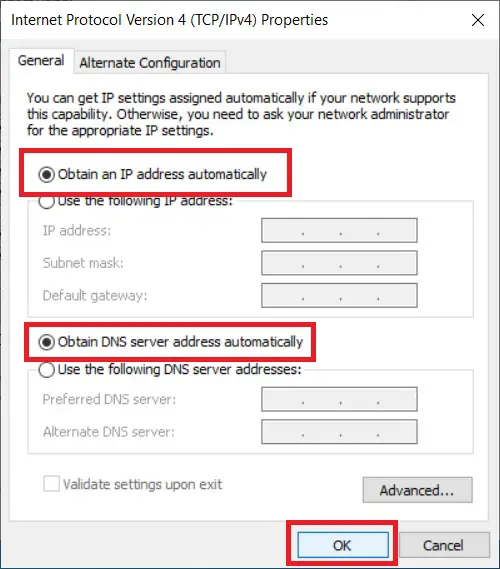
Click on OK on every dialog box to save the settings. Now check if you can browse the Internet or not. If not, follow the next.
4. Run The Network Troubleshooter
Running the troubleshooter is a good choice if you do not know what is wrong. The troubleshooter will automatically search for any faults and suggest you apply the possible fixes.
Here is how to run the Network Troubleshooter:
- Right-click on the WiFi icon in the taskbar. Then click on ‘Open Network & Internet settings. Also, you can open the Settings app and then go to the Network & Internet option.
- Navigate down and click on ‘Network troubleshooter.’

Now, let the troubleshooter run; it will try to detect any problems, and you will be asked to apply the fix. This should fix the WiFi connected but no internet problem.
5. Perform Network Reset
You can perform a network reset if the above method doesn’t work for you. Note that this will erase all your saved network settings, and you must provide the WiFi password again to join the network.
Here is how you can do it:
- Go to the Windows Search Bar, type “Settings,” and press enter.
- Here, select ‘Network & Internet.
- Navigate down, click ‘Network reset,’ and then click ‘Reset now.

Once you grant permission to reset, you will be asked to restart your computer after the process completes. Upon restarting, you can connect to your network, and you won’t face “WiFi connected but no Internet” issue anymore.
6. Fix Adapter Socket API Errors, Flush DNS & Renew the IP
There could be a problem with the network adapter, DNS cache, and IPv4. You can reset them all to fix the issue.
1: Go to the Windows Search bar, type “CMD,” and right-click to ‘Run as administrator.
2: Now type the following commands and hit enter one by one:
netsh winsock reset
netsh int ip reset
netsh int ip reset resetlog.txt
ipconfig /flushdns
ipconfig /release
ipconfig /renew
netsh int ipv4 reset resetlog.txt
The above commands will do the next task in order-
- Reset the network adapter.
- It will reset the IPV4
- Reset all the IP catalogs
- Remove the old DNS cache
- Release the old IP
- Renew the IP
- Reset IPV4 logs, similar to the 2nd command, but you can instruct to reset IPv4 logs.
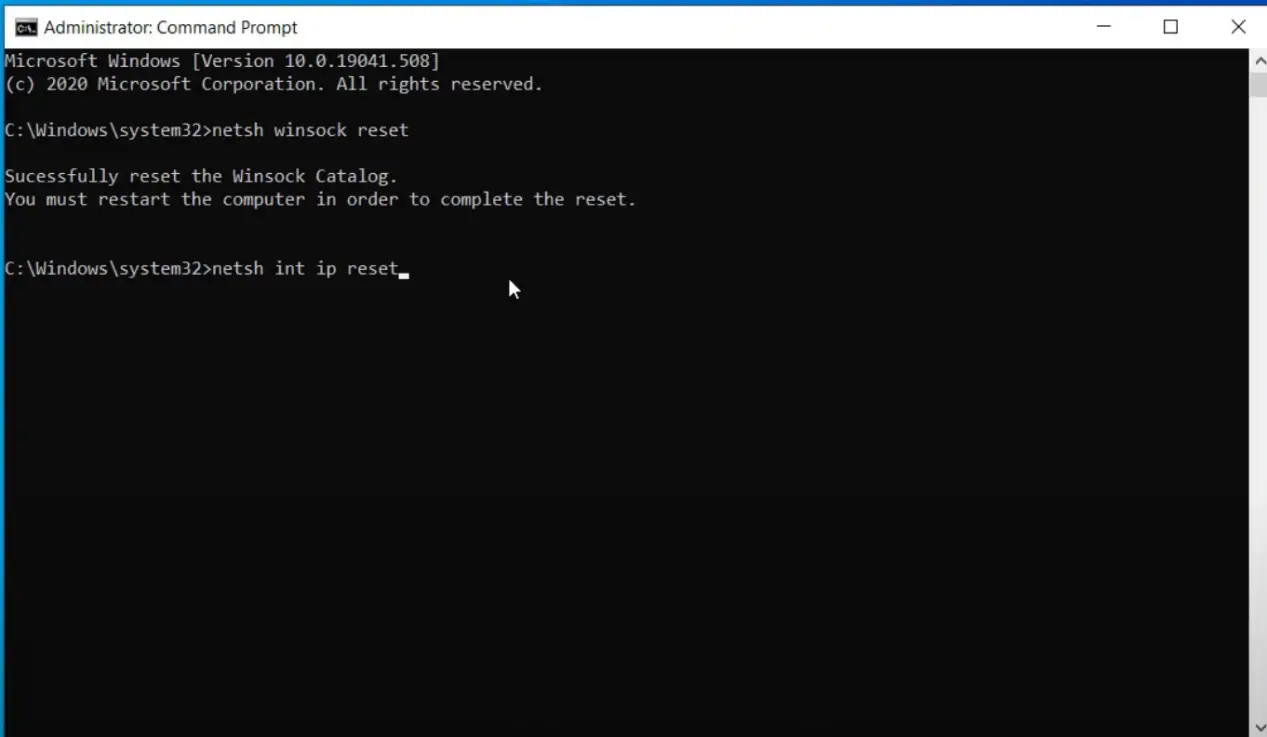
Once you run all the above commands, exit the command prompt and restart your Windows 10. This method will fix no internet access issue for you.
7. Update to the Latest WiFi/LAN Drivers
Using the latest drivers on your computer is very important for seamless performance. So make sure you use the latest network drivers as well.
1: Open the Windows Search bar, type “Device Manager,” and hit enter.
2: Double-click on ‘Network adapters’ to expand.
3: Select your network adapter. It could be Realtek, Broadcom, Atheros, Intel, etc.
4: Right-click on it and select ‘Update driver.
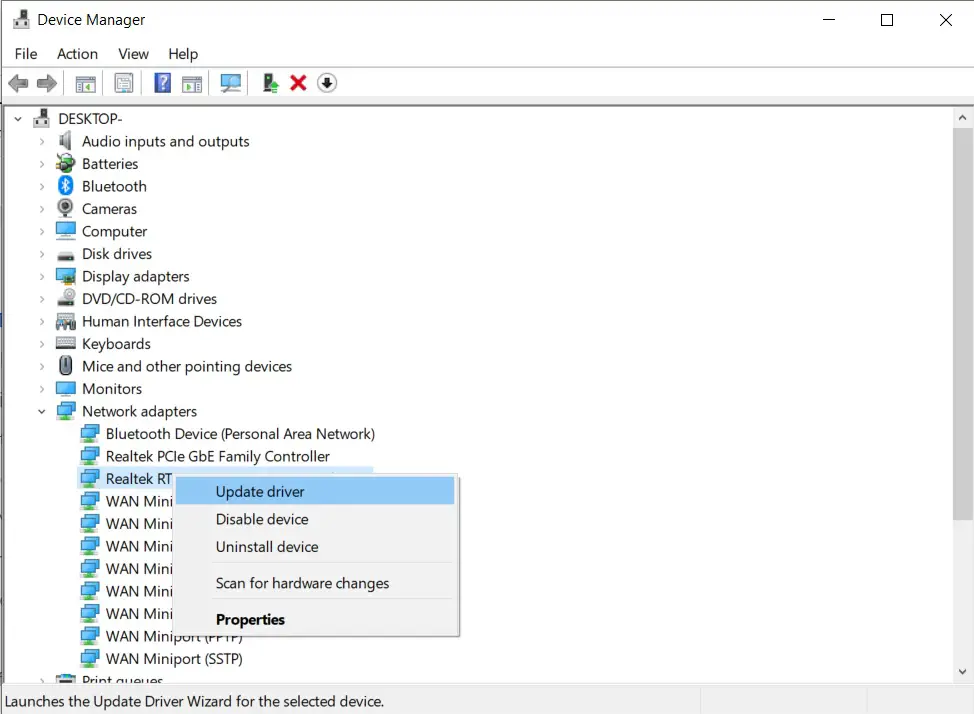
5: Select ‘Search automatically for drivers.’
6: The computer will search and update the drivers for you.
Complete the process and restart your computer. If the Internet is working in the background, this should update the driver.
8. Reinstalling the Network Driver
If the above method doesn’t work or shows “Best driver is already installed,” you can try reinstalling the network driver. Here is how:
1: Open the Windows Search bar, type “Device Manager,” and press enter.
2: Double-click on ‘Network adapters’ to expand.
3: Select your network adapter; it could be Realtek, Broadcom, Atheros, Intel, etc.
4: Right-click on it and select ‘Uninstall device.’
5: Finally, click on ‘Uninstall’ and uncheck the box reading “Delete the driver software for this device.”
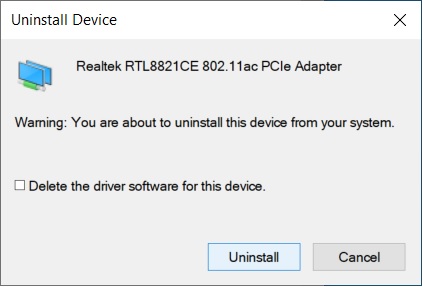
Let the process complete, and after that, restart your computer and check if the problem is solved or not.
If not, repeat the above process, and this time, check the box “Delete the driver software for this device” and uninstall.
Restart the Windows and check.
9. Download and Install the Latest Drivers from the Manufacturer’s Website
You will have to reinstall the driver if a driver malfunction causes this issue. For this, you need access to another computer which has internet access. Once you have a computer with internet access, follow these steps:
1: Open the browser.
2: Now, search for your computer’s drivers.
Just enter the name of your computer manufacturer followed by “drivers” and hit enter.
3: This works differently for different manufacturers; some ask for serial numbers, and some ask for models and series.
The main goal here is to download the latest wireless drivers for your computer.
Here are the websites from where you can download the drivers for major computer manufacturers:
| Manufacturer | Site |
| Asus | Download Drivers |
| HP | Download Drivers |
| Dell | Download Drivers |
| Acer | Download Drivers |
| Lenovo | Download Drivers |
| MSI | Download Drivers |
4: Once you have downloaded the driver, transfer it to the affected PC and install it. Restart your PC and check.
10. Do Not Use Public WiFi
Public Wi-Fi has a terrible reputation and lives up to it most times. So, if you are using public WiFi and getting this error, I suggest you disconnect from that network and use your personal network.
11. Uninstall McAfee Antivirus & Third Party Firewalls
If you have McAfee antivirus and firewall installed, try to disable it temporarily; this could fix the problem if the antivirus is blocking the connection. There could be other third-party antivirus or firewalls like –
- Comodo firewall
- Spyware doctor
Generally, manufacturers supply McAfee antivirus with their laptops. For many users, simply uninstalling the antivirus has resolved this issue. The pre-loaded antivirus hinders the performance of the PC. So it is better to uninstall it for good and find better alternatives.
Hopefully, this will fix the no-internet access issue for you. After this, you will be able to use your WiFi seamlessly.
Check the WiFi Bands
Generally, we use a 2.4 GHz or 5 GHz WiFi channel to connect our devices. Modern routers have both frequencies enabled. Some older devices aren’t compatible with the 5 GHz band; you can switch the WiFi channel to 2.4 GHz if you are unable to connect with the 5 GHz WiFi band.
Also, you can log in to the router’s interface and change the channel. An overlapping WiFi channel will create problems and hinder the WiFi connection.
Closing Phrase
WiFi may act weird anytime. There could be different reasons behind it. Now you know about various reasons and ways to fix WiFi connected but no internet access problem. All of the methods are tested and verified. I hope this guide helps you resolve your WiFi connection issue. If you need any help, feel free to contact us.
Also, Read:
- How To Fix Wireless Adapter Missing In Windows 10
- Fix This Site Can’t Be Reached Error On Windows 10/8.1
- How to Fix Some Websites Not Loading or Opening in any Browser
Faqs About WiFi is Connected, But There is No Internet
Try to check if there is any problem with the ISP; if not, you can follow these tips to fix all Wi-Fi problems with Windows 10.
It could happen for several reasons: check the proxy server, reset the network, update the network driver, and follow all the above methods; it should fix the problem.
Open cmd as admin, type “netsh winsock reset,” and press enter to reset the socket catalog. Now open Settings > Network & Internet and select Network reset > Reset Now. Click “Yes” to confirm. Now restart the PC.
There are two ways to re-install the WiFi drivers.
1. Open the Device Manager and look for your WiFi driver in the Network Section.
Right-click on it and then hit Uninstall; now restart the PC, and it will automatically install the driver.
2. Go to the manufacturer’s website and search for the WiFi driver for your laptop, download, and install it.

