Sometimes, when you connect with a wireless network on your Windows 10 PC, the WiFi keeps disconnecting at irregular intervals. It doesn’t matter if you connect it again & again or even restart the PC or router. It keeps getting disconnected. This could be very annoying, especially when working online, streaming, or gaming.
If you are facing WiFi connectivity issues on your PC, then in this article, you will find some ways to fix the frequent WiFi disconnection problem with your Windows 10.
Why WiFi Disconnects Randomly?
There could be numerous reasons behind the problem, these are some common factors-
- Faulty network adapter drivers.
- Windows 10 power management can also cause WiFi trouble.
- Invalid DNS settings.
- Windows Network Services aren’t running.
- Third-party antivirus or Firewall
- WiFi Sense
- Network switching between 2.4 and 5 GHz Channel.
Ways to Fix When WiFi Keeps Getting Disconnected
Depending on the problem with your PC, there could be a number of solutions; you need to start with basic troubleshooting and look into different areas of the PC.
Let’s start with basic-
1. Change The Network Profile
Windows 10 might automatically disconnect you from WiFi if it is Public and unsafe. In that case, changing your network profile is definitely a way to go. Here is how you can do it:
1: From the Windows taskbar, click on the WiFi icon on the right side.
2: Click on the ‘Properties’ of your connected WiFi.
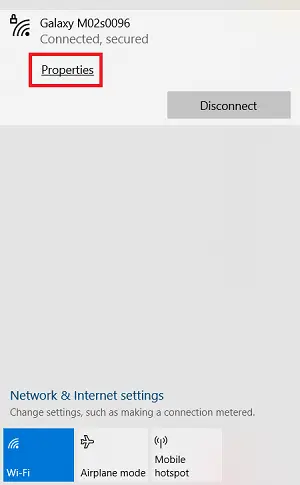
3: Under the ‘Network profile’, select the ‘Private’ option.
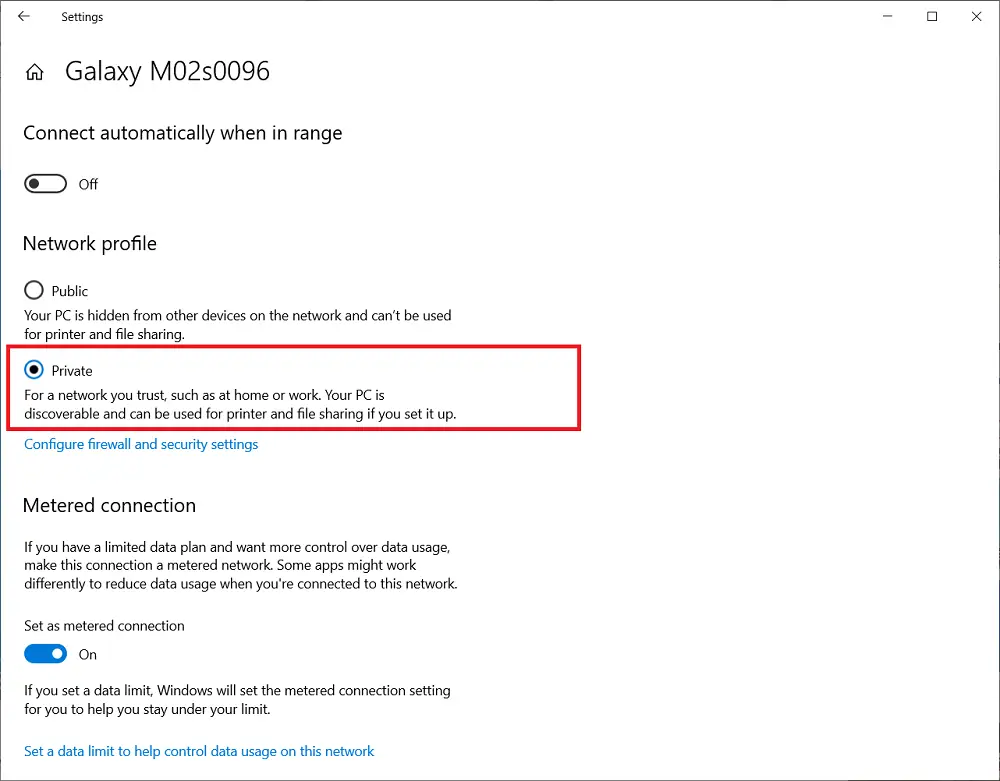
That’s it. This should fix the problem for you. If not, move on to the next fix.
2. Try Disabling Power Saving for WiFi
The Power Saving tool is known to cause some problems with the proper functioning of the WiFi. So it is just better to disable it for good. Here is how you can do it:
1: Go to the Windows 10 Search bar, type “Device Manager” and hit enter.
2: Double-click on the Network adapters to expand them.
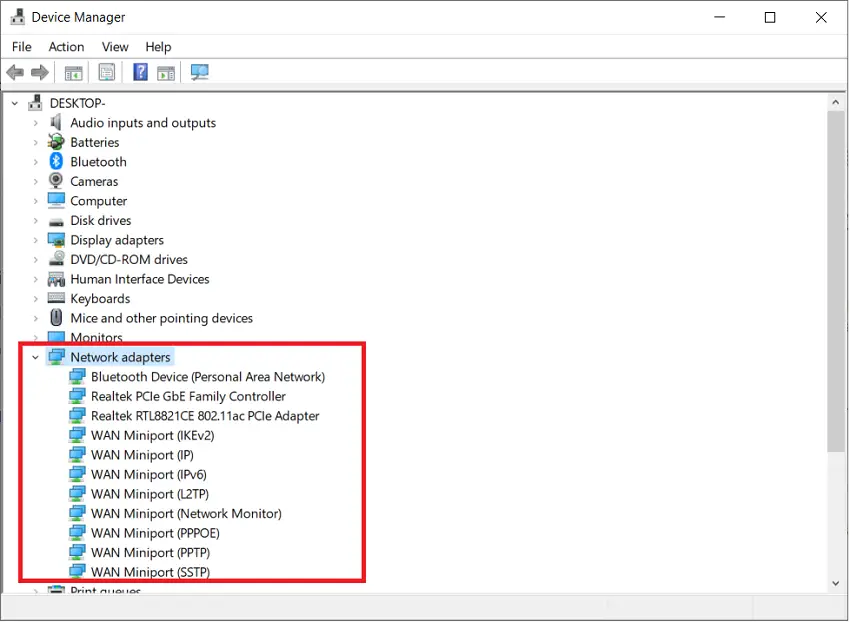
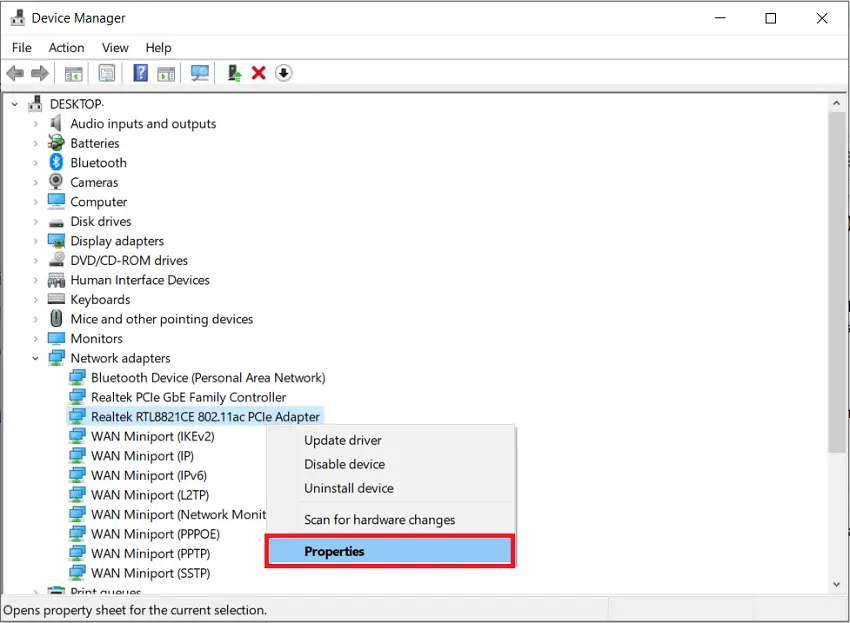
3: Right-click on your network adapter and click on ‘Properties.’ The network adapter could be Realtek, Atheros, Intel, Broadcom, etc.
4: Now click on the ‘Power Management’ tab.
5: Here, uncheck the box reading “Allow the computer to turn off this device to save power.”
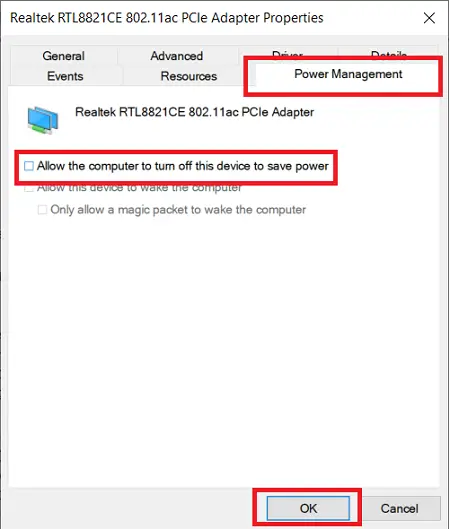
6: Click on OK to save the changes.
Now restart your computer and check if the issue is fixed or not. If not, move to the next solution.
3. Change Power Plan Settings For WiFi
This is another approach to allow the WiFi adapter to use power when it is working. Sometimes, power-saver plans may disconnect the WiFi to save the battery power; you can enable the Max-Performance for WiFi to eliminate frequent disconnection.
Here is how to do it:
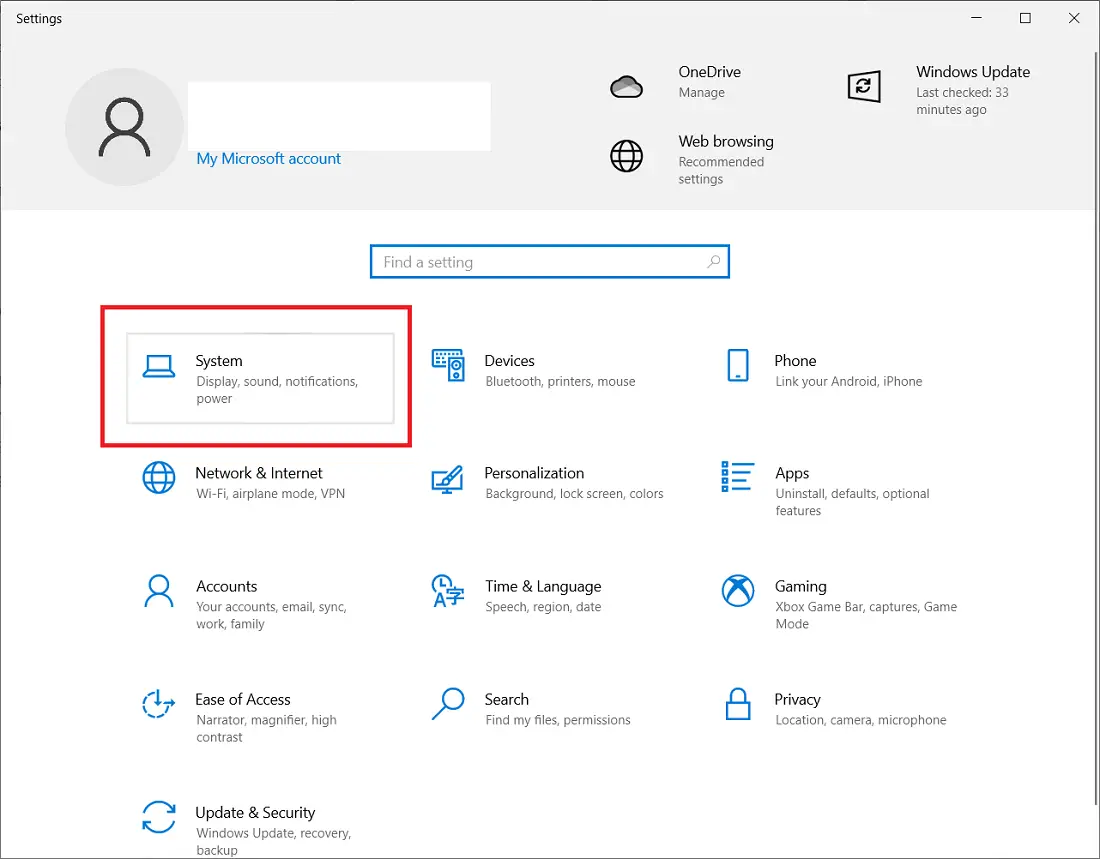
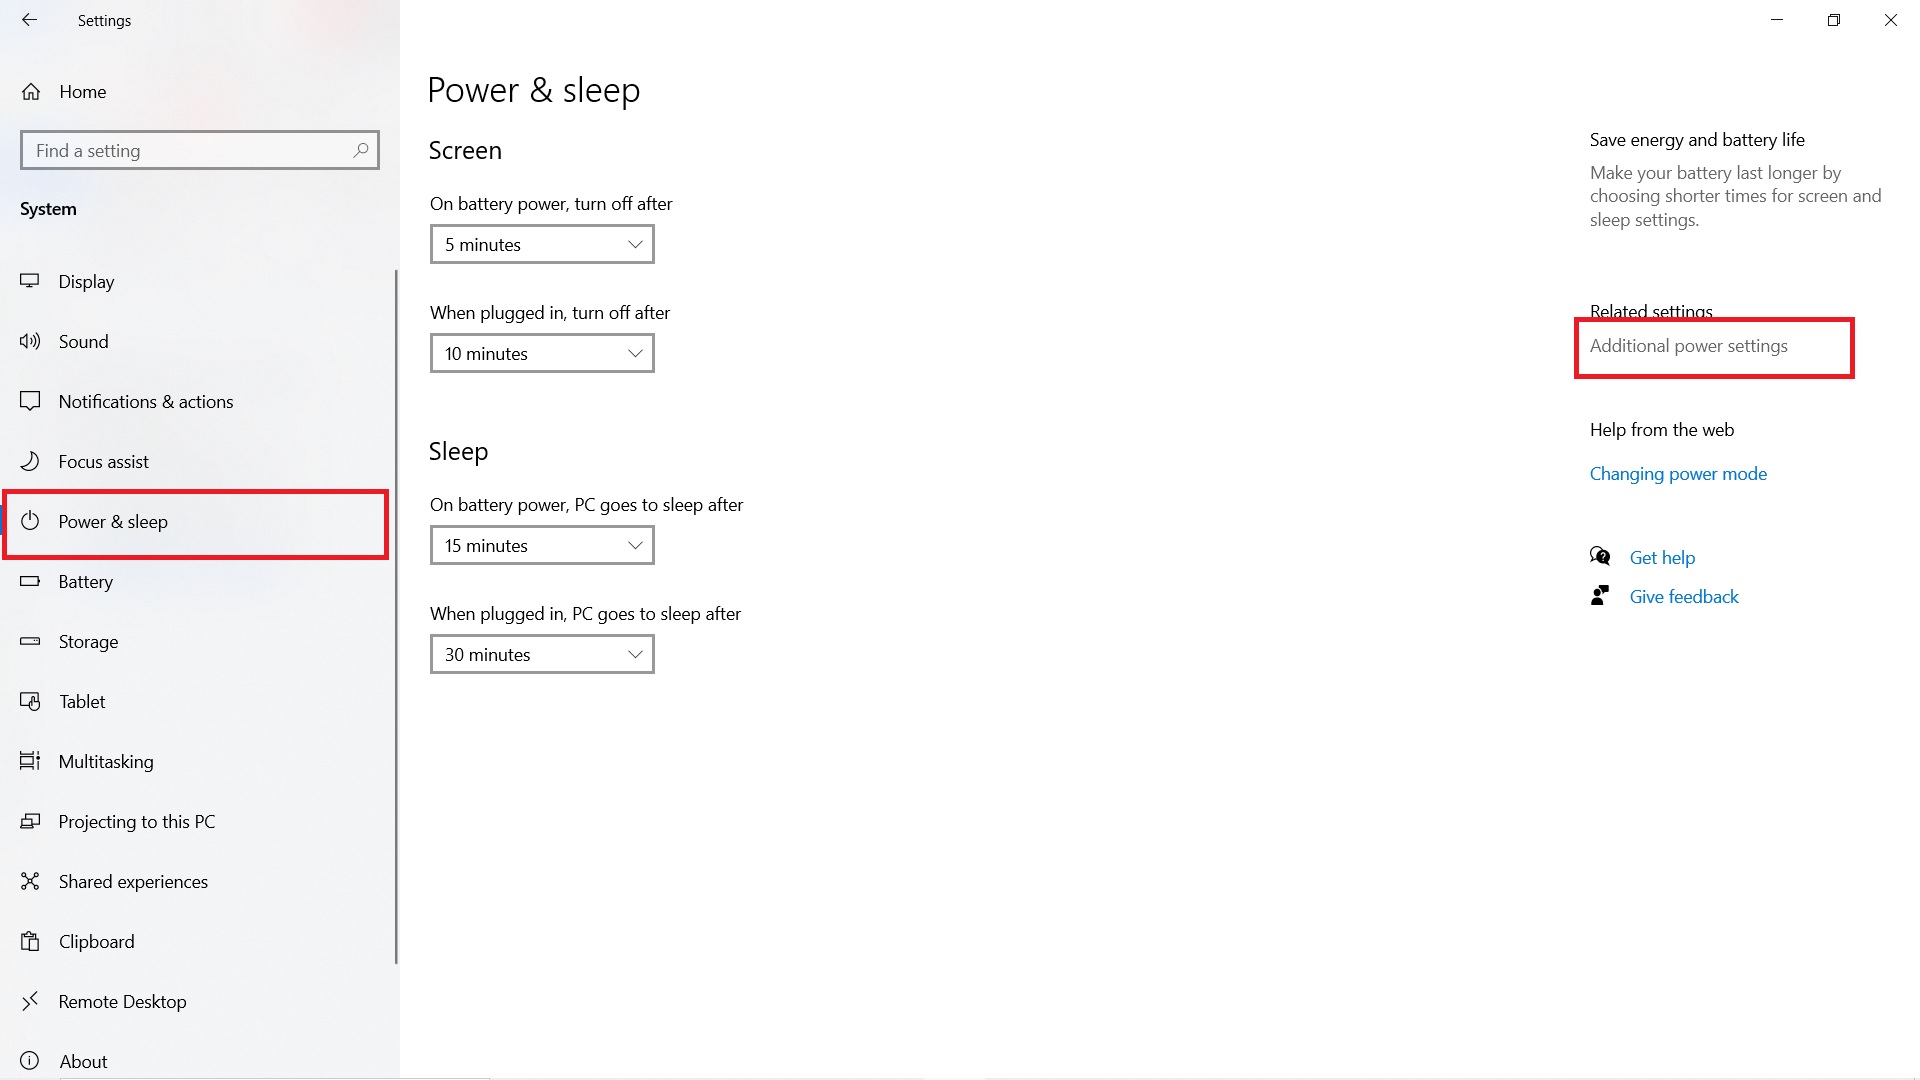
1: Go to Windows 10 Search Bar, type “Settings” and hit enter.
2: Now click on ‘System’ settings.
3: From the left menu, click ‘Power & sleep.’
4: Now click on Additional power settings on the right side.
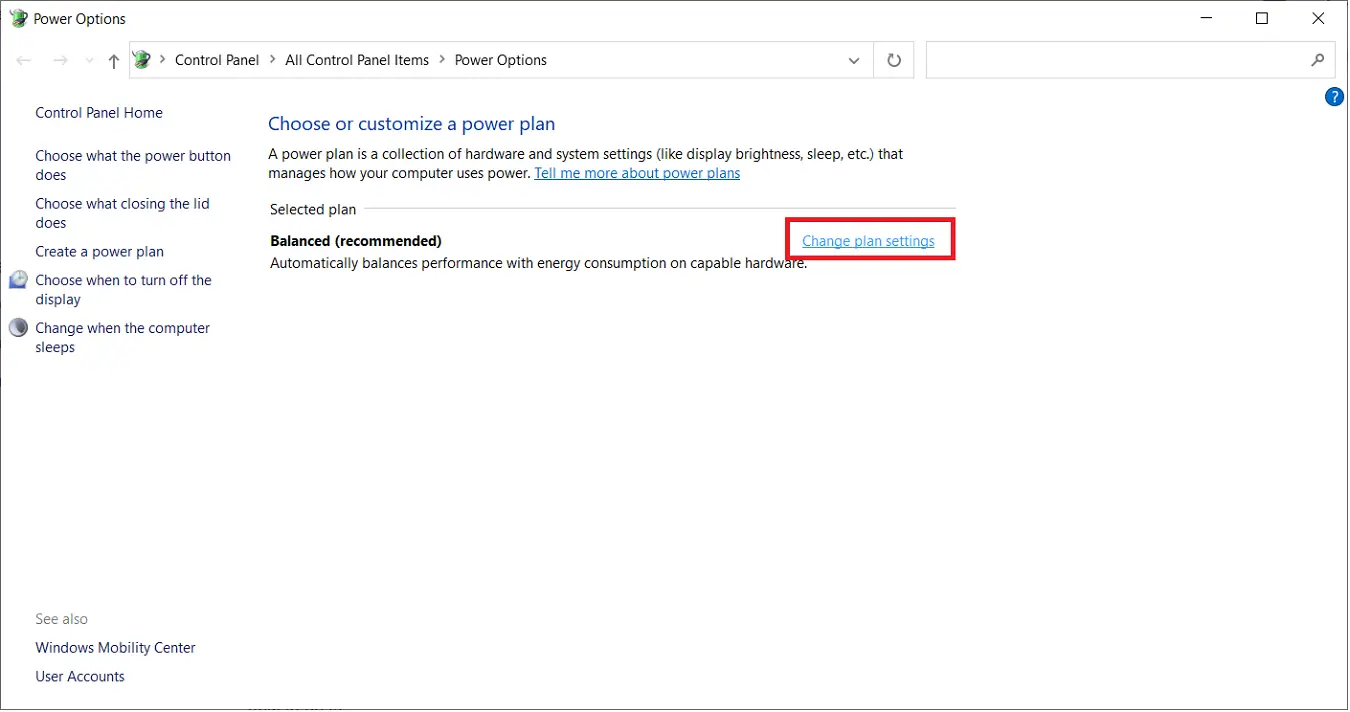
5: Whatever power plan is selected, click on ‘Change plan settings.
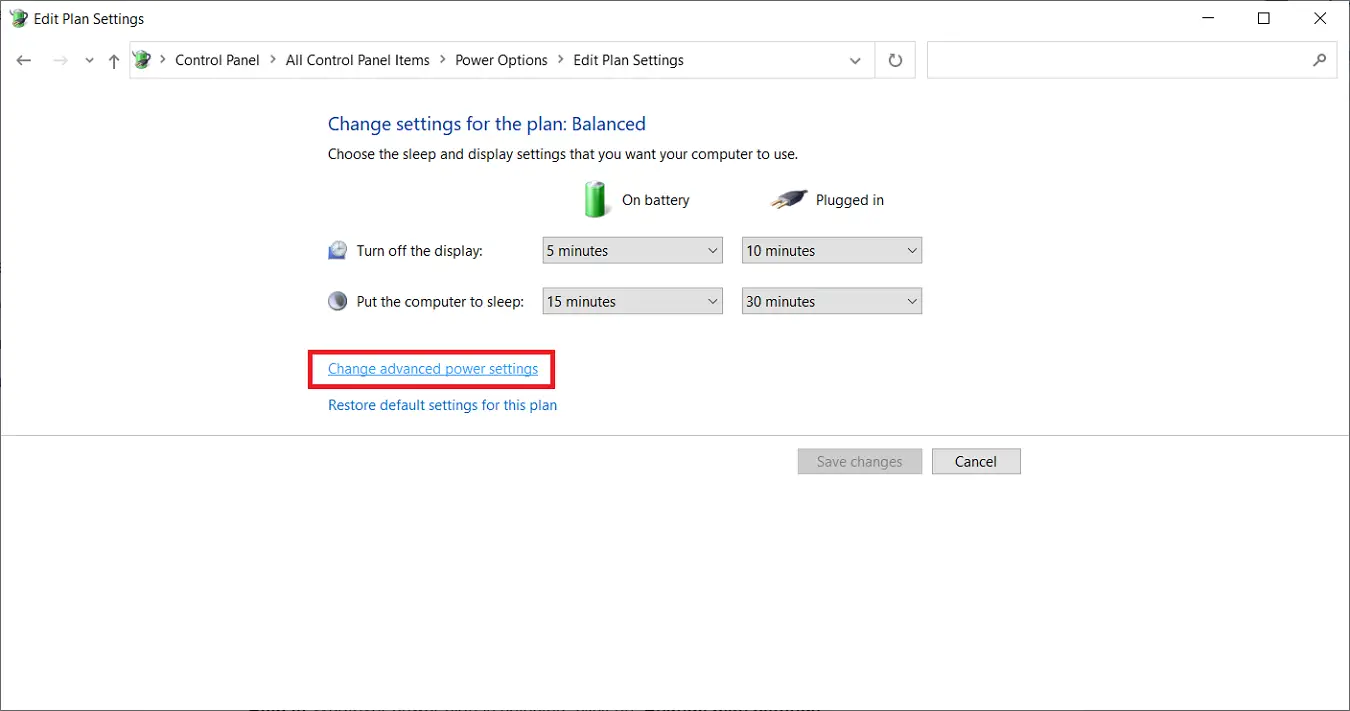
6: Now click on ‘Change advanced power settings.’
7: Click on Wireless Adapter Settings and then Power Saving Mode to expand it.
8: Select ‘Maximum Performance’ from the drop-down menu for both ‘On battery’ and ‘Plugged in’ options.
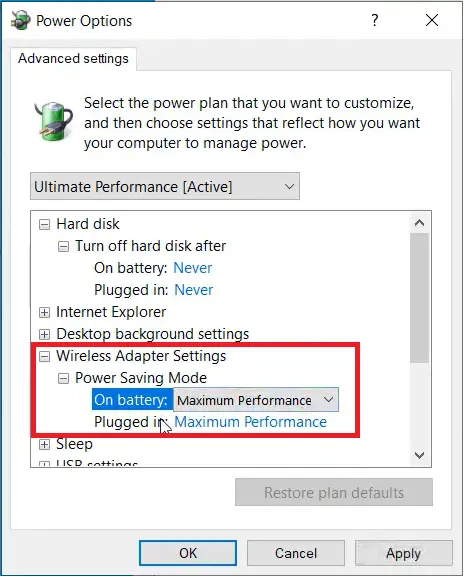
9. Click on Apply and OK.
That’s it; restart your computer and check if the WiFi is working properly.
4. Run The Network Troubleshooter
Windows inbuilt troubleshooter can help you find and fix the problems; you can use network troubleshooter.
1: Go to the Windows search bar, type “Settings,” and hit enter.
2: Open ‘Network & Internet’.
3: Click on the ‘Network Troubleshooter’ button.
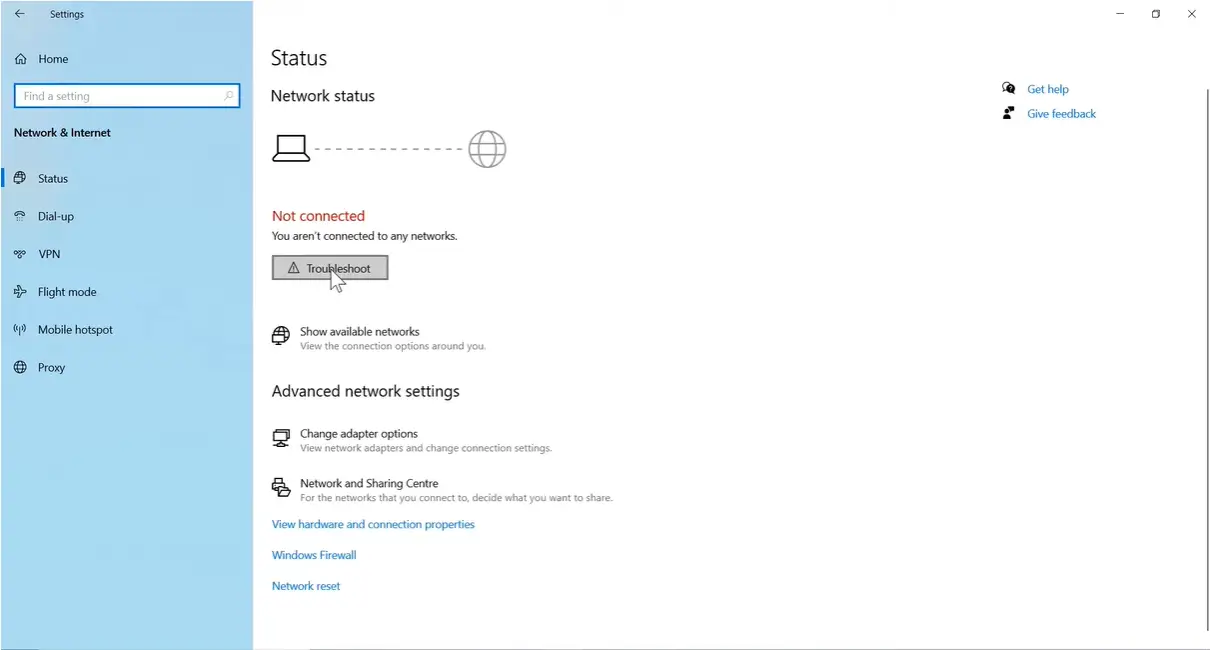
If it is not present there, navigate down, and you will find the option to troubleshoot network-related issues.
4: Run the troubleshooter.
Now, the troubleshooter will look for any potential problems. If it finds anything, you will get the option to fix it. You can apply the fix, and the issue will be solved for you.
5. Reset Network Sockets and Ports if WiFi Disconnecting Frequently
Network adapter and socket API-related corruption may lead to this issue. You can fully reset the network adapter sockets to get rid of this problem. Follow the steps below-
1: Go to the Windows Search Bar, type “cmd,” and right-click to Run as administrator. This will open the command prompt.
2: Type the following command and hit enter:
netsh winsock reset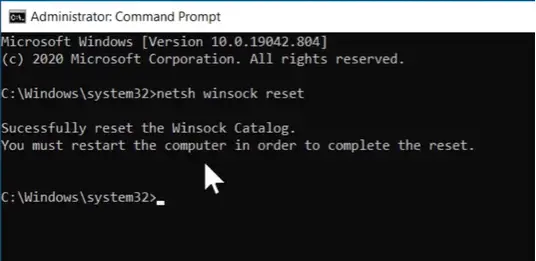
If there are any socket API errors, this command will resolve them. Just restart your PC and use it for some time to check if the issue is resolved.
If not, follow the next steps:
1: Go to the Windows Search Bar, type “cmd,” and right-click to Run as administrator.
2: Type the following command and hit enter:
netcfg -d You should see a message reading, “Successfully removed all MUX objects.”
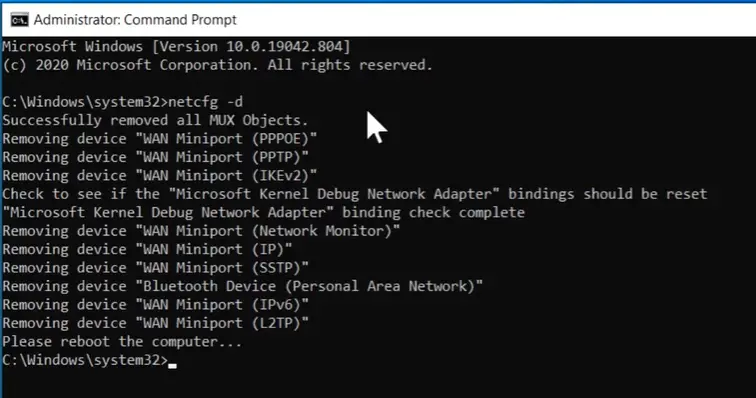
Now restart your computer. This will remove and reinstall all the network drivers, and you are good to go.
6. Using Google’s Public DNS
There may be a situation where WiFi is connected, but the Internet is still disconnecting then it may be due to a problem with your ISP’s DNS. In this case, you can try to use Google’s public DNS for better connectivity.
1: Go to the Windows search bar, type “Control Panel,” and hit enter.
2: Click on ‘Network and Sharing Center.
3: Here, click on your connection name.
4: Then, click on ‘Properties’.
5: Select ‘Internet Version Protocol 4(TCP/IPv4)’ and then click on Properties.
6: Click on ‘Use the following DNS server addresses.
7: Enter the following DNS addresses in ‘Preferred DNS server’ and ‘Alternative DNS server’ respectively:
8.8.8.8
8.8.4.4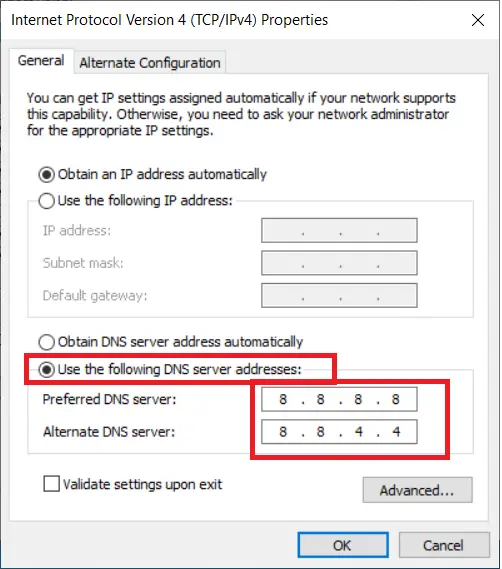
You can also use Cloudflare’s Lightning Fast DNS with the following addresses:
1.1.1.1
1.0.0.1
Step 8: Click on OK.
Finally, restart your computer and check.
7. Check WLAN Network Service
Any fault in the startup type of WLAN Network service will cause this error on your computer. Make sure that the service startup type is Automatic and it’s running while you are using WiFi. Here is how:
1: Go to the Windows search bar, type “Services,” and hit enter.
2: Navigate down, locate, and select the ‘WLAN AutoConfig’ service.
3: Right-click on it and click on ‘Properties’.
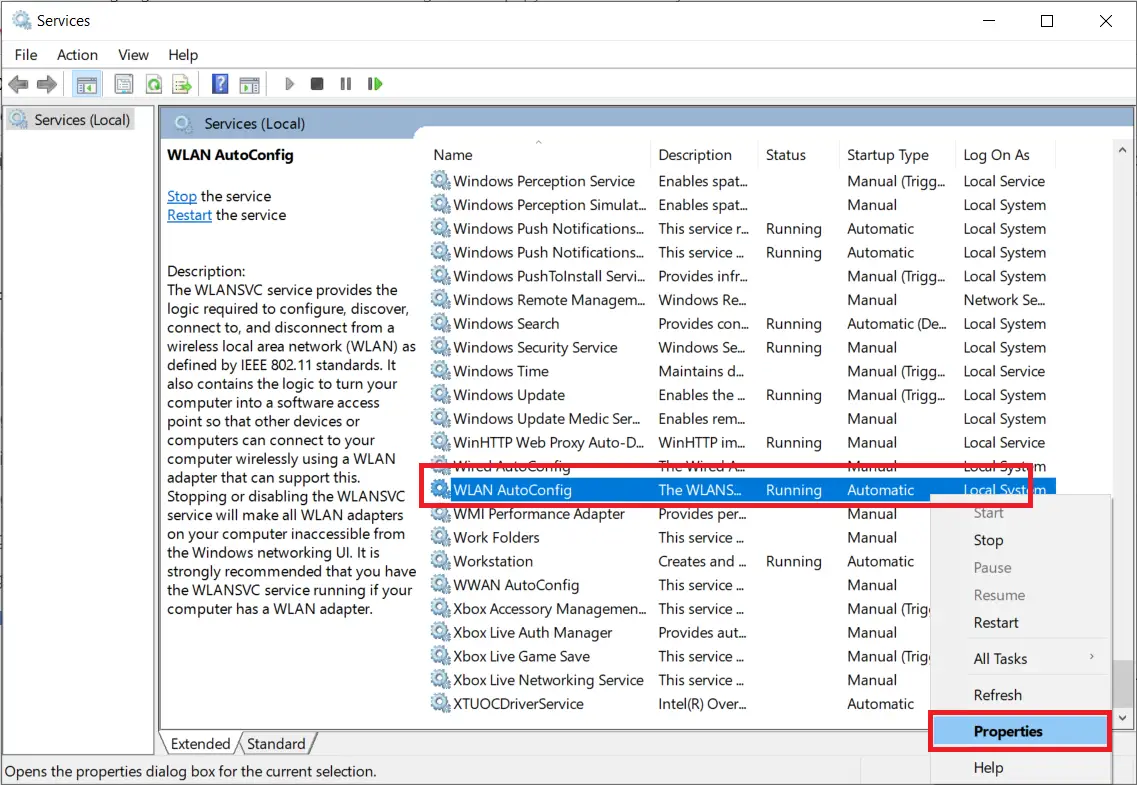
4: Make sure that the ‘Startup type’ is “Automatic.”
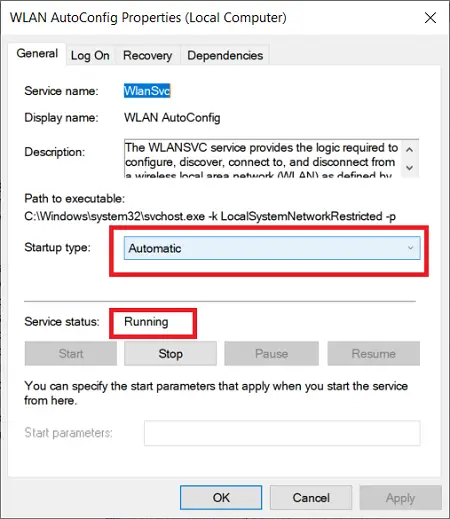
5: If the service isn’t running, click on ‘Start’ to run the service.
6: Apply the changes and click on OK.
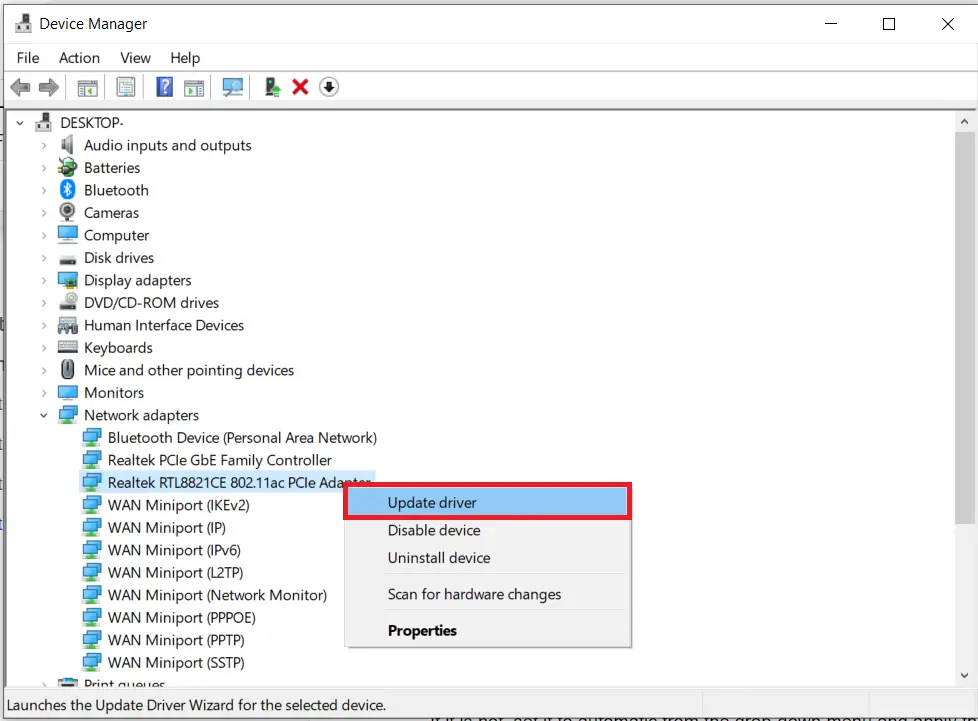
8. Updating the Network Driver
Updating the Network Driver to a newer version can fix the problem. Here is how you can update the network driver:
1: Open the Windows Search bar, type “Device Manager,” and hit enter.
2: Double-click on ‘Network adapters’ to expand.
3: Select your network adapter; it could be Realtek, Broadcom, etc.
4: Right-click on it and select ‘Update driver’.
5: Select ‘Search automatically for drivers.’
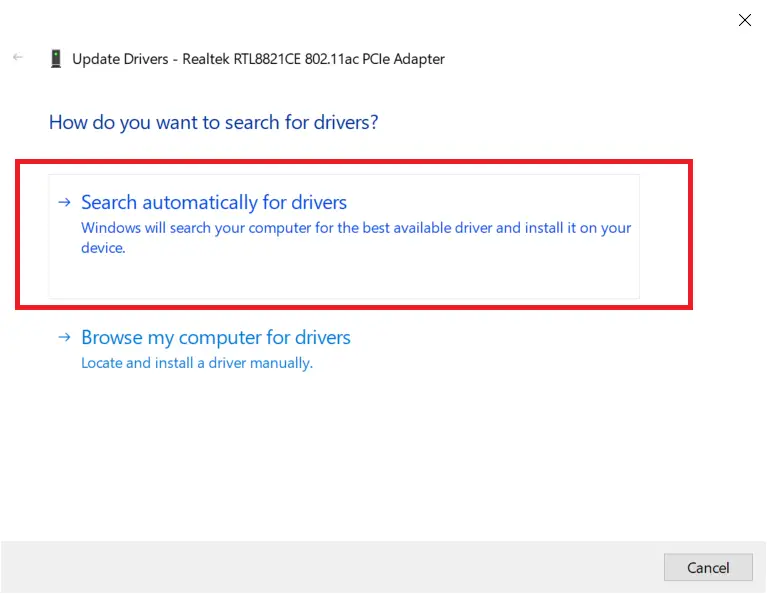
6: Now, the computer will search and update the drivers for you.
Complete the process and restart your computer. Check if it is fixed or if the WiFi is still disconnecting randomly. If yes, follow next.
9. Reinstalling the Network Driver
If the above method doesn’t work for you or shows “The best driver is already installed,” you can try reinstalling the network driver.
Here is how:
1: Open the Windows Search bar, type “Device Manager,” and hit enter.
2: Double-click on ‘Network adapters’ to expand.
3: Select your network adapter; it could be Realtek, Broadcom, etc.
4: Right-click on it and select ‘Uninstall device.’
5: Finally, check the box reading “Delete the driver software for this device” and click on Uninstall.
Let the process complete, and after that, restart your computer and check if the problem is solved or not.
10. Fresh Install the Network Drivers
If none of the above methods work out for you, then you have to install the network driver manually. For this, you will have to download the network drivers and then install them. Here is how:
1: Fire up a browser.
2: Now, simply search for your computer’s drivers.
Just enter the name of your computer manufacturer followed by “drivers” and hit enter.
3: This works differently for different manufacturers. Some ask for the serial numbers, and some ask for models and series.
The main goal here is to download the latest wireless drivers for your computer.
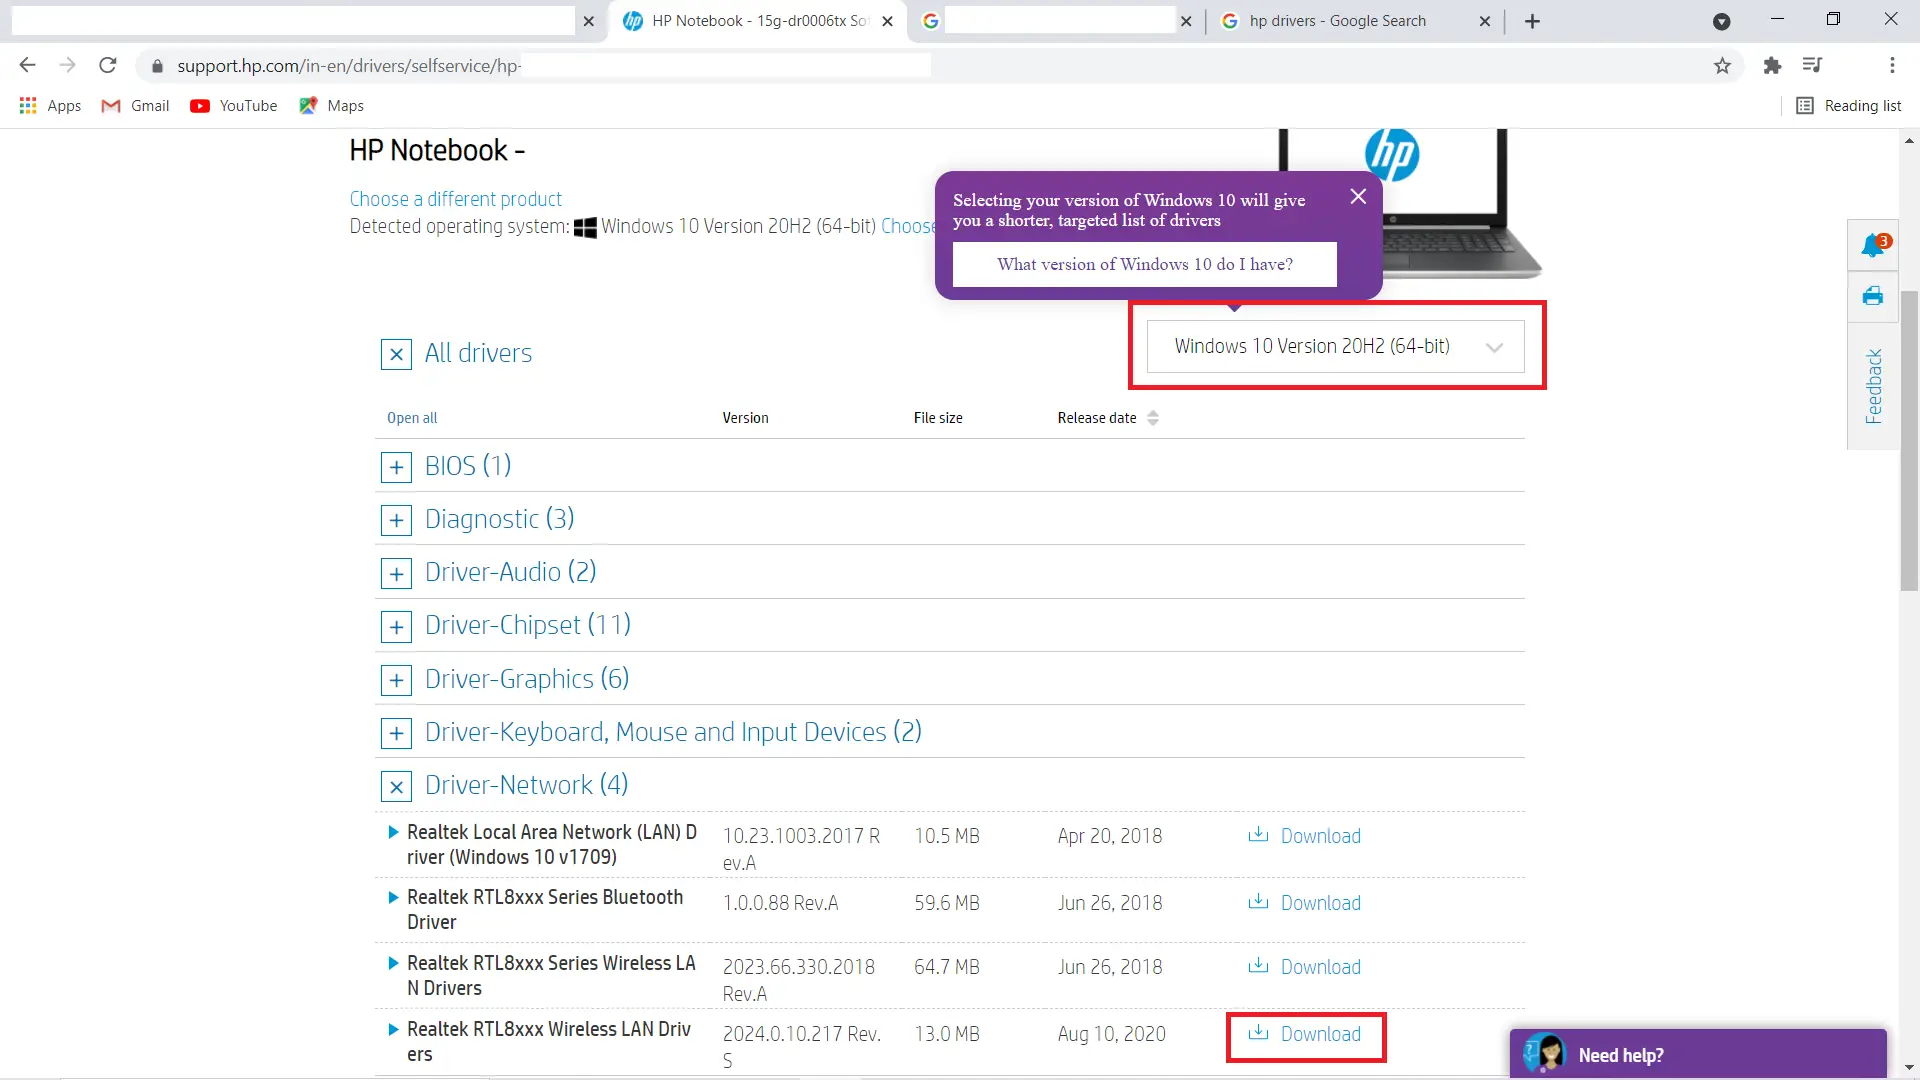
Here are the websites from where you can download the drivers for major computer manufacturers:
| Manufacturer | Site |
| Asus | Download Drivers |
| HP | Download Drivers |
| Dell | Download Drivers |
| Acer | Download Drivers |
| Lenovo | Download Drivers |
| MSI | Download Drivers |
Step 4: Once you have downloaded the latest wireless drivers for your computer, simply install them and restart your computer.
That’s It!
Another thing you should check is the connection strength, if the router is too far from the PC then signals may drop, try moving the router near to your PC.
No More WiFi Disconnecting Frequently
WiFi may frequently disconnects without a particular reason, you have to find and fix the root cause. If you are unsure, then follow the above methods.
These were some of the methods to fix the WiFi keeps disconnecting issue on your Windows 10 PC. I hope this guide helps you in fixing the problem. If you feel anything difficult, feel free to contact us.
Also, Read: