Overview– Read & write protection with the USB flash drive/pen drive is a common issue. In this article, you will find the reason behind disk protection and how you can remove write protection from the USB Disk using Cmd and Registry.
USB Flash drives or Pendrives are the easiest way to carry and transfer any type of data like images, documents, music, movies, etc from one computer to another. The higher capacity of flash drives is also used for data storage. Flash drives are handy in Windows Installation and specific troubleshooting.
However, sometimes you may get an error while transferring data from a computer to a USB flash drive: “The disk is write protected, remove the write protection or use another disk”.
Why Does Your Flash Drive Get Write Protect?
Some malware or software can affect the registry entries in Windows computers, or the system admin has put some restrictions on the ports, or your flash drive may be corrupt.
This error occurs when Write protection to your USB flash drive is enabled, and you cannot transfer any data to the flash drive and can’t delete data from the flash drive. However, you can copy data from the flash drive to your computer.
Write protection on flash drives is sometimes useful. Say you have some important data, then enable write protection and prevent accidental deletion or format. Also, it is not easy to delete data for a non-tech person.

So enabling and disabling write protection is a good idea to keep your data secure. Sometimes, different types of malware can enable write protection to the USB drives.
Remove Write Protection From USB Flash Drive Using CMD
Usually, people take Write protection as a problem since they cannot copy data to a flash drive, so this is a big issue. Many people throw away their flash drive, assuming that it is useless now. So here are simple steps by which you can disable write protection from a USB drive using the command prompt.
1. Insert your flash drive into the PC.
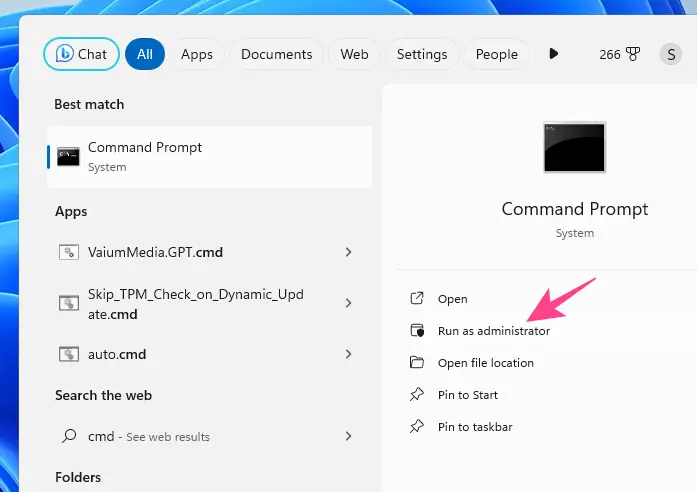
2. Go to Start and search for cmd, right-click on it, and “run as administrator“. For Windows 10, 11, and 8.1, press the Start button + X and select Command Prompt (Admin).
3. Once the command prompt opens, type diskpart and hit Enter. It will give you access to manage the disk partition.
4. Type list disk and hit Enter. It will show you all connected disks to your computer, like disk 0, disk 1, disk2, along with their storage capacity.
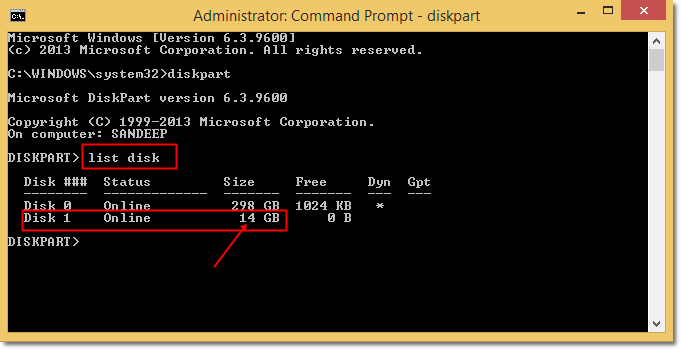
5. Find your flash drive by its storage capacity, like mine is 16 GB ( As per the Manufacturer), which is showing here 14 GB (Actual Size) as Disk 1, or remove all other external drives except your Flash Drive. Then you will get as above, and Disk 1 will be your Flash drive.
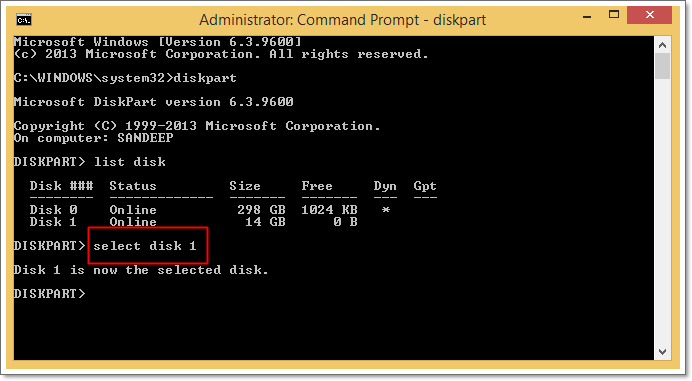
6. Now type Select Disk # (Select disk <disk no.>)
As in the above case, I need to type Select disk 1 and hit Enter. It will select disk 1, and any further command will apply on disk 1.
7. Now you need to check if your flash drive is Write protected.
Just type attributes disk and hit enter; it will show you the current status of disk protection.

Check the “Read-only State“; if it is Yes, then the disk is write protected.
8. To disable write protection, type attributes disk clear readonly and hit enter.
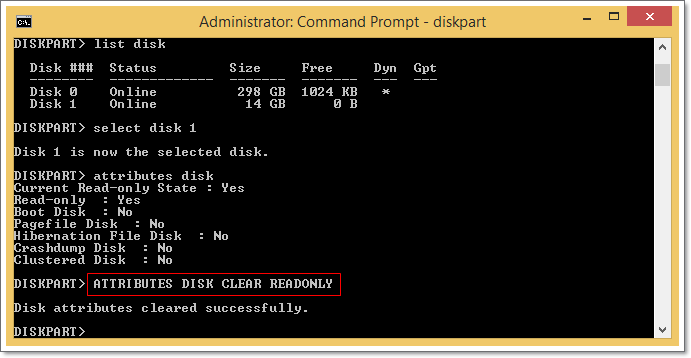
The above command will clear the read-only mode from your flash drive and won’t be write-protected anymore. You can copy and delete data from your flash drive as usual.
Changing Registry Value to Disable Write Protection
You may be unaware that there are some corrupt registry entries in your PC, leading to the write-protected flash drive. Changing the registry value is good if the cmd method doesn’t work.
Connect the USB drive to another PC and check whether it works. If it is working on another computer, there is a problem with your first PC.
If not, your flash drive is write-protected, or it is corrupted. (Use the cmd method to fix it.)
To fix the corrupt registry value, follow these steps-
1. Press the Win + R keys together to open the “Run” dialog box.
2. Type in “regedit” and hit OK. It will open the registry editor
Now navigate to HKEY_LOCAL_MACHINE\SYSTEM\CurrentControlSet\Control\StorageDevicePolicies
3. Make sure to highlight StorageDevicePolicies to see the registry values.
4. On the right pane double, click on “WriteProtect”
5. In the Value box, if it has a value of “1”, change it to “0” and hit OK to save the changes.
The value 0 removes the write protection from the registry.
Now, reboot your computer and check if the flash drive is working or not.
What if there is no such registry key?
By any chance, if you don’t see StorageDevicePolicies in the control folder, then it is easy to create.
1. Navigate to HKEY_LOCAL_MACHINE\SYSTEM\CurrentControlSet\Control inside the registry editor.
2. Select the Control folder and right-click on it. Select New -> Key and name this folder “StorageDevicePolicies”.
3. Now, highlight the created folder and see the registry keys.
4. On the right pane, right-click on the blank space and select “New -> DWORD.” Name the new key as WriteProtect and change the value to “0“.
Reboot your computer to make changes effective. Now, you would be able to copy data to the flash drive.
How to Format Write Protected USB Flash Drive Using CMD
You wouldn’t want to do this if your flash drive has important data, but if everything fails and you want to save the flash drive, then try to format it.
Just open My Computer or This PC, select the flash drive, right-click on it, then click on Format. It may take some time to format the drive into NTFS (New file system).
If you can’t format the flash drive using Windows GUI, then use the cmd to format it.
1. Follow the steps in the first method until Step 6, where you can select the flash drive inside the diskpart.
2. After selecting the disk, type in format fs=fat32 quick, and hit Enter. Or you can format it as NTFS by typing format fs=ntfs quick.
This will completely format the flash drive; you may recover the lost data using file recovery tools like Recuva or Undelete.
Enable Write Protection to Flash Drive
In any case, if you want to protect your data from deletion or formatting flash drives, you can enable write protection, which will help you secure your data.
- Open cmd as admin.
- Type diskpart to enter into disk partition mode.
- Now type list disk, and it will show you all the disks.
- Type select disk <disk_no> and hit enter to select the flash drive. (Find the flash drive disk number by its storage capacity).
- Type attributes disk set readonly and hit enter.
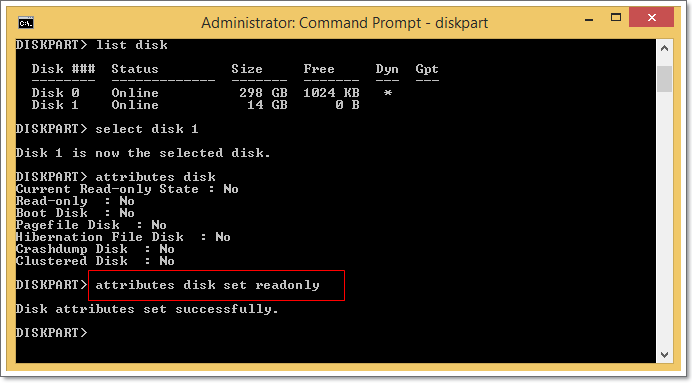
This will set your flash drive in Read-Only mode, which is write-protected.
All the above steps to enable and disable write protection applies to USB flash drive, Micro SD Cards, Camera, and any other removable storage device.
If you have a Camera Memory card, you first need to check the lock button on the side of the memory card.
If it is write-protected, then flip the lock switch on another side (Up-Down). It will disable write protection from the Camera Memory card or if you are using a memory card holder for SD Cards.
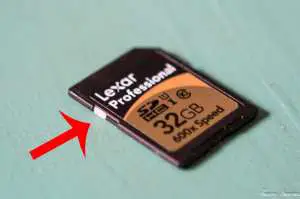
Also, you can follow the above steps if the lock button does not work or is broken.
If you want to buy a USB 3.0 Flash drive for faster read and write operation, then here is my recommendation for you; this flash drive and its performance are tested by me. Buy Faster USB 3.0 Flash Drive (Affiliate link) with a transfer speed of up to 225 MB/s.
Also Read