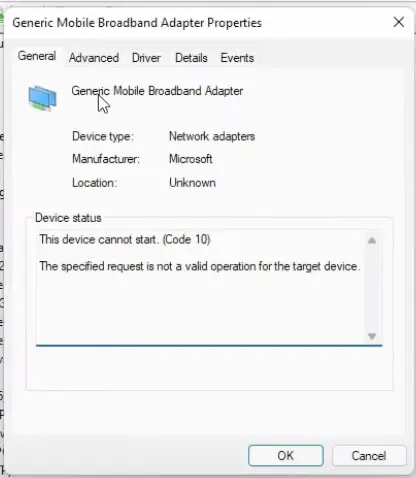
This device cannot start (Code 10) is a common error with WiFi, Bluetooth, display, and other drivers on Windows 11, 10, or lower. You might face driver-related issues on your PC; if the drivers don’t work properly, they can cause many issues with your PC’s functioning.
When you open the Device Manager, you might see an exclamation mark in front of a driver. When you right-click on it and click on Properties under General, you will see an error message reading: This device cannot start. (Code 10). The specific request is not a valid operation for the target device.
If you see a similar error with any of your drivers on a Windows PC, then this guide is for you. I will show some easy methods to fix the Code 10 issue in this guide.
Table of contents
- 11 Ways to Fix This Device Cannot Start Code 10 with WiFi & other Drivers
- 1. Restart Your PC
- 2. Disable and Enable the Device
- 3. Uninstall the Driver To Get Rid of Code 10 error
- 4. Update the Driver
- 5. Roll Back Driver Update
- 6. Run the Windows Troubleshooter to Fix the Code 10 error
- 7. Fix This Device Cannot Start With Hardware Troubleshooter
- 8. Delete UpperFilters and LowerFilters Registry Keys
- 9. Install the Latest Drivers Manually
- 10. Perform a Power Flush
- 11. Perform a System Restore to Fix “This device cannot start” error
- Error Code 10 Gone for Good
11 Ways to Fix This Device Cannot Start Code 10 with WiFi & other Drivers
Let’s start with the easy to advanced ways to fix this annoying error with your Windows PC.
1. Restart Your PC
Restarting your PC is the first thing you should be doing. Sometimes, the drivers might not work properly because of an improper startup. When you restart your PC, it gets time to boot up properly, and chances are that your issue will be resolved easily by restarting.
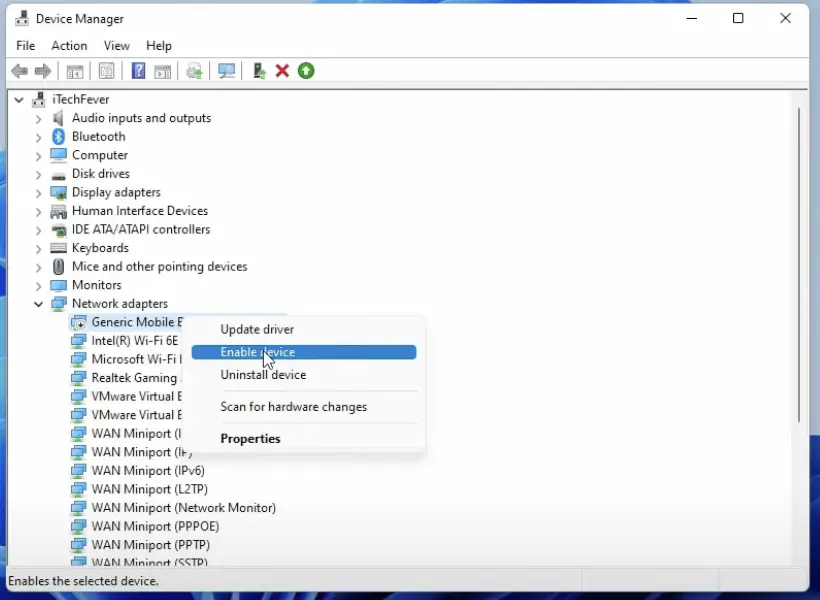
2. Disable and Enable the Device
If you still see this error with a driver even after restarting, you can try disabling and enabling the device on your own from the device manager. Here is how you can do it:
1: Go to the Windows Search bar, type Device Manager, and hit enter.
2: Locate and highlight the faulty driver with the exclamation mark.
3: Right-click on it and then click on Disable device. Click on Yes.
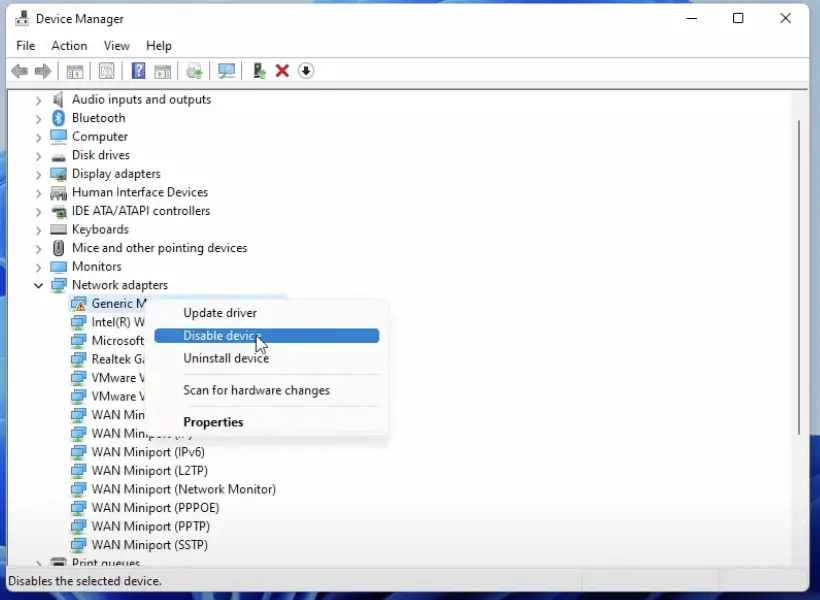
4: Now, right-click again on the same driver and then click on Enable device.
Now you can check if the driver is working or not. If not, you can move on to the next method.
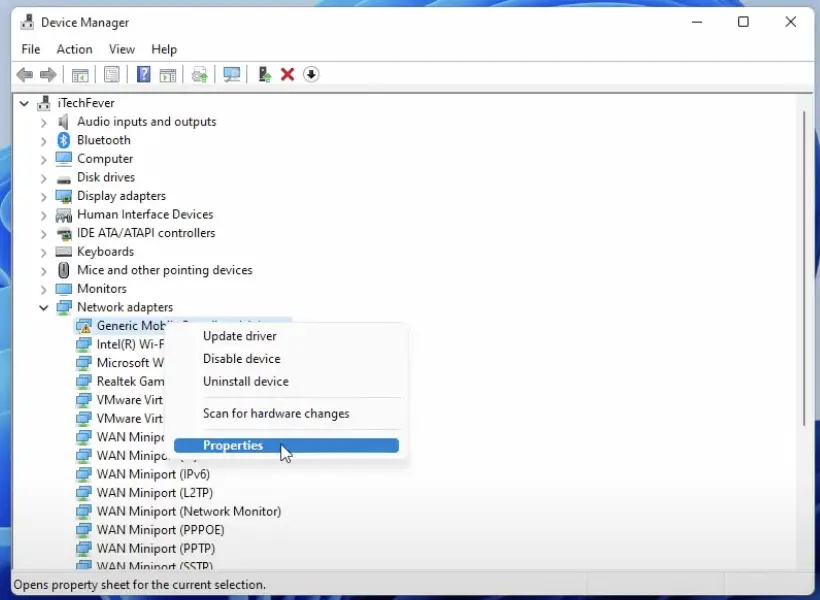
3. Uninstall the Driver To Get Rid of Code 10 error
You can try uninstalling the faulty driver and then reinstall it again. This works for a lot of users. Here is how to do it:
1: Click on the Search icon on the taskbar.
2: Type Device Manager and hit enter.
3: Locate and highlight the faulty driver with the exclamation mark.
4: Right-click on it and then click on Uninstall device.
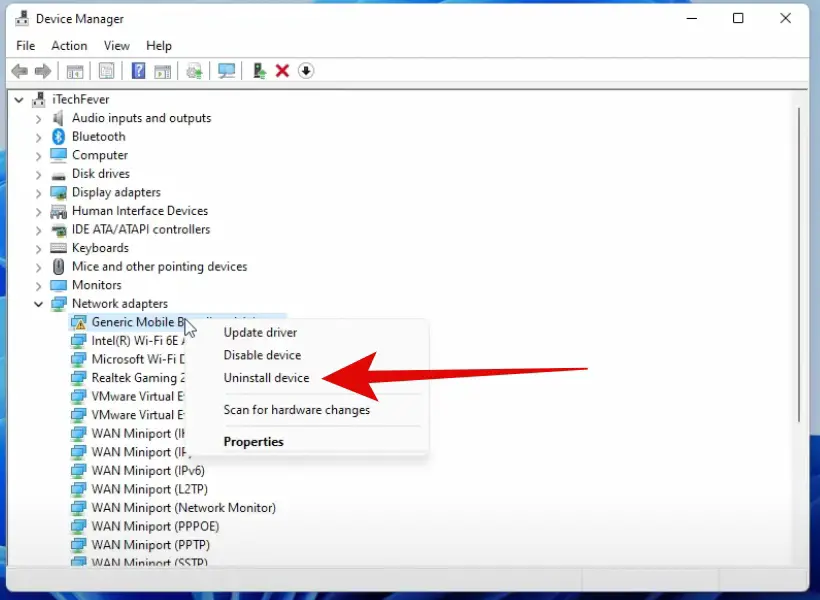
5: Uncheck the option for Attempt to remove the driver from this device. Click on Uninstall.
Now simply restart your PC, and upon the restart, Windows will auto-install the driver and this should fix the issue.
4. Update the Driver
Sometimes, it is an old version of the driver that gets corrupted or has some issues. In that case, you can try updating the driver, and this will fix the issue for you. Here is how to do it:
1: Click on the Search icon on the taskbar.
2: Type Device Manager and hit enter.
3: Locate and highlight the faulty driver with the exclamation mark.
4: Right-click on it and then click on Update driver.
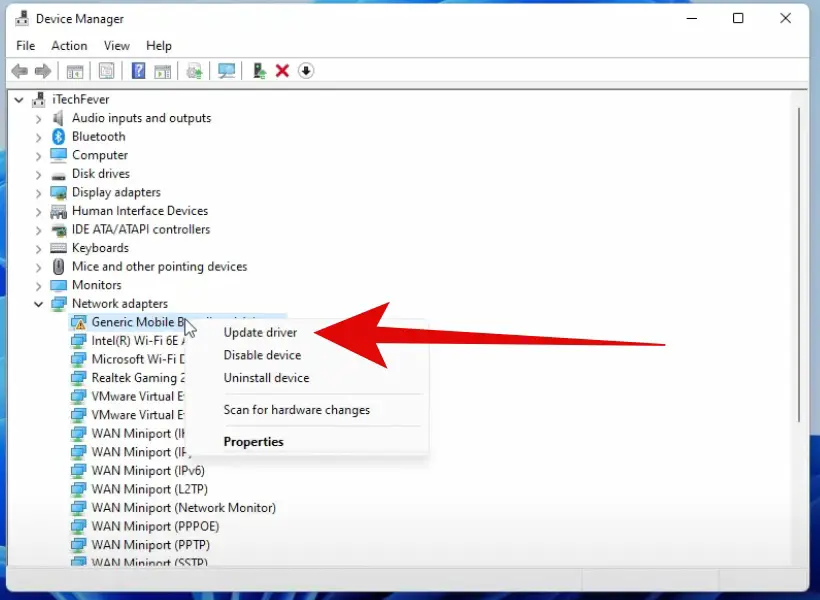
Step 5: Select Search automatically for drivers and click on Next.
That’s it! Now, the system will automatically update the driver. Once the process is finished, restart your PC. Make sure you are connected to the internet during this process. After the update, check whether the error “This device cannot start” is gone.
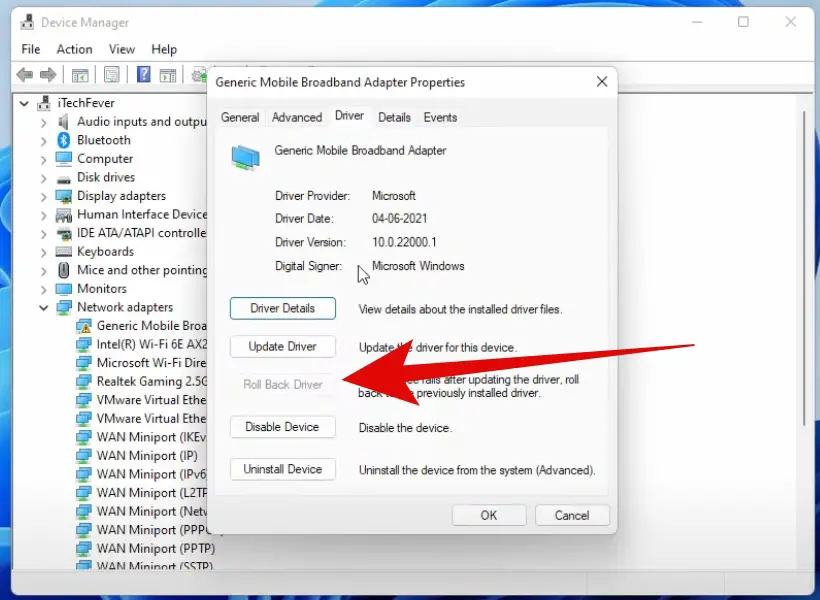
5. Roll Back Driver Update
This might sound a little weird, like why would I want to roll back a driver update but sometimes new updates might not fully support your PC because of a number of reasons. And that is why you can try rolling back to a previous update. Here is how to do it:
1: Click on the Search icon on the taskbar.
2: Type Device Manager and hit enter.
3: Locate and highlight the faulty driver with the exclamation mark.
4: Right-click on it and then click on Properties.
5: Now go to the Driver tab.
6: Here, you will see an option to Roll Back Driver, if there is a previous version of the driver available, you can seamlessly roll back to it by clicking on the option.
6. Run the Windows Troubleshooter to Fix the Code 10 error
If none of the methods mentioned above are working and you can’t figure out the issue, it is time to run the Windows troubleshooter. Windows automatic troubleshooter can find the problem with the driver and might fix the Code 10 error. Here is how to do it on Windows 11:
1: Click on the Windows icon on the Task Bar to open the menu.
2: Now click on Settings.
3: Click on System from the left and then select the Troubleshoot option.
4: Now click on Other troubleshooters, click on it.
5: Now you have to find the Troubleshooter related to the driver. If it is a Network driver, you have to click on the Network Adapter troubleshooter, and if it is a Bluetooth driver, click on Bluetooth.
Step 6: Once you click on the related troubleshooter, click Run.
Now, the troubleshooter will run and will detect any possible issues. It will also recommend a course of action.
7. Fix This Device Cannot Start With Hardware Troubleshooter
If the Windows Troubleshooter isn’t helping you to fix This device cannot start. (Code 10) error, then you can also try running the hardware troubleshooter. Here is how to do it on Windows 11:
1: Press the Windows+R keys together on the keyboard.
2: Type “msdt.exe -id DeviceDiagonistic” and hit enter.
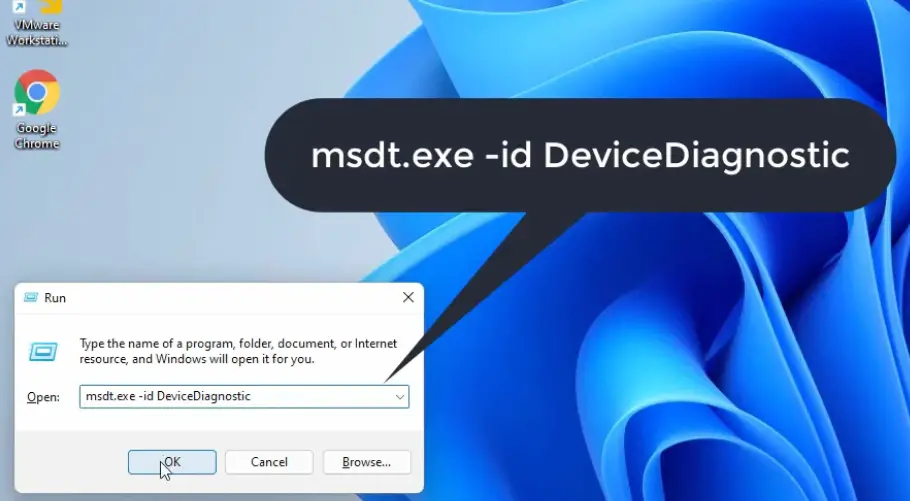
3: This will open the hardware troubleshooter; just click on Next.
This hardware troubleshooter will try to detect any hardware problems in your PC. This process might take time, but will show you the correct results. Once it detects the issue, it will show you suggestions to resolve the issue, and you have to follow the on-screen instructions to resolve it.
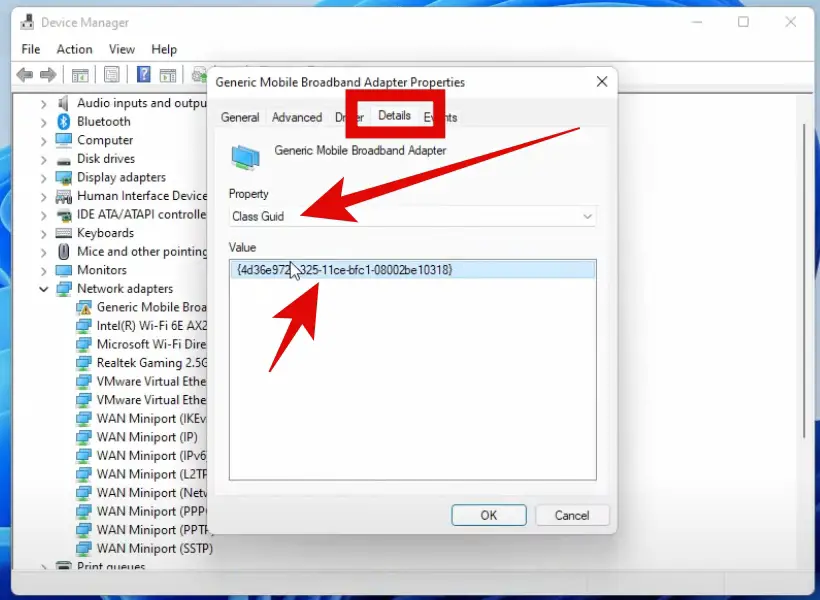
8. Delete UpperFilters and LowerFilters Registry Keys
If you are still unable to start the device, then you can tweak some registry keys to remove the error message. Follow this method carefully:
First, we need to find the GUID of the faulty driver, and then with the help of GUID, we will find the UpperFilters & LowerFilters registry key of the driver.
1: Click on the Search icon on the taskbar.
2: Type Device Manager and hit enter.
3: Locate and highlight the faulty driver with the exclamation mark.
4: Right-click on it and then click on Properties.
5: Now go to the Details tab.
6: Under Property, use the drop-down menu to select Class Guid. Here, you will get a value; you simply have to right-click on it to copy it.
Editing the Registry
1: Click on the Search icon on the taskbar.
2: Type Registry Editor and hit enter.
3: Expand the menu on the left and go to the following path:
HKEY_LOCAL_MACHINE\System\CurrentControlSet\Control\Class
4: Now click on the Edit tab and then click on Find.
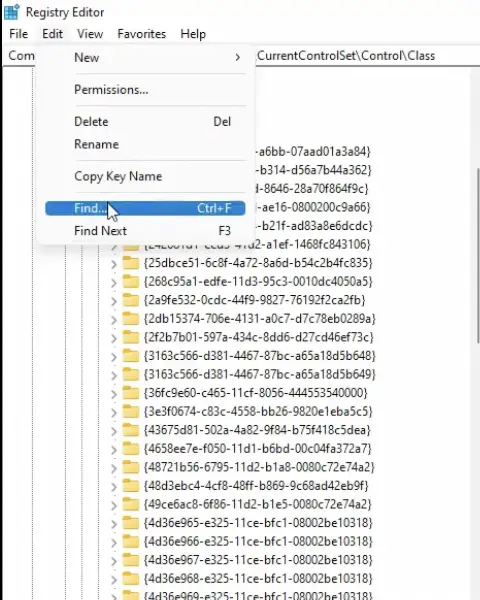
5: Paste the Class Guid value you copied in the above step and click on OK. Once the value is highlighted, we can move to the next process
Before making any changes, it is safe to create a backup.
Simply highlight the value, click on the File tab, and then click on Export.

Save the registry key with any name you want.
Once you do that, follow these steps:
1: You will see some registry values on the right pane.
2: If you see two keys named UpperFilters and LowerFilters, simply delete both of them by right-clicking on them.

Once you do this, simply restart your PC to see if This device cannot start. (Code 10) issue is gone or not.
9. Install the Latest Drivers Manually
If the above method does not work, you can simply install the latest version of the driver. Here is how you can do it:
- Open the web browser.
- Simply type “YOUR_PC_MANUFACTURER drivers” and hit enter. For example, if you have an Asus PC, just type “Asus drivers” and hit enter.
- Open the official site to download the drivers.
- You might be asked to fill out basic details of your PC; simply enter them.
- Now, you will see all the drivers you can download.
- Download and install the fault driver just like you would any other software.
That’s it!
10. Perform a Power Flush
What happens is one fine day, you shut down your PC, and the next day, your system does not recognize the connected or installed hardware? In that case, you can perform a power flush to resolve this issue.
Power flush or power drain will remove any saved state of hardware from the capacitors by discharging the static current. This is truly a game-changer method and will definitely help you out.
For Tower PC
- If you have a tower PC or a custom desktop, then, first of all, shut it down.
- Turn off the Power supply by using the button on the PSU.
- Remove the power plug.
- Remove all the peripherals from the PC.
- Now press and hold the power button for about 30 seconds.
- Doing this will discharge all the capacitors.
Now connect everything back and start the PC.
For Laptops
On a laptop, you will have to remove the battery first and then press and hold the power key for 30 seconds. If the battery is non-removable, you should still do the power flush. If it doesn’t work, you must discharge your laptop completely and then do all the above-mentioned steps.
Turn on the laptop and check the faulty driver.
Power Flush works like magic with WiFi and Bluetooth drivers. With other drivers, it should work, too.
11. Perform a System Restore to Fix “This device cannot start” error
If you have created a system restore point, you can roll back your PC to the date everything worked fine. To access the system restore wizard, follow these steps:
1: Press the Windows+R keys together on the keyboard.
2: Type “rstrui.exe” and hit enter.
3: Click on Next.
4: Now, if you have created a system restore point where everything on your PC was fine, you can select and roll back to that version.
If you don’t see a system restore point, you have not created any. Always make sure to create a system restore point of the current version before you perform a system restore.
Error Code 10 Gone for Good
This device cannot start. (Code 10) error is a common problem with Windows 10/11 and 8/8.1. It mainly happens with WiFi, Bluetooth, Display, and some other important drivers.
Above are some of the tried and tested ways to fix Code 10 errors. First of all, you can try disabling/enabling the faulty driver, uninstall it, update it, or roll back the driver update. Apart from that, you can also run the Windows and hardware troubleshooter.
Then there is the power flush option that can really help, and you can try performing a system restore as well. Please make sure to follow all of these steps, and it will definitely help you resolve the issue.
Read More:-