Sometimes, the laptop sound not working on Windows 11, 10, or lower versions. Despite having a speaker(s) or an audio output source, you do not get any sound. That can be really annoying, especially if you are trying to do something important that requires you to hear audio from your Windows PC. If you are facing a No Sound problem on Windows 10 or 11, then this guide will surely help you.
Table of contents
Ways to fix Audio issues with Windows 10 or 11
In this guide, you will find some working methods to fix the underlying issue with your PC. Apply these methods one by one, and any of these should work to fix the audio with your PC.
1. Check the Audio Levels
First of all, you need to see the audio levels on your laptop or PC. They are easily accessible through the taskbar. This is unlikely to happen, but just in case, check the audio levels.
1: Go to your Taskbar and click on the sound icon.
2: Use the slider to make the volume to 100.

3: Now, right-click on the sound icon and then click on Open Sound settings.

4: Use the toggle to make the Master volume to 100.
5: Again, right-click on the Sound icon and then click on Open Volume Mixer.

6: Set all the volume levels to maximum.

That’s it! If you have lowered the volume of your PC or it is mute by some chance, doing this should resolve your issue.
2. Check for Windows Update
If you do not keep your Windows up to date, then it can cause a lot of issues for you, including sound problems. Although Windows gets updated automatically, you still have to make sure that you have downloaded and installed all the essential updates.
Here is how you can check for Windows updates:
1: Go to the Windows Search Bar, type “Windows Updates” and hit enter.
2: You will see all of the available Windows updates here. Make sure to download and install them.
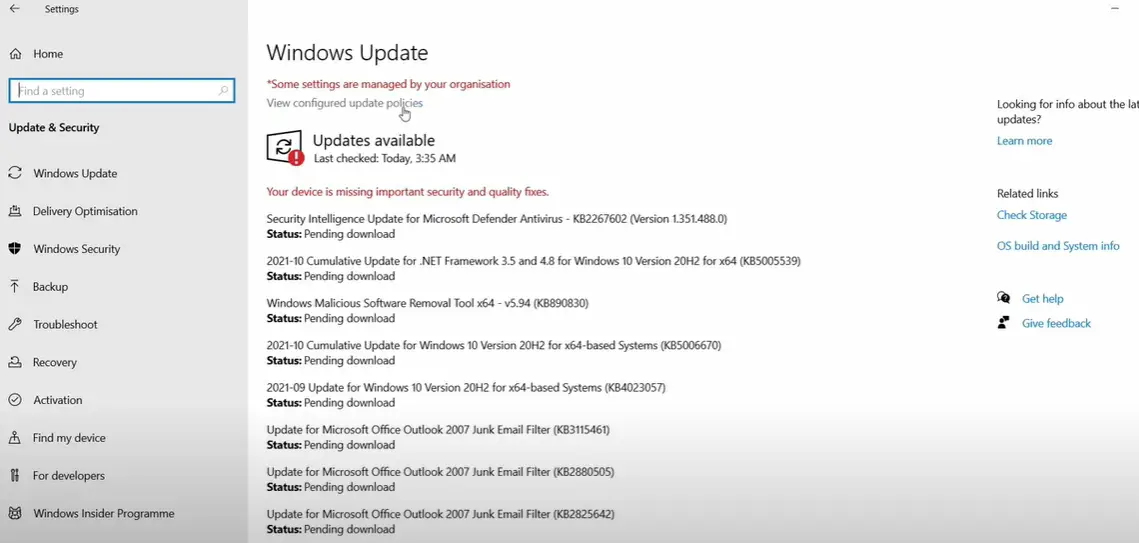
Once you finished installing updates, restart the PC and check if the audio is working fine or not.
3. Make Sure that the Windows Audio Service is Running
Windows Audio Service is quite essential for the audio to work on your PC. You can check if it is running or not by going to Services. Here is how:
1: Go to the Windows Search Bar, type “Services” and hit enter.
2: Scroll down and select, Windows Audio, double-click on it to open it.

3: Make sure that the Startup type is Automatic and the Service status is Running.

Click Apply & OK and that is it. This should fix the issue for you. If not restart the PC and check.
4. Disable/Enable Audio Enhancement
1: Go to the Windows Search Bar, type “Settings” and hit enter.
2: Now click on System and then click on Sound from the menu of the left.
3: Here click on the Sound Control Panel.

4: Select your speaker and then click on Properties.
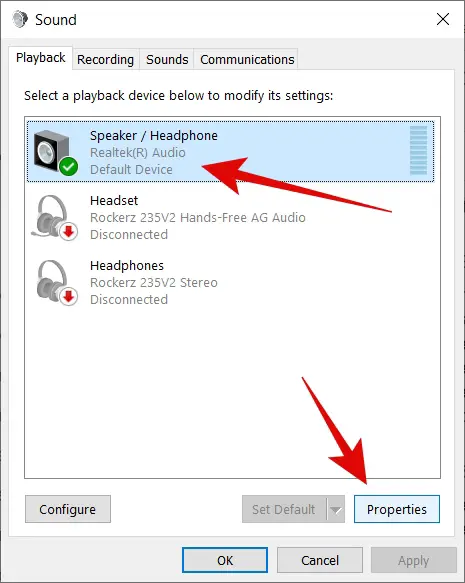
5: Now go to the Enhancement tab and check the option reading Disable all enhancements.
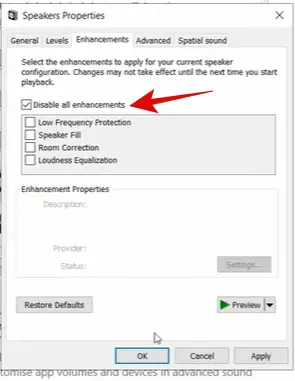
Apply the settings and then hit OK. After that, restart your PC. See if the sound is working if not then you can enable Audio Enhancement again following the same steps mentioned above.
5. Run the Windows Troubleshooter
If none of the above methods work for you then you should run the troubleshooter to fix the sound problems with your PC. Here is how you can do it:
1: Go to the Windows Search bar, type “Troubleshoot” and hit enter.
2: Now click on Additional troubleshooters.

3: From here, click on Playing Audio and then click on Run the troubleshooter.
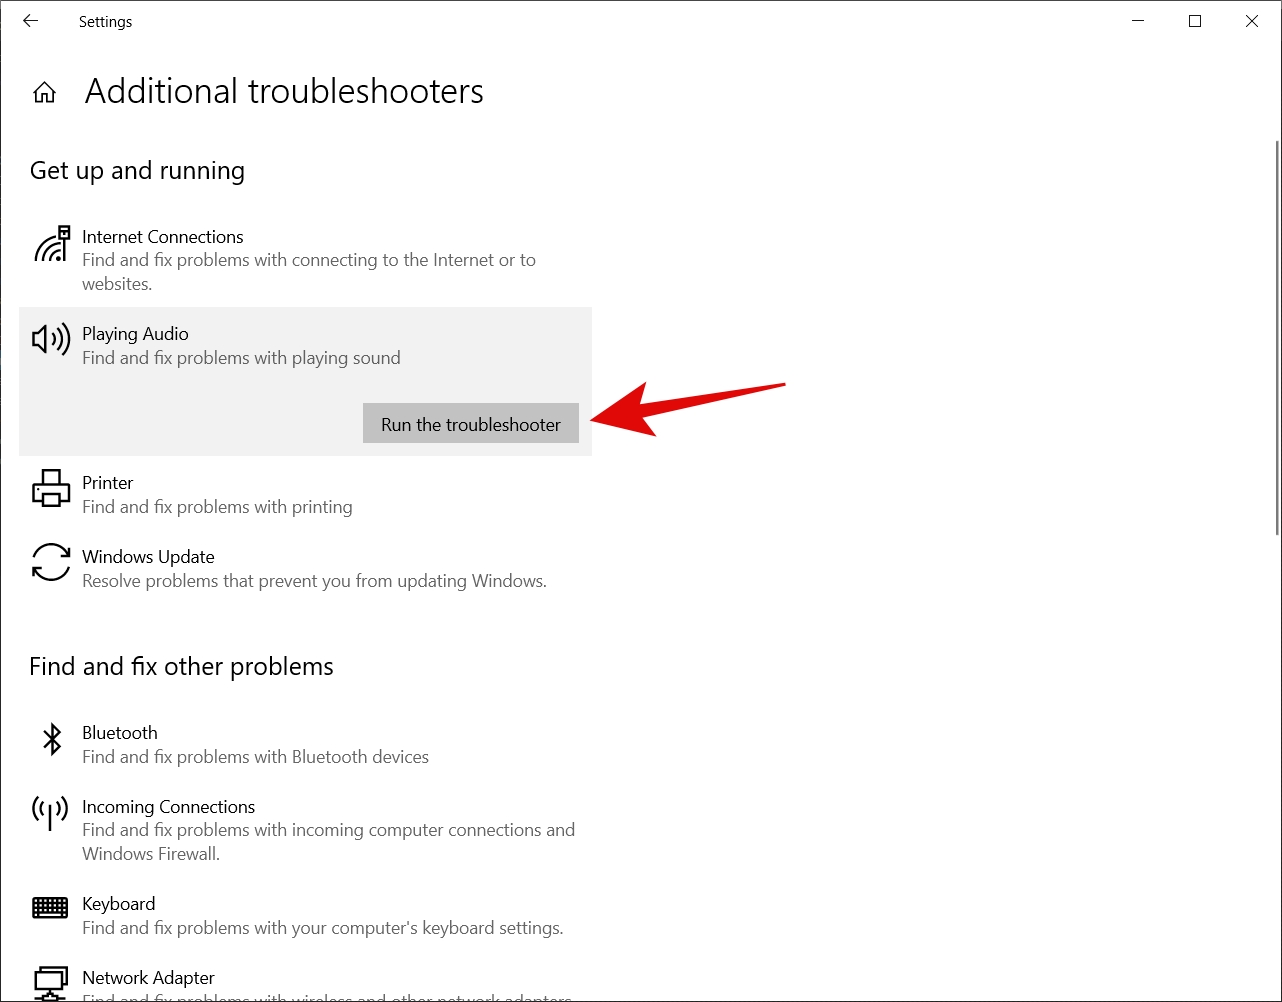
The troubleshooter will now run and try to find the fix the problem, and it might also ask you which speaker you are having a problem with, make sure to select the right one. After that, it will try to resolve your issue.
6. Update the Audio Driver to Get Back Sound
Faulty sound drivers can also cause this issue, and all you need to do is update your Audio drivers. Here is how to do it:
1: Go to the Windows Search Bar, type Device Manager, and hit enter.
2: Scroll down and expand Sound, video, and game controllers.
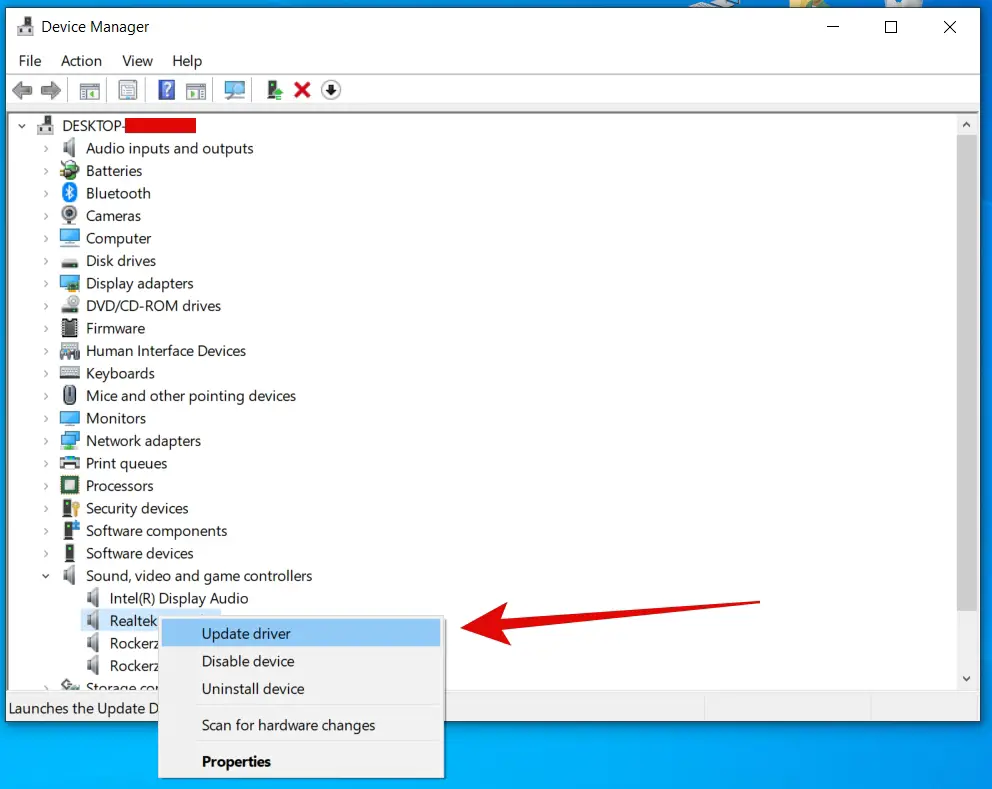
3: Now right-click on the sound driver of your speaker. If you have multiple options there, do this for all of them one by one.
4: Right-click and click on Update driver.
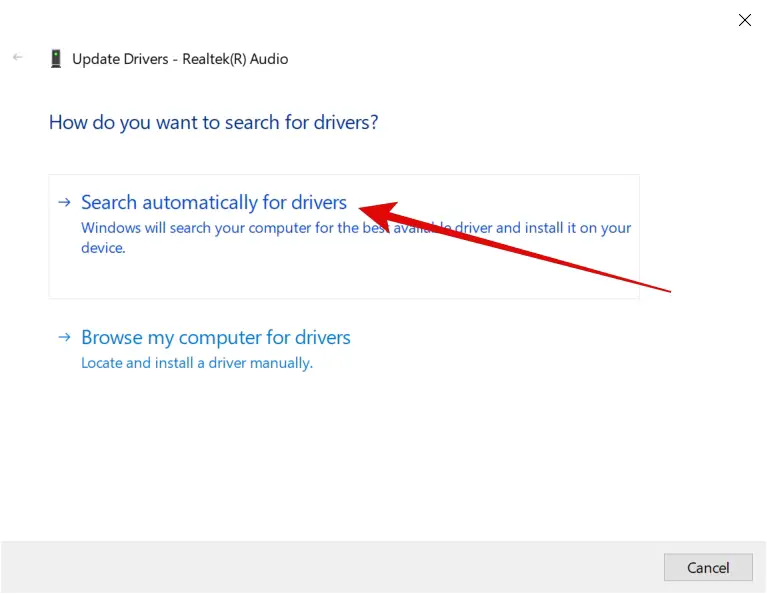
5: Select the Search automatically for drivers option.
Do this for all the audio drivers. If this doesn’t work, you can also click on Uninstall device and then hit Uninstall. Just make sure not to check the option reading Delete the driver software for this device.
And restart your PC.
7. Install the Latest Version of the Audio Driver
Generally, the above methods should help to fix sound problems on Windows 10/11. But if still, you are not having any luck in fixing this problem then you can try installing the latest audio drivers for your PC.
To do that, first of all, you need to know which audio drivers your PC use, and you can find that info on the manufacturer’s website.
Then you need to download the audio drivers for your particular model. The drivers are available for free on the manufacturers’ site, and you can download them easily by entering some details about your PC like model name, number, etc.
You can either download them from your manufacturer or, if you know the audio driver your PC uses, you can download it from the audio driver brand as well.
| Brand | Link to Download Audio Drivers |
| HP | Download Drivers |
| Dell | Download Drivers |
| Asus | Download Drivers |
| Lenovo | Download Drivers |
| Realtek Audio | Download Drivers |
Once you download the drivers, you can simply install them just like you install any other drivers. In case, your manufacturer is not mentioned here, you can go to Google and search for “YOUR_MANUFACTURER Audio drivers” and download your audio drivers from a trusted source. Then you can simply install them.
Closing Phrase
The audio might stop due to different reasons on Windows 10 or 11, and you don’t get sound from the speakers. This happens due to incorrect settings, audio drivers, or faulty speakers.
The above methods should help you to fix the no sound problem on Windows 10 or Windows 11. If nothing works, then don’t forget to check for the faulty speakers. I hope this guide helps you in resolving the issue for good, and you will be able to hear from your PC. In case of any queries, feel free to reach out to us.
Read Next

