
If Windows is not activated using a product key or the OEM digital license, you will get a watermark reading “Activate Windows” build number. The build number represents the current build of Windows 11 or 10 OS installed on the PC. You can remove Activate Windows watermark easily on any version of Windows 11/10.
You might be using a non-genuine copy of Windows or didn’t activate the license; then you will get this message that is Active Windows. This message just appears right on the welcome screen of Windows 10. Well, there are a few tricks that you can apply to get rid of this watermark.
Now, if you have a Windows 10 license, you can easily activate Windows, and the message will disappear. However, if you don’t, you will have to try out some different methods. To assure you, none of these are crack methods. So your computer is going to be totally safe.
How To Remove Activate Windows Watermark On Windows 11/10
In case you don’t have a license, then these methods will simply remove or disable the watermark. It won’t activate Windows 11 or Windows 10.
Use Windows 10 Activation Key
There’s a basic scenario where we generally reinstall Windows because of some error or corrupt Windows, right? Modern laptops and computers already have the activation key embedded into the motherboard. That way, you don’t even have to enter any activation key. It automatically activates.
However, it is quite essential that you find Windows 10 activation key and note it down. You can easily find it on your computer. We have a dedicated article for it; you can read it.
Once you have the Windows 10 activation key, you can follow these steps:
- Go to the Windows 10 Search bar, type Activation Settings, and hit enter.
- Now, here you can enter your Windows 10 Product Key.
- Once you enter the key, click on Activate.
Now wait for the confirmation, restart your computer, and the Activate Windows watermark should now be gone for good. If you don’t have an activation key, follow the methods below.
Note: You can use Windows 10 license to activate Windows 11 as well.
Use Ease of Access Center
You can remove the activate Windows watermark from the ease of access center. Basically, it will hide the watermark from the desktop.
Step 1: Go to the Windows 10 Search bar, type “Control Panel,” and hit enter.
Step 2: Now click on Ease of Access Center.

Step 3: Scroll and select Make the computer easier to use. 
Step 4: Navigate and check the option reading “Remove background images(where available).”

Step 5: Click on OK and restart your computer. You should be all good now
That is one of the easiest ways to remove Activate Windows watermark on Windows.
Get rid of Activate Windows Watermark Using CMD (Command Prompt)
You can use the Software Licensing Management Tool to extend the product evaluation period.
- Go to the Windows Search Bar, type “CMD,” and right-click to Run as administrator.
- Once the command prompt opens up, type the following code and hit enter:
slmgr -rearm- You should see a message reading “The operation completed successfully.”
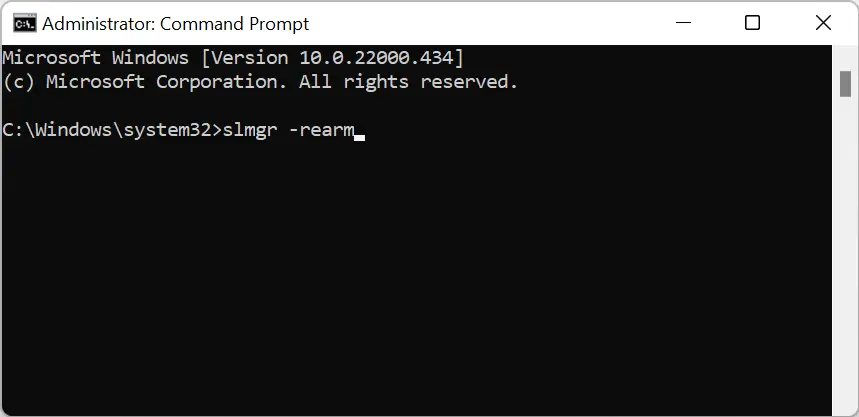
After this, restart your computer, and you should be all good. This will give you 30 extra days to activate Windows 11 or 10.
Remove Watermark Via Windows Registry
This method will allow you to hide the watermark from the desktop. You can achieve this by changing some registry values.
Step 1: Press the “Windows+R” keys to open the Run dialog box.
Step 2: Type “regedit” and hit enter.
Step 3: Expand and browse to the following path: Computer\HKEY_CURRENT_USER\Control Panel\Desktop
Step 4: Now, on the right-side panel, double-click to open PaintDesktopVersion.
Step 5: Select Hexadecimal and change Value data to “0” from 1. Click on OK.

Step 6: Go to the Windows Search Bar, type “CMD,” and right-click to Run as administrator.
Step 7: Type the following command and hit enter:
gpupdate /force
You should now see the message regarding the update of user policy.
Now restart the Windows, and you won’t see the watermark anymore.
Another Registry Method
1. Open the Registry Editor and navigate to the following path-
Computer\HKEY_LOCAL_MACHINE\SYSTEM\CurrentControlSet\Services\svsvc2. On the right-side menu, double-click to open Start.
3. Select Hexadecimal and change Value data to “4”. Click on OK. 
4. Now open the command prompt again, type the following command, and hit enter:
gpupdate /forceThis will disable the build info, and you shall no longer see Activate Windows watermark.
Remove Activate Windows Watermark Using Notepad
You can terminate the process responsible for the watermark using a batch file.
Step 1: Go to the Windows Search Bar, type “Notepad,” and press enter.
Step 2: Paste the following lines into a new file:
@echo off
taskkill /F /IM explorer.exe
explorer.exe
exit
Step 3: Go to the File tab and click “Save As.”
Step 4: Select “All Files” for Save as type. Name the file as “remove.bat” and save it anywhere you like. 
Step 5: Now go to the location where you saved the file, right-click on it and “Run as administrator.”
You will see a prompt for permission. Grant the permission. You will now see a command prompt windows open and close automatically. Once done, you can restart your computer, and that is how you remove Activate Windows watermark.
Remove Activate Windows Message Using the Display Settings
Step 1: Right-click on the Desktop and select Display settings. 
Step 2: Now go Notifications & actions tab from the left.

Step 3: Uncheck the options reading “Show me windows welcome experience…” and “Get tips, tricks, and suggestions…”
Finally, restart your PC, and the issue should be gone.
Closing Phrase
You will get the Activate Windows watermark on Windows 11 and 10 if you have an unlicensed version installed. If you try Windows Insider Build, you will see the build info. You can easily remove the message from the desktop by following the above methods.
These methods are safe, and you won’t lose anything. However, it is always good to take backup. In case of any difficulty, feel free to reach out to us. I hope this guide helps you in fixing the issue.
Also, Read:


