
Sometimes when you boot your Windows 10 PC, it gets stuck on loading screen. Worst-case scenario, you get the black screen of death, or you see an infinite loading screen. Even if you try to restart multiple times, the same problem occurs. Your PC or laptop might show the loading screen for a long time. No worries; in this article, you will find easy fixes depending on the problem.
These are some common Windows 10 startup problems that can happen anytime.
Why Windows 10 Won’t Boot?
There could be different reasons why you can’t boot into Windows 10, as follows:-
- Faulty hardware/peripherals.
- Disk Errors
- Failed Windows 10 updates.
- Corrupt Windows registry.
- Invalid boot files.
- Corrupt or incompatible graphics cards and drivers.
- Different types of malware.
Or there could be an unknown reason why Windows 10 is stuck at the loading screen or completely black screen.
Fix Windows 10 Stuck at Loading Screen & Other Startup Issues
Once you have a fair idea of what could be wrong with your Windows 10, then you can look into different areas of your PC and Operating system to fix the root cause of the problem.
Now let’s see how you can fix Windows 10 startup issues using some simple steps and methods.
Method 1: Unplug Any USB Dongles
If you have any USB dongles connecting to your computer, make sure that you remove them before booting up your PC. It could be anything like an SD card reader, flash drive, mouse, or keyboard. This method has helped a lot of users to fix Windows 10 startup issues.
Try disconnecting all the external devices and peripherals, and start the PC. If it works, then there are some faulty USB/external devices. Now connect those devices one by one and boot into Windows.
This way, you can find the actual faulty device.
Method 2: By Rebooting Windows 10 in Safe Mode
Well, the easy way to boot into Safe Mode to open advanced settings is by pressing the “f11” key when you turn on your computer.
If that isn’t working for you, then you will have to trigger the Automatic Repair mode. To trigger the automatic repair mode, you will have to perform a hard restart. The Windows automatically enters into Automatic Repair mode if it fails to boot up manually three times.
For Laptops
To trigger the Automatic Repair mode:
- Turn your laptop on by pressing the power button.
- Now press and hold the power button for about 10 seconds.
- Repeat the above steps three times.
- Finally, turn your laptop on, and this time Windows will start in Repair mode.
OR, you can take out the battery while the laptop is ON, then put it back and turn it ON again to see the Automatic Repair mode.
For Desktops
Desktops will save you the trouble of pressing and holding the power button as they do not have batteries.
- Just press the power button.
- Before the Windows load, unplug the CPU from the power source.
- Repeat the above steps 3 times.
- Finally, turn your desktop on, and this time it will start in Repair mode.
Entering the Safe Mode
1: Once you enter the Startup Repair, Windows will ask you to select an account.
2: Select your user account and type the password to enter.

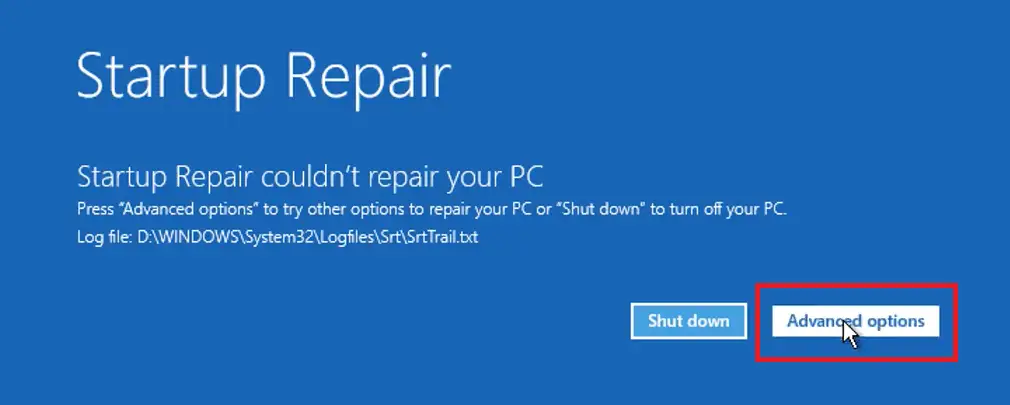
Now, Startup Repair will try to fix your computer.
3: If it fails, you will get the message and option to ‘Shut down’ your computer or go to ’Advanced options.’
4: Click on ‘Advanced options.’
5: From the Advanced options, click on ‘Troubleshoot.’
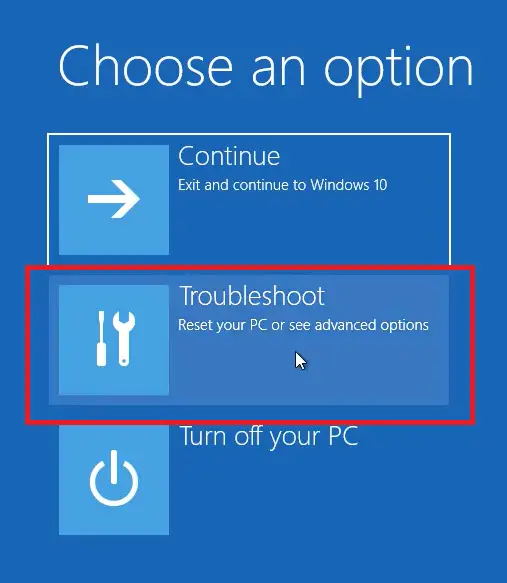
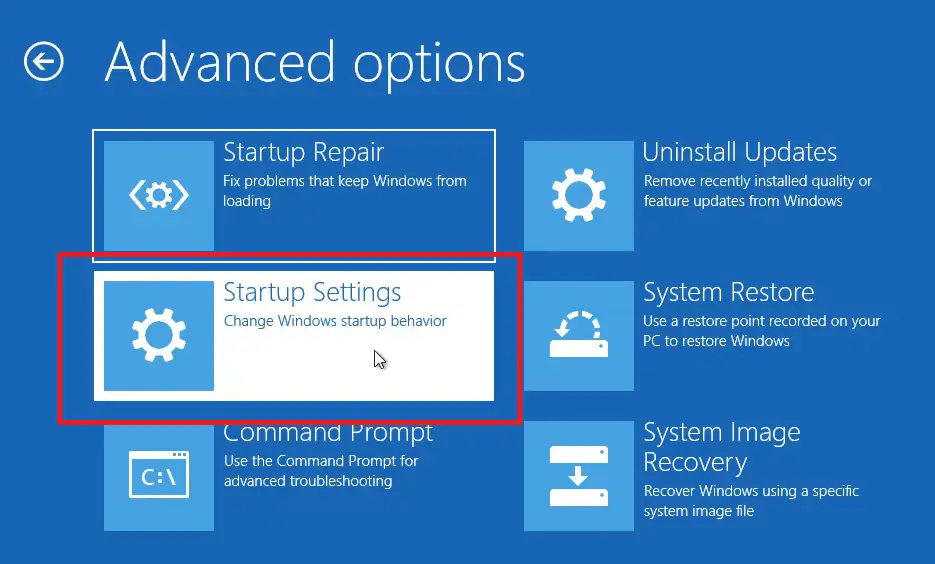
6: Again, click on ‘Advanced options.’
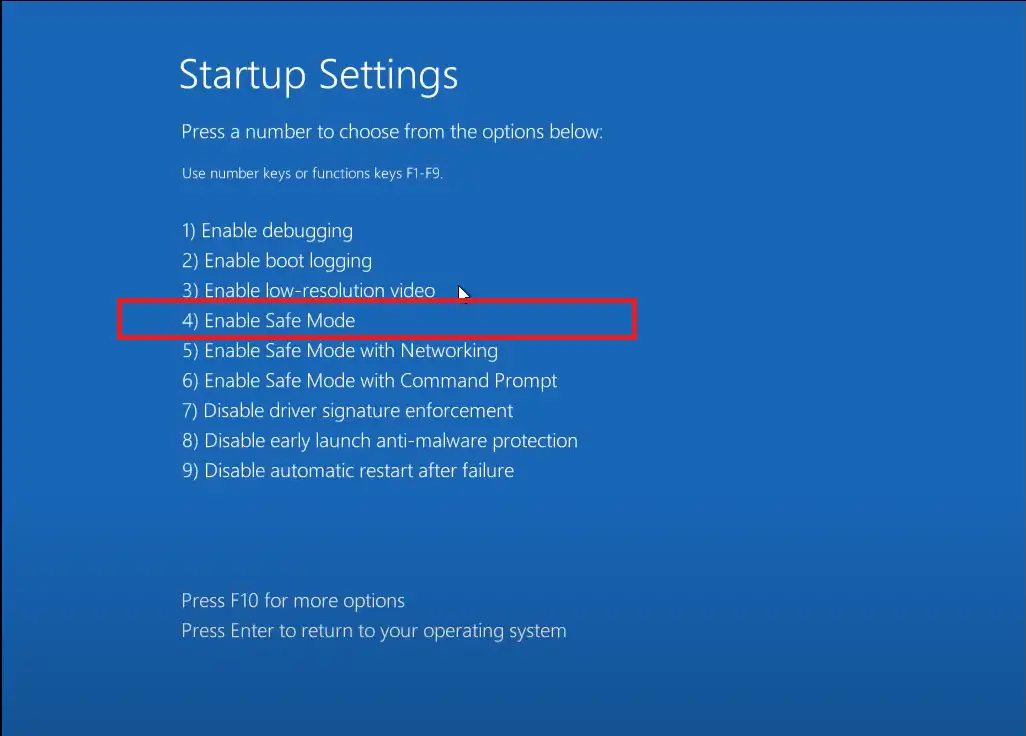
7: Click on ‘Startup Settings.’
8: Finally, click on ‘Restart.’
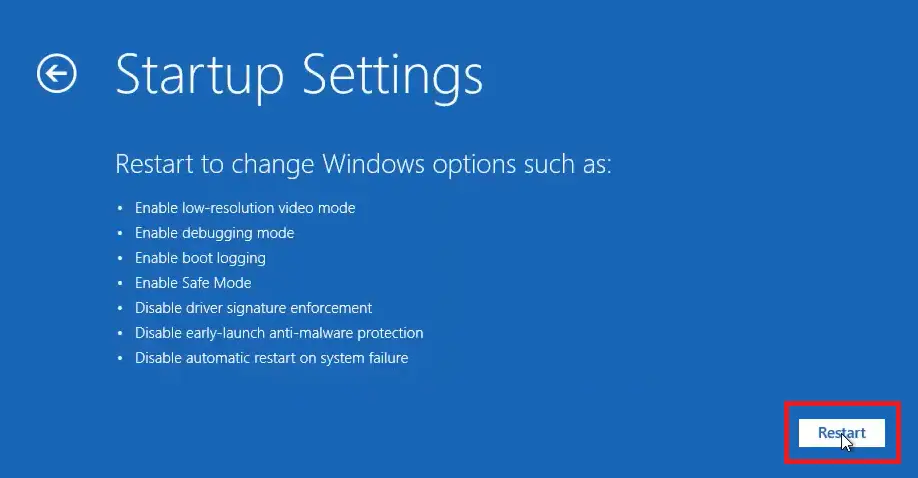
Now the computer will restart, and you will get startup options.
9: To start Windows 10 in safe mode, press the number ‘4’ key.
Once you have entered the safe mode, you have 4 options that you can try:
- First of all, do nothing and just boot into safe mode and then restart your computer.
- Use antivirus software in safe mode, conduct a full scan, and then reboot into normal mode.
- Uninstall the graphics drivers if you use a graphics card, and then restart your computer in normal mode. To do that:
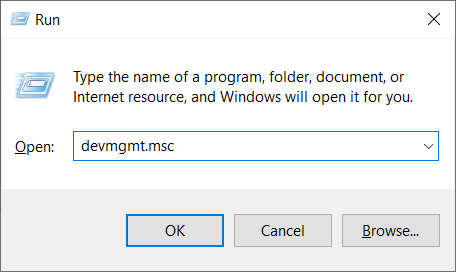
1: Press the “windows+R” keys to open the Run dialog box.
2: Type “devmgmt.msc” to open the Device manager.
3: Double-click on the ‘Display adapters’ to expand it.
4: Right-click on your display adapter, select your graphics card driver, then click on ‘Uninstall device’.
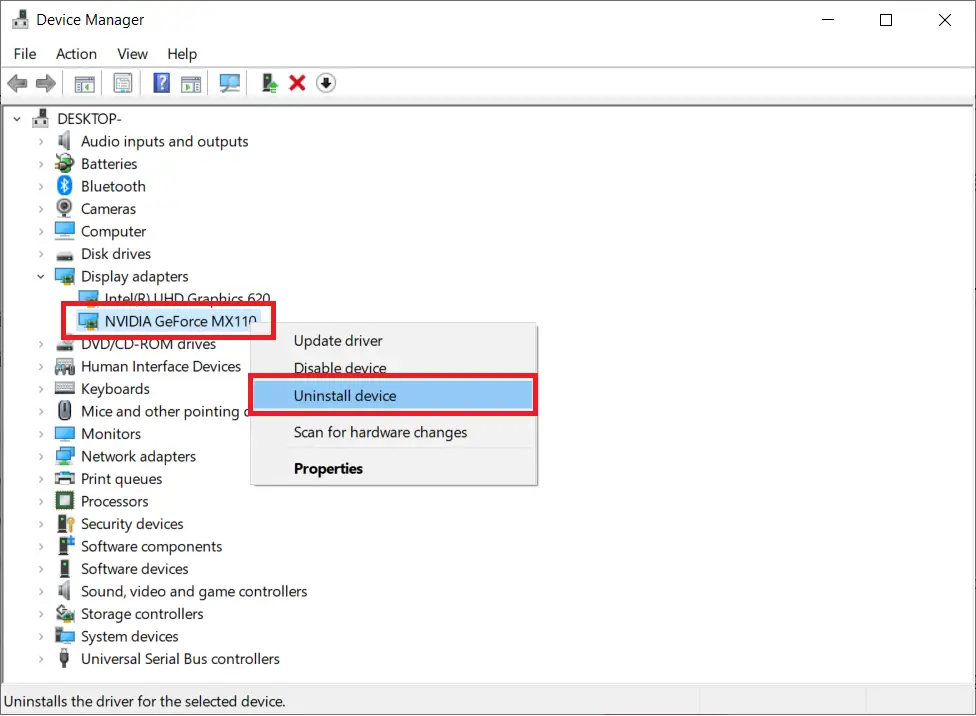
5: Check the box reading “Delete the driver software for this device” and click on ‘Uninstall’.
This is generally the case with NVIDIA Drivers only.
- You can also uninstall the recently installed apps one by one and then restart your computer. Access the “Settings” app and go to “App,” and uninstall recent apps.
Hopefully, this shall fix the Windows 10 startup issues for you.
Method 3: Uninstall Recent Windows 10 Updates
If you are facing Windows 10 startup issues after installing Windows updates, then you can simply uninstall them. Here is how:
1: Go to the Automatic Repair mode on your laptop or desktop from the steps above.
2: Once you enter the Startup Repair, Windows will ask you to select an account.
3: Select your user account and type the password to enter.
Now, Startup Repair will try to fix your computer.
4: If it fails, you will get the message and option to ‘Shut down’ your computer or go to ’Advanced options’.
5: Click on ‘Advanced options’.
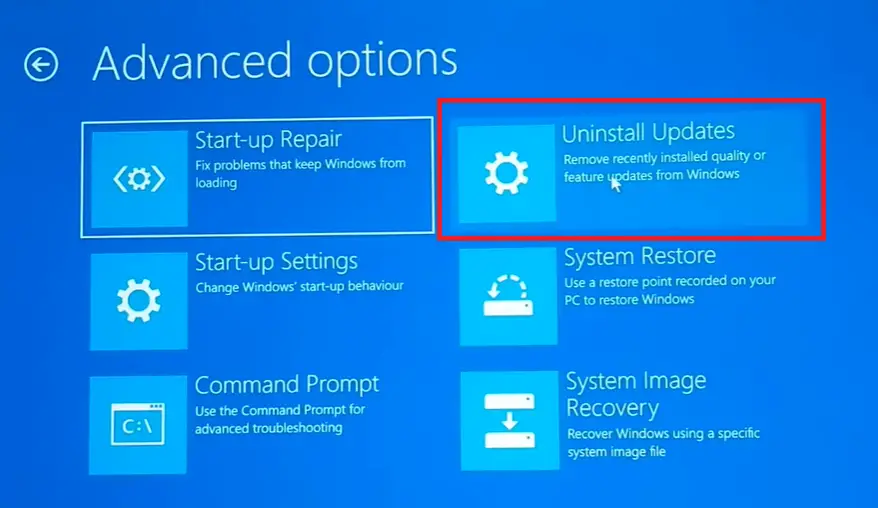
6: From the Advanced options, click on ‘Troubleshoot’.
7: Select the ‘Uninstall Updates’ option.
Uninstall both the latest quality update and the latest feature update one by one.
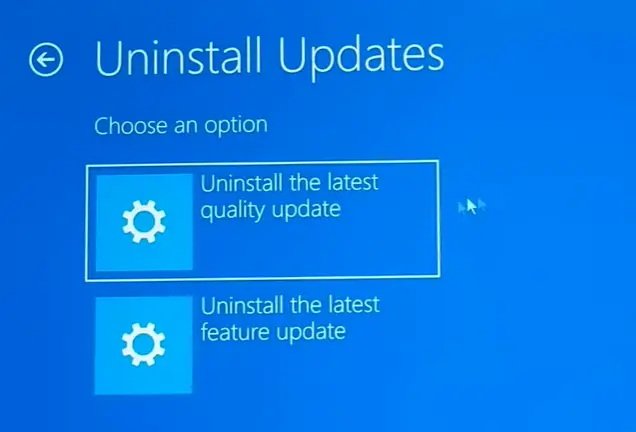
You might be asked to log in to your account, so use the admin account and uninstall the updates. Uninstalling recent updates may fix Windows 10 stuck loading screen problem.
If this method doesn’t work, move on to the next one.
Method 4: Using Command Prompt in Recovery Mode
There are different solutions to Windows 10 startup issues depending on the type of disk structure you are using. If you are using a GPT drive, then there are different solutions, and if you are using MBR Disk, then there are different solutions.
The very first thing, however, is opening the command prompt from the recovery menu. To do that, first, enter into automatic repair mode from the method above. Then:
1: Once you enter the Startup Repair, Windows will ask you to select an account.
2: Select your user account and type the password to enter. Let the Startup repair run.
3: If it fails, you will get the message and option to ‘Shut down’ your computer or go to ’Advanced options’.
4: Click on ‘Advanced options’.
5: From the Advanced options, click on ‘Troubleshoot’.
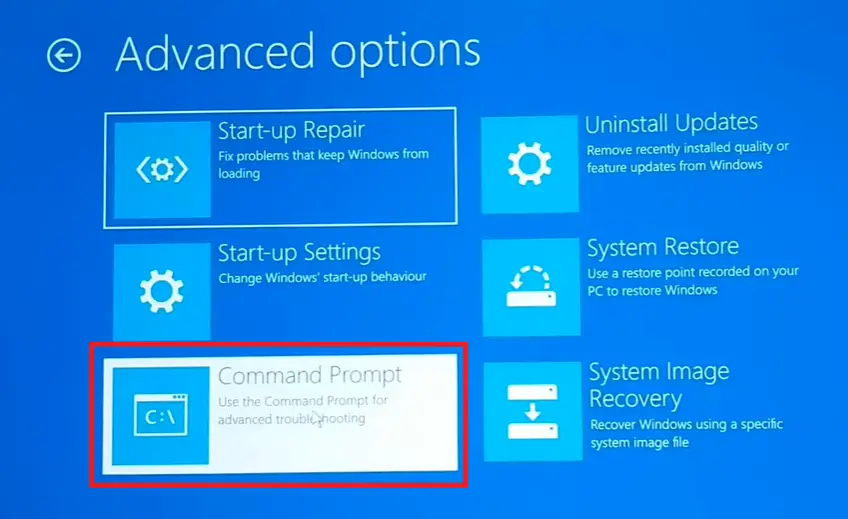
6: Click on ‘Command Prompt’.
7: To determine whether you are running a GPT disk or an MBR disk, enter the following command and hit enter:
diskpart8: Type the following command and hit enter:
list volIf you see an EFI partition, then you are running a GPT disk. Otherwise, it is an MBR disk.

9: Run the following command:
list diskIf you see an “*” mark under the GPT column, it confirms that you are running a GPT disk with UEFI firmware. If not, then you are running a legacy BIOS+MBR Disk combination. We will use this info later.
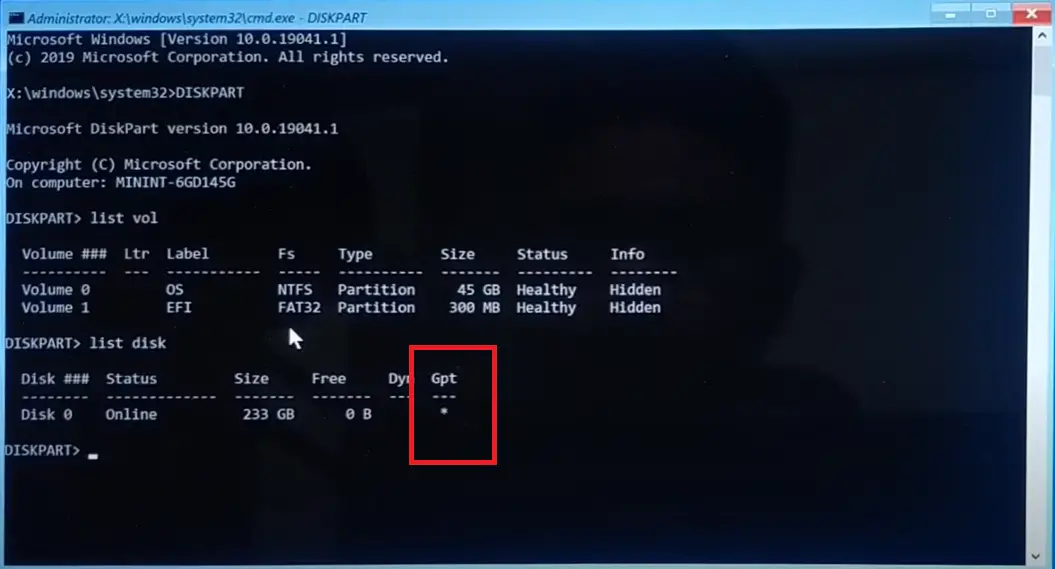
Now, in my case, I am using a GPT disk, and you can see that my OS volume is listed as hidden. That is why Windows 10 won’t start. If that’s the case with you, you can unhide it easily. Here is how:
1: Type the following command and hit enter:
select volume volume_numberWhich in my case is “select volume 0”. This might be different in your case.
2: Run the following command:
attributes volume clear hidden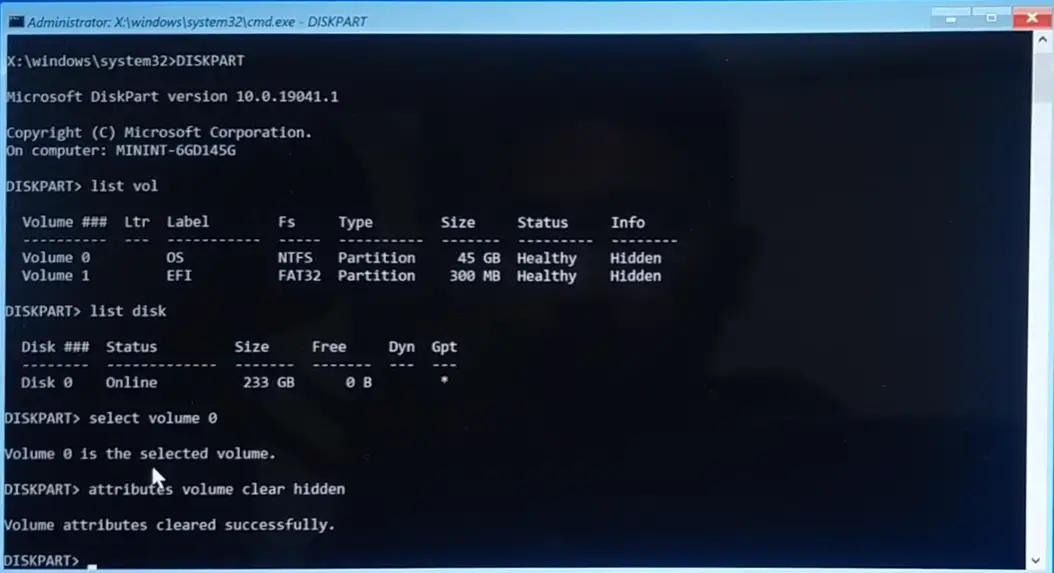
Now exit the command prompt and restart your Windows. This should fix the issue only if the OS volume was hidden. [Clearing hidden attributes will work for both GPT and MBR disks.]
Method 5: By Repairing the Disk and Boot Files
If your PC stays on the loading screen, then there might be a problem with the boot files. You can try to repair the boot file and get it working again. Here’s how to do it:-
1: Open the ‘Startup Repair’ window once again by following the steps from above.
2: Click on ‘Advanced options’.
3: From the Advanced options, click on ‘Troubleshoot’.
4: Click on ‘Command Prompt’.
5: Enter the following command and hit enter: [You don’t need to enter into diskpart mode if the volume is already visible, skip the steps 5,6,7]
diskpart6: Type the following command and hit enter:
list volYou shall now see a letter assigned to the volume containing the OS. You will also see that the info is not “Hidden”.
7: Leave the Disk partition by running the following command:
exit8: Now you need to enter the disk containing Windows files, type the following command, and hit enter:
drive_letter:Generally, it is the C: drive that contains Windows files. So you can simply type “c:” and hit enter. Or try with the letter “d“.
You can verify if the selected volume contains all the Windows files by typing the dir command.
dir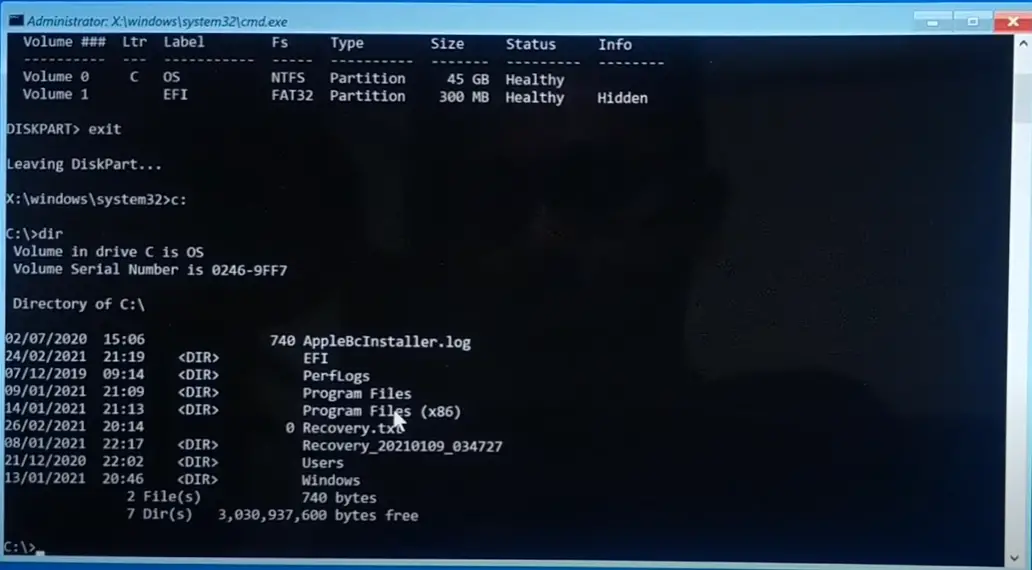
9: Type the following command and hit enter:
chkdsk drive_letter: /fWhich is “chkdsk c: /f” in my case. Also, press ‘Y’ to start the process after running the command.
Now this command will check your disk for any possible errors.
Now you will have to repair the boot files. To do that:
For MBR Disks
1: If you are running an MBR disk, type the following command and hit enter:
bootrec /fixmbr2: Now run the following command:
bootrec /fixboot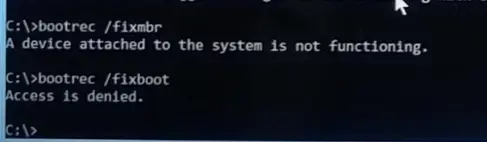
3: Finally, type the following command and hit enter:
bootrec /rebuildbcdFor GPT Disks
1: If you are running a GPT disk, type the following command and hit enter:
bcdboot Drive_Letter:\Windows /s Drive_Letter:Which is “bcdboot c:\windows /s c:”

This will rebuild the boot files. Finally, restart your computer, and you shouldn’t get stuck at loading screen, see a black screen of death, or an infinite loading screen.
Method 6: By Rebuilding Boot Files
If the boot files are missing or totally corrupt, then fixing them may not work. In this case, you can create the new boot files again.
1: Open the ‘Startup Repair’ window once again by following the steps from above.
2: Click on ‘Advanced options’.
3: From the Advanced options, click on ‘Troubleshoot’.
4: Click on ‘Command Prompt’.
5: Enter the following command and hit enter:
diskpart6: Run the following commands one by one:
list disk
list volume
On a GPT disk, you will see an EFI volume/Recovery volume listed. If it does not have any letter assigned to it, You will have to assign a letter to this partition and then create boot files.
7: Type the following command and hit enter:
select volume Volume_NumberWhich in my case, is “select volume 1” as it is the EFI partition.
8: Now assign a letter by the following command:
assign letter=”letter”You can choose any letter. In my case, I selected “assign letter=”v””.
9: Type the following command and hit enter:
exit10: Now, to enter the EFI partition, type and hit enter:
Assigned_Drive_Letter:Which is “v:” in my case.
11: Type the following command and hit enter to create a new boot directory.
md \efi\mircosoft\boot\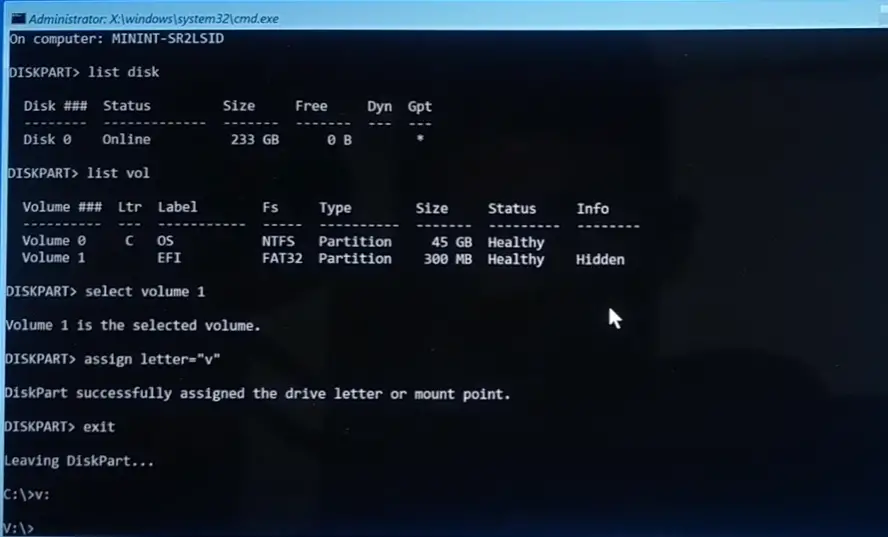
12: Run the following command to enter into the newly created boot directory.
cd /d EFI_Drive_Letter:\efi\mircosoft\bootWhich is “cd /d v:\efi\mircosoft\boot” in my case.
The above steps to create a boot directory is common for both MBR and GPT disk, but to create boot files are different as below-
For MBR
1: Type the following command and hit enter:
bootrec /fixboot2: Finally, type the following command and hit enter:
bootrec /rebuildbcd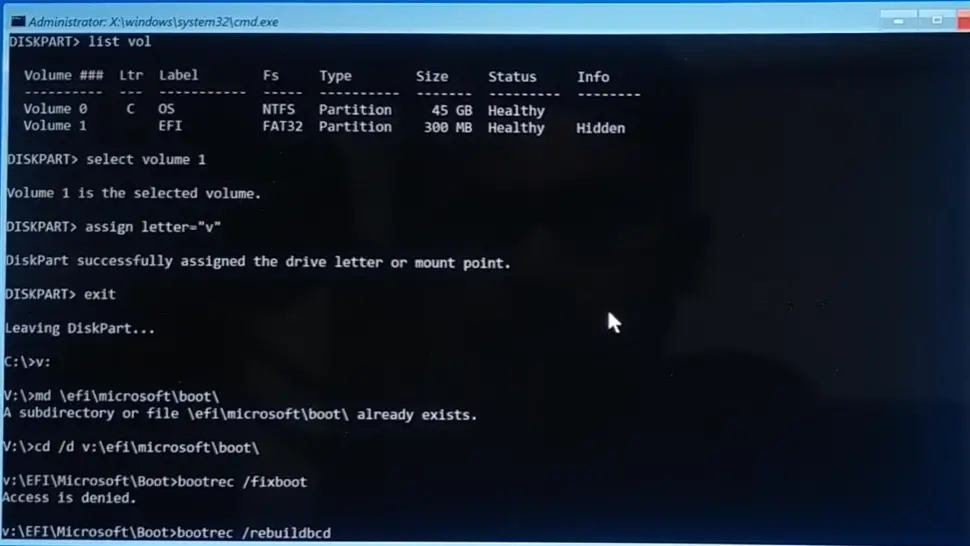
For GPT
1: Type the following command and hit enter so that we can rename the old BCD (Boot Configuration Data) file.
ren BCD BCD.old2: Finally, run the following command to create a new BCD file.
bcdboot c:\windows /l en-us /s EFI_Drive_Letter: /f allYou should see the boot file successfully created. If not, you can execute the below command.
bcdboot c:\windows /l en-us /s EFI_Drive_Letter: /f UEFIWhich is “bcdboot c:\windows /l en-us /s v: /f all” in my case. OR bcdboot c:\windows /l en-us /s v: /f UEFI these commands should create boot files.
That’s it! Now just exit the command prompt and restart your computer. Hopefully, this should fix the Windows 10 Startup issues for you.
Method 7: Enable last Know Good Configuration
If all the above methods fail, then you can try to enable the last known good configuration when Windows 10 booted successfully. It is about loading the registry files when Windows was running without such problems.
1. Access the command prompt by going to Advanced options. Same as above methods.
2. Navigate to C drive, where Windows files are located. Again, it may be a different drive in your case.
c:3. Move to the “config” folder inside System32 by typing the following commands.
cd \windows\system32\config4. Now, before proceeding further, you have to take a backup of the config folder.
md bakup5. Now, you have to copy all the content of the config folder to the backup folder. Type the below command-
copy *.* backup6. Move to regback folder by typing-
cd regback7. Check the files and folders inside regback folder by typing the dir command.
dir8. Now, if you get different folders having different numbers, then you have to execute another command.
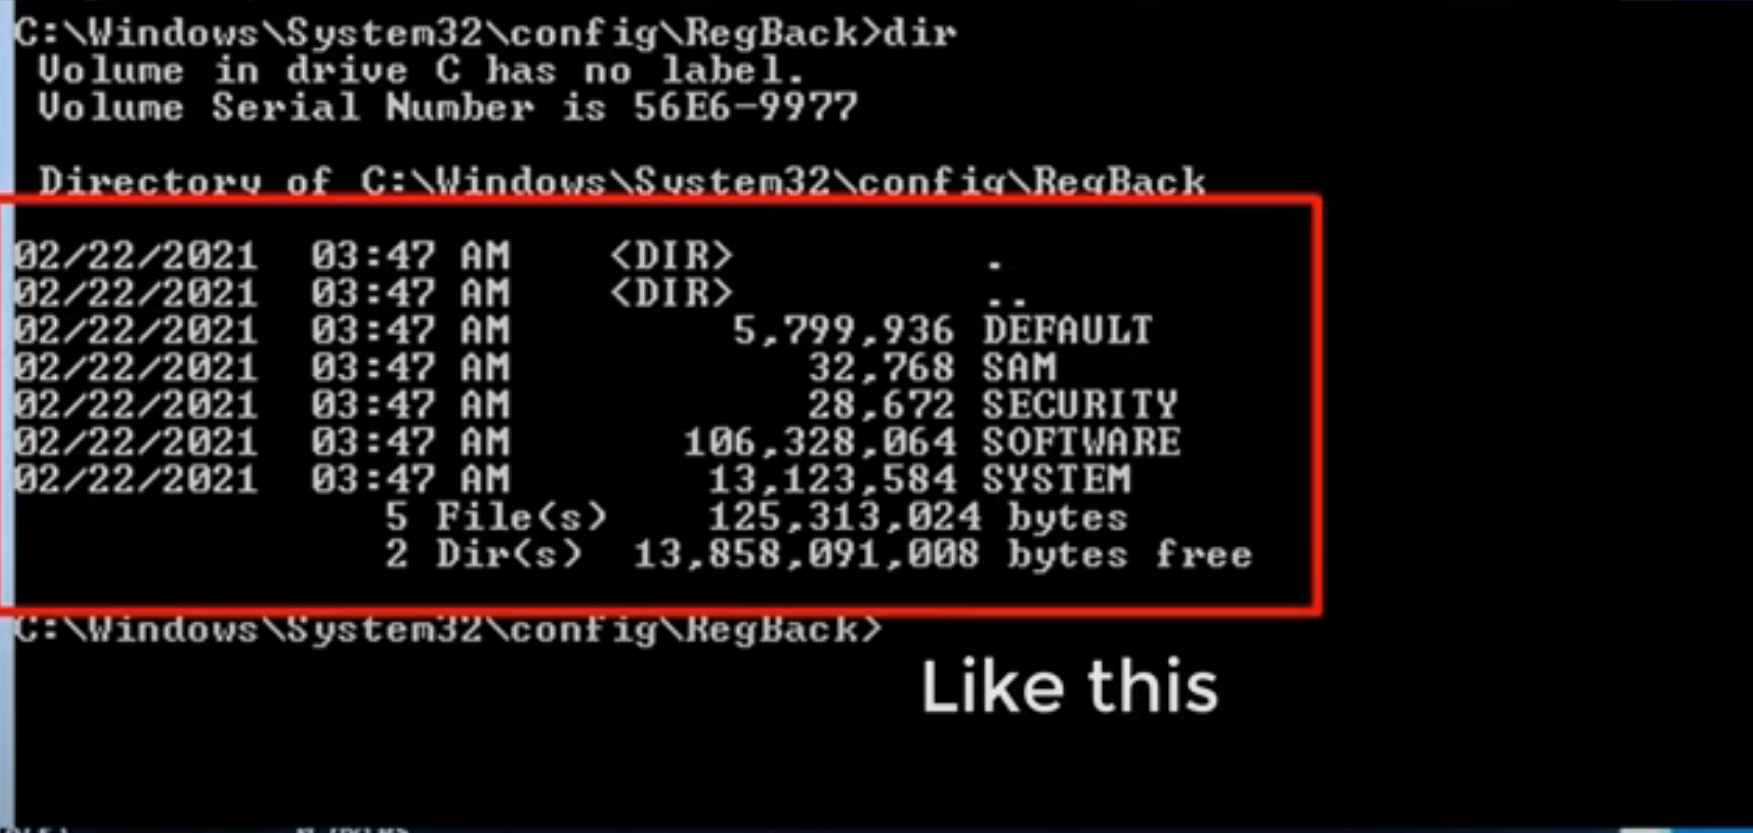
And if you don’t see numbers but “0”s beside Default, SAM, Security, Software, and System folders, then exit out cmd. You can’t enable the last known good configuration.
But if you see numbers beside those folders, execute the below command.
copy *.*Exit the cmd and restart your PC.
Verdict
Windows 10 may stop booting, show a black screen, or get stuck at the loading screen for an infinite time. There may be multiple known or unknown reasons; you can fix all such startup problems on Windows 10 by applying the above fixes.
Also, Read:
- How To Fix Extend Volume Option Greyed Out In Windows 10 | Extend the C Drive
- Fix Windows Cannot Be Installed To This Disk GPT MBR Partition Error. BIOS vs UEFI
- How to Fix Slow Windows 10 & Improve Performance – 200% Faster PC
- What Are GPT, MBR, NTFS, and FAT32?
- What is UEFI, BIOS Firmware & GPT, MBR Disk Structures?
![[2025 Guide] Fix High CPU Usage on Windows 11 Like a Pro](https://www.itechfever.com/wp-content/uploads/2025/05/cover-1024x536.jpg)